
You know the spot. It's the patch of dirt behind the house where the grill lives, the one that turns to soup after a hard rain and sprouts weeds by July. The picnic table sits on two pavers and a cinder block because the ground won't stay level. This is the year it becomes a real patio, and you're standing out there with a shovel trying to work out where the digging starts.
Start with the part nobody photographs. A patio is a drainage structure with a walking surface on top, and every decision that decides whether it lasts happens below the finish. Get the base and the fall right and a modest gravel pad survives decades. Get them wrong and a paver job that cost thousands rocks and ponds within two winters.
Plenty of homeowners take on a project like this every year, and a patio is one of the more forgiving builds to attempt yourself, as long as you respect what happens underground. In the Kansas City metro the stakes run higher than in a mild climate. The ground freezes and thaws repeatedly from December into March, water expands in every void it can find, and any patio that traps moisture in its base pays for it every February. The sections below walk through the build in the order that matters: the ground first, the surface last.
Choose the Right Patio Material and Spot
Start with the load the patio has to carry. A grill, four chairs and a side table are light loads that sit comfortably on a compacted aggregate base. A hot tub holding a ton of water, or a pad you intend to back a trailer onto, changes the structure underneath entirely: deeper excavation, more base, sometimes a thicker slab or footings. Decide that now, because upgrading a finished patio means tearing it out.
The gap between what people plan and what they use is wide. In 2024, 82% of U.S. consumers with outdoor living space said they underused it, according to Wakefield Research's Outdoor Trend Report. That same year, 33% of U.S. homeowners renovating outdoor areas said they were doing it to extend their living space, per Houzz's U.S. Outdoor Trends Study. Put the patio where a door already leads and size it around the furniture you own, or it becomes a hard surface you admire from the kitchen.
| Material | Best for | Main drawback |
|---|---|---|
| Poured concrete slab | Low maintenance, fast install, sturdy under furniture | Cracks over time and is hard to repair invisibly |
| Concrete pavers | Repairable, flexible, many patterns | Settles and rocks if the base is weak or poorly drained |
| Natural flagstone | Natural look and irregular shapes | Uneven surface, labor-heavy, stone prices swing widely |
| Crushed gravel | Lowest cost, quick build, drains well | Shifts underfoot and needs topping up and edging |
Two of those surfaces deserve a second thought on a flat Midwest lot. Gravel and pavers on open-joint bedding let rain drop straight through to the base. A solid slab sends every gallon somewhere, and on flat ground that somewhere is usually the foundation or the neighbor's side of the fence. If you're weighing a raised deck against a slab at grade, this breakdown of deck versus patio cost shows how differently the two projects fail and what each costs to fix.
Sizing and Siting Rules That Save a Rebuild
Twelve to 14 feet deep is the working minimum for a dining set that people can push back from without tipping off the edge. Run the patio at least as wide as the door it serves, and wider still if two doors open onto it. Anything shallower than 10 feet ends up holding two chairs and a walkway that never quite works.
Depth buys you drainage too. At a quarter inch of fall per foot, a 12-foot slab drops 3 inches across its width, enough to shed water without feeling tilted underfoot. Skimp to 8 feet and the same slope barely clears 2 inches, which is where ponding starts.
Watch the yard at 10 a.m. and again at 4 p.m. before you commit to a spot. Sun exposure decides whether you'll want a pergola, and shade from the house decides where snow lingers into March. Then note where each downspout lets out. Roof water that crosses a new patio toward the foundation is a common cause of wet basement walls the spring after a build.
Settle this before anything else: where the water goes. The furniture, the pattern and the surface can all change later. The fall and the outlet can't.
Pick the material last. If water already pools in the spot after heavy rain, no surface fixes it, so move the patio or plan to raise and drain that area first. Before ordering, work out volume: multiply length by width by base depth in feet, divide by 27 for cubic yards of crushed rock, then add 10 percent for waste. A 12 by 14 foot patio on a 4-inch base runs about 2 cubic yards before the extra, and rounding up beats paying a second delivery fee for a short load.
Check Grading, Permits and Utilities First
Digging is the point of no return. Five checks take an afternoon and save you from the calls you don't want to make later, the ones to a utility company, a neighbour or a foundation contractor.
Five Checks to Run Before the First Shovel
- Trace the roof water. Walk the perimeter during a steady rain and note where each downspout discharges and where that water ends up. A patio placed across that path intercepts it and pushes it toward the house. New downspout runs are cheap compared with regrading, and this guide to downspout installation covers how the discharge point should be set up.
- Measure the existing fall. Lay a 4-foot level on the ground against the wall and see how fast the grade drops. If the yard is flat or tipped back toward the house, you're fixing drainage as part of this project whether you planned to or not.
- Confirm the permit threshold for your address. Rules vary by city and county, and they count more than the patio itself. One jurisdiction requires a land-disturbance and stormwater permit at 2,500 square feet and counts patios, access paths and staging areas in that total, and the same guidance points to the code principle of six inches of fall within the first 10 feet from the foundation, or drains and swales where the ground won't provide that fall (Arlington County land-disturbing activity FAQ). Call your own office and ask for its number.
- Call 811 before you dig. In the U.S., the free locate service marks buried gas, electric, water, sewer and communications lines. A patio that clips a sprinkler zone is an annoyance. One that clips a gas line is an emergency.
- Plan the transitions at the door. Keep the finished surface below the door threshold with room for a sill and weather seal, check that any step down is a comfortable height, and keep accessible routes at a shallow running slope, roughly 1 in 20 or flatter, so a wheelchair or a walker can use them without help.
Bare soil during construction is its own problem. A silt fence, a straw wattle or a temporary berm that redirects runoff away from the excavation keeps sediment out of your neighbour's yard and out of the base you just built.
The whole sequence fits on one sheet:
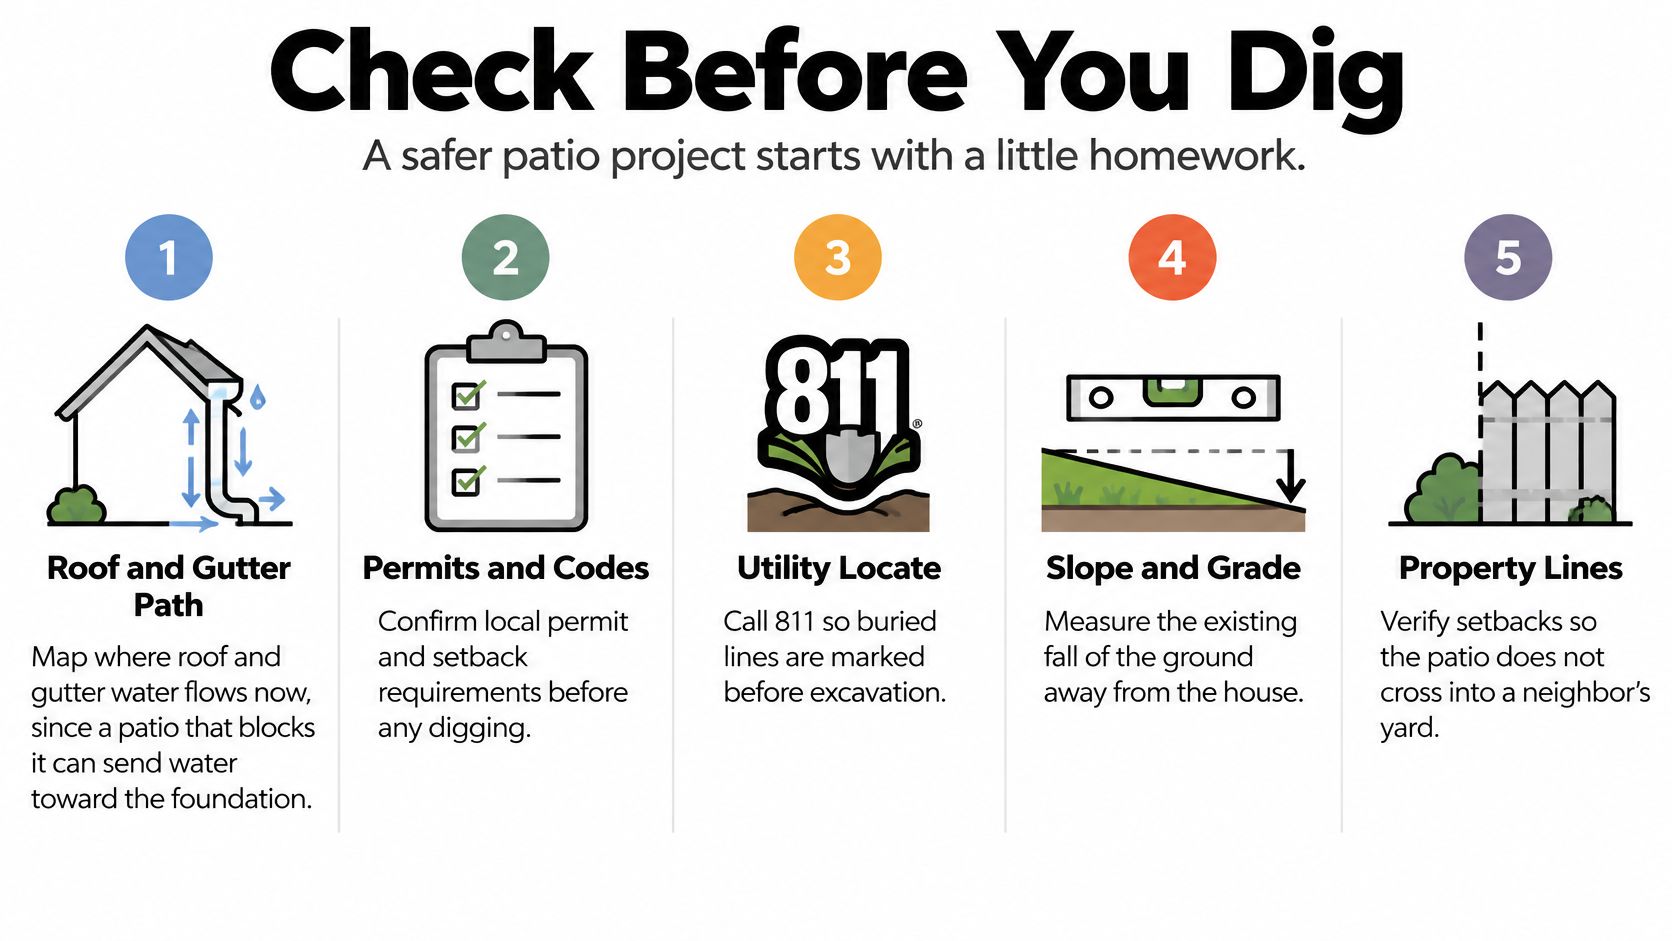
Nothing on that sheet gets marked off from memory. Write the permit status, the utility ticket number, the finished elevations, the door clearances and the drainage outlet on one page, and sign it off before the shovel comes off the truck.
When a Solid Patio Makes Drainage Worse
A sealed slab doesn't remove water from your yard. It collects rain from every square foot of its surface and delivers it to the lowest edge in a concentrated stream. If that edge sits near the foundation, a window well, a swale that already runs full, or the property line, the patio has created a drainage problem and hidden it under a good-looking finish.
That doesn't make solid paving wrong. It makes it a decision you make against your lot rather than a default. The U.S. Environmental Protection Agency's guidance on permeable pavement lists permeable concrete, porous asphalt and permeable interlocking pavers among the options that let rain and snowmelt infiltrate through the surface, filter out some pollutants and cut runoff volume.
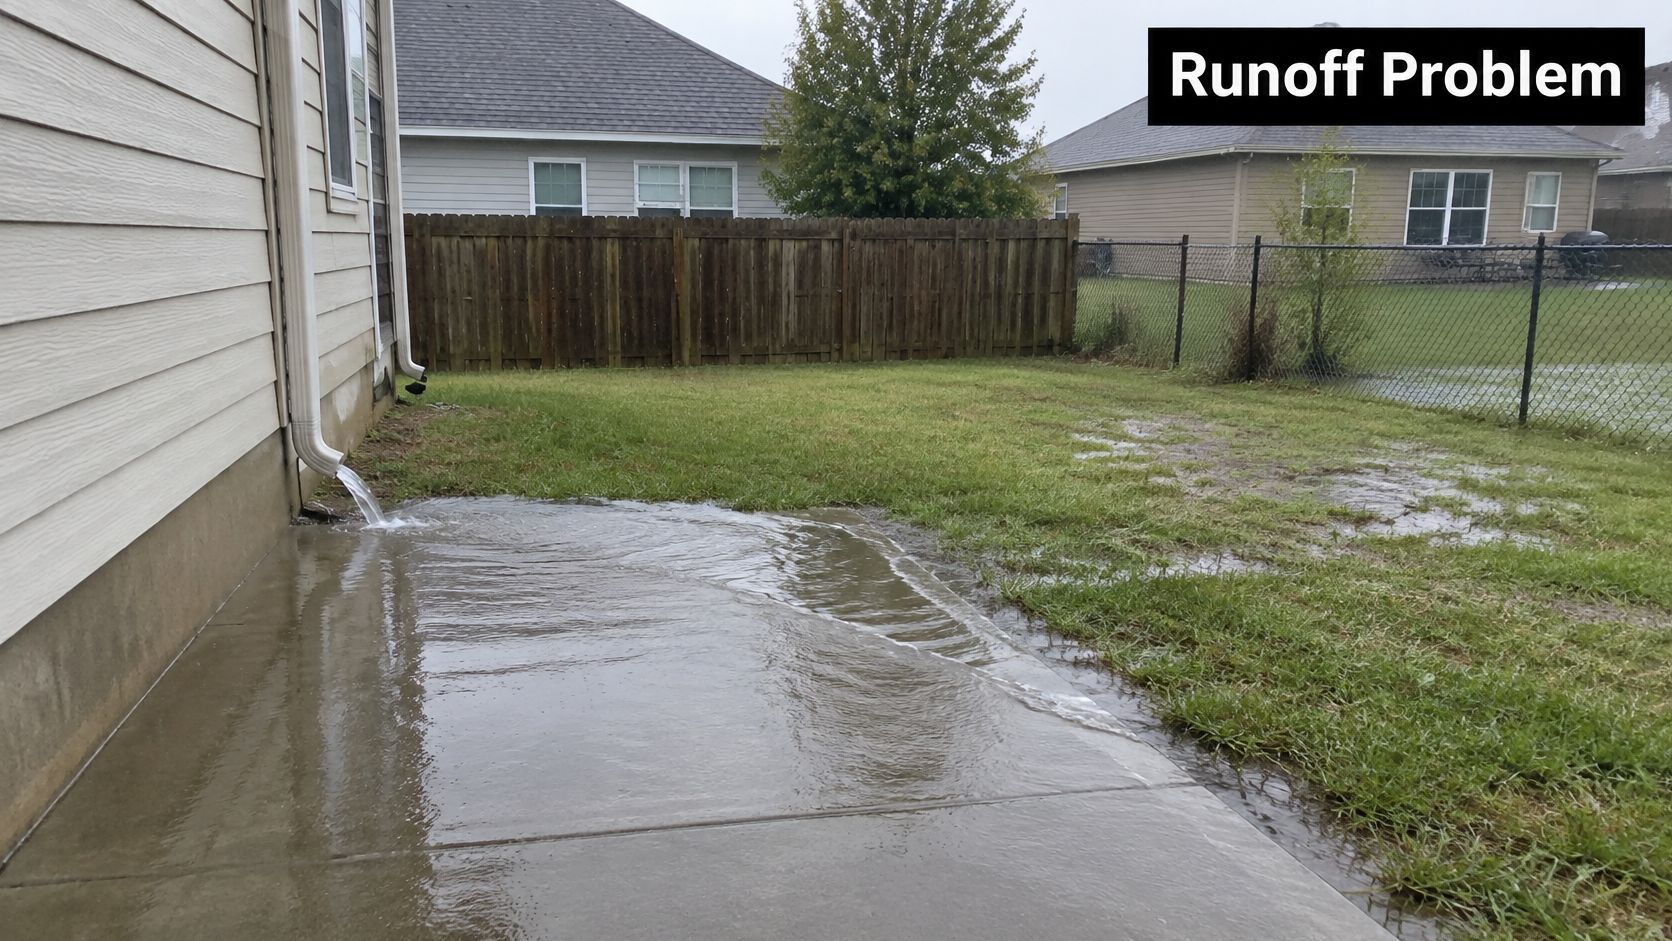
The same guidance is blunt about the limits. Infiltration capacity has to be confirmed by testing the actual soil, contamination risks on the site have to be considered, and where a large storm could overwhelm the system, an engineered underdrain or overflow outlet is required. Permeable paving is a stormwater system with a walking surface on top, not a paver that happens to have gaps.
There's also a ratio that catches homeowners out. EPA guidance notes that the impervious area draining onto a permeable system is commonly limited to roughly three to five times the permeable area, with some jurisdictions stricter than that. If your roof, driveway and an uphill slope all shed onto a small permeable patio, the patio is undersized for the job no matter what it's made of.
Where Permeable Paving Fits and Where It Fails
In the Midwest, three details matter that generic guides skip. Freeze-thaw durability of the surface counts for more than the permeability claim on a brochure. Sediment control during construction decides whether the system still works in year three, because fines washing into the voids clog them permanently. And roof runoff has to be coordinated, either piped away or deliberately routed, rather than dumped onto the pavement and hoped for.
Four questions settle most sites:
- Does water already pond there after heavy rain? If yes, the soil drains poorly and a permeable surface won't fix it.
- Is the soil clay or sand? Clay needs soil testing and often an underdrain. Sandy or gravelly soil is a far better candidate.
- How much roof area drains onto the patio? Add the roof footprint, the driveway and any slope above the site before you size anything.
- Is there a safe outlet? A low spot with nowhere to send overflow is a bathtub, permeable or not.
Solid paving suits small, level patios on ground that already drains well, especially where runoff can reach a daylight outlet or a dry well. Permeable paving suits sites with proven infiltration and a safe overflow path. If you already have a slab and drainage is the problem, building a deck over a concrete patio lifts the walking surface and lets water move underneath instead.
How to Excavate and Compact the Base
A patio fails from the bottom up. The surface you see lasts a decade or a single winter depending on what sits underneath, and base depth is the number that decides. Match it to the load and the site, not to whatever is left in the truck.
| Use case | Base build-up | Compaction target | Drainage add-on |
|---|---|---|---|
| Light foot traffic, paver patio | 4 in crushed rock in one or two lifts, 1 in sand bedding | 90 to 95 percent | None needed on well-draining soil |
| Heavy use or vehicle load | 8 in crushed rock in two compacted lifts, 1 in sand bedding | 90 to 95 percent per lift | Geotextile under base |
| Freeze-thaw site with poor drainage | 8 in crushed rock in two compacted lifts | 90 to 95 percent per lift | 4 in perforated drain at low point |
| Concrete slab, residential | 4 in compacted granular base over prepared subgrade | Compacted subgrade before forms | Drainage course where soil stays wet |
Four inches of base is fine under foot traffic on soil that drains. Put the same patio where the ground stays wet through spring and that base holds water like a reservoir, and the pavers heave every time it freezes. That's the argument for going to 8 inches and adding a drain, not for buying thicker pavers.
Every one of those numbers traces back to water.
The compaction target comes from Western Washington University's Division 32 unit pavers specification, which calls for compaction testing at approximately 90 to 95 percent and fill placed in lifts no thicker than 6 inches with each lift tested. A representative heavy-duty installation in that same specification uses about 8 inches of crushed rock in two compacted lifts.
Seven Steps From Stakes to Screeded Sand
- Stake the outline and set the finished elevation. Run string between stakes and mark the final surface height on the house. The surface should fall about 1/4 inch per foot, roughly 2 percent, away from the building.
- Excavate below the planned surface. Strip topsoil, roots and organic material to about 7 to 8 inches for a paver patio, plus bedding thickness. Organic material left in place decomposes and settles.
- Fix soft spots and compact the exposed subgrade. Remove wet or loose pockets and replace them with compactable material. This is the step that prevents settlement, and it's the one that gets rushed.
- Lay geotextile where soil can migrate into the base. A separation fabric keeps fine soil from pumping up into clean stone, which would otherwise turn the base into a mud layer within a few seasons.
- Place crushed rock in lifts no thicker than 6 inches and compact each one. Two passes with a plate compactor per lift is normal. Compacting only the visible surface while leaving loose fill underneath produces rocking pavers and low spots a year later.
- Install a 4-inch perforated drain at the low point if the site needs it. Run it to a daylight outlet or a dry well. A pipe that dead-ends holds water against the base instead of removing it.
- Screed a 1-inch layer of sand as the bedding. Set screed rails, pull the sand flat, then lift the rails and leave the finished bed undisturbed until the pavers go down.
The rule for any freeze-thaw site: if water can sit in the base in January, the base is too shallow or too poorly drained, whatever the surface looks like.
The build order, in one view:
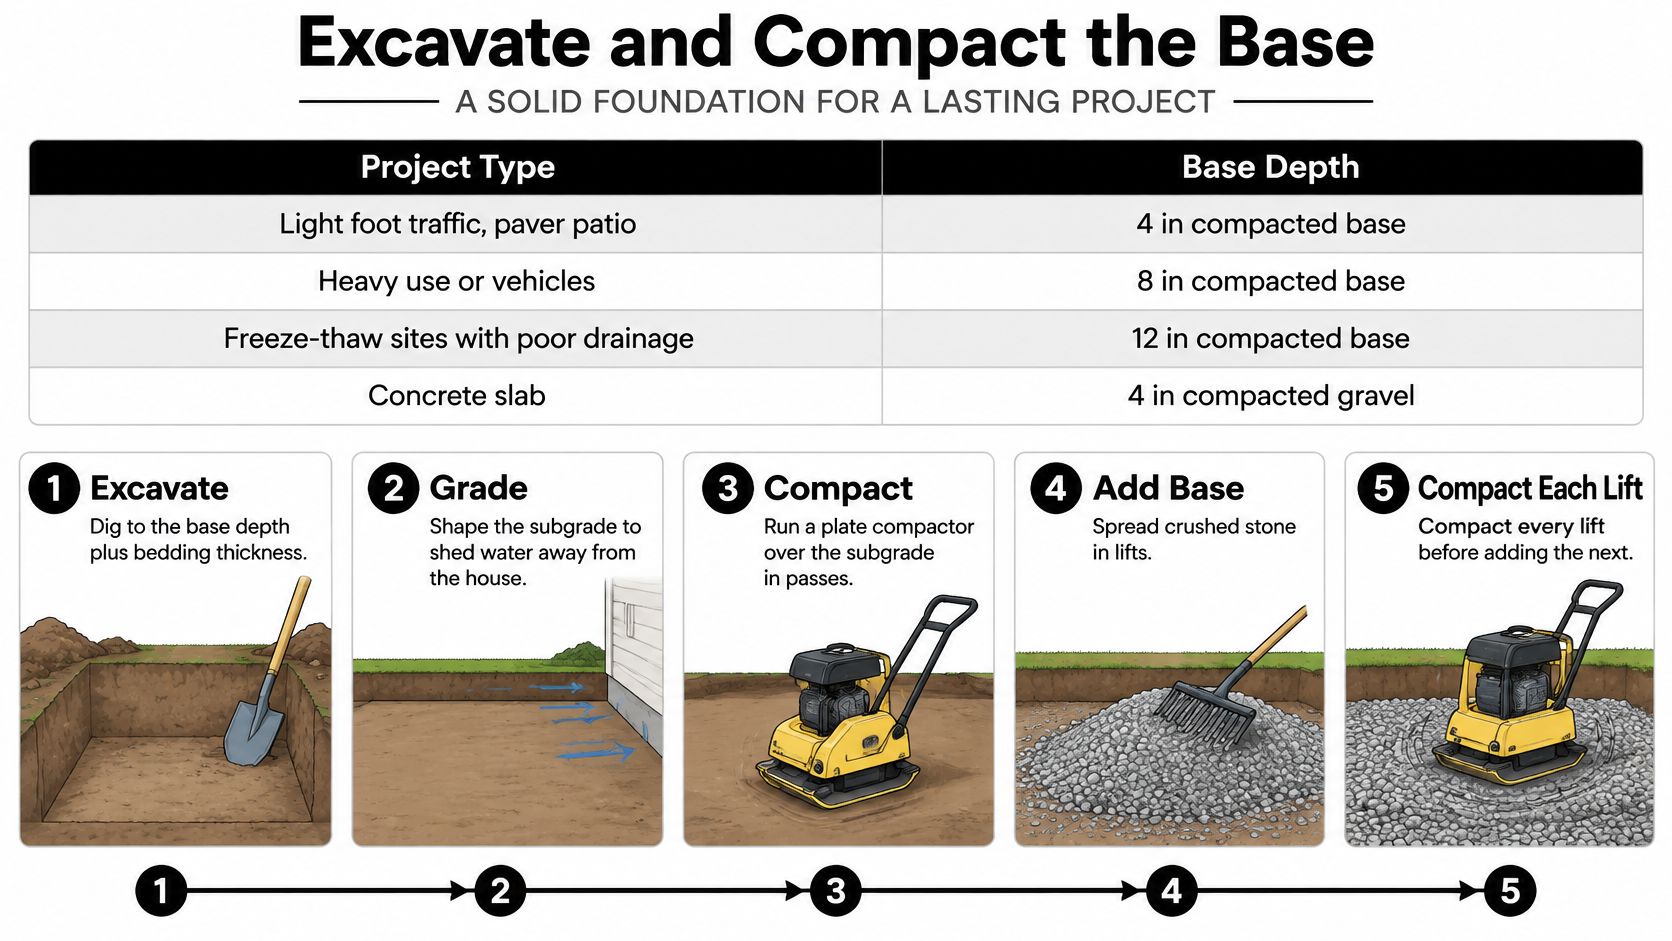
Before you lay anything, check the base with a straightedge and a level in several directions. Every low spot you find now is a puddle you'd otherwise meet next spring. Then confirm runoff moves away from the foundation instead of along the wall.
For a photographed walkthrough of the same sequence, the Bare Roots Landscape Solutions paver guide shows how bedding and edge restraint come together once the base is compacted.
How to Lay Pavers or Pour a Concrete Slab
A patio surface gets a few hours of attention during the build, then carries every winter after it. Pavers fail at the edges and joints. Slabs fail at the surface and the saw cuts. Both materials come down to the same two disciplines: keep the bedding or the mix consistent, and keep water content where it belongs.
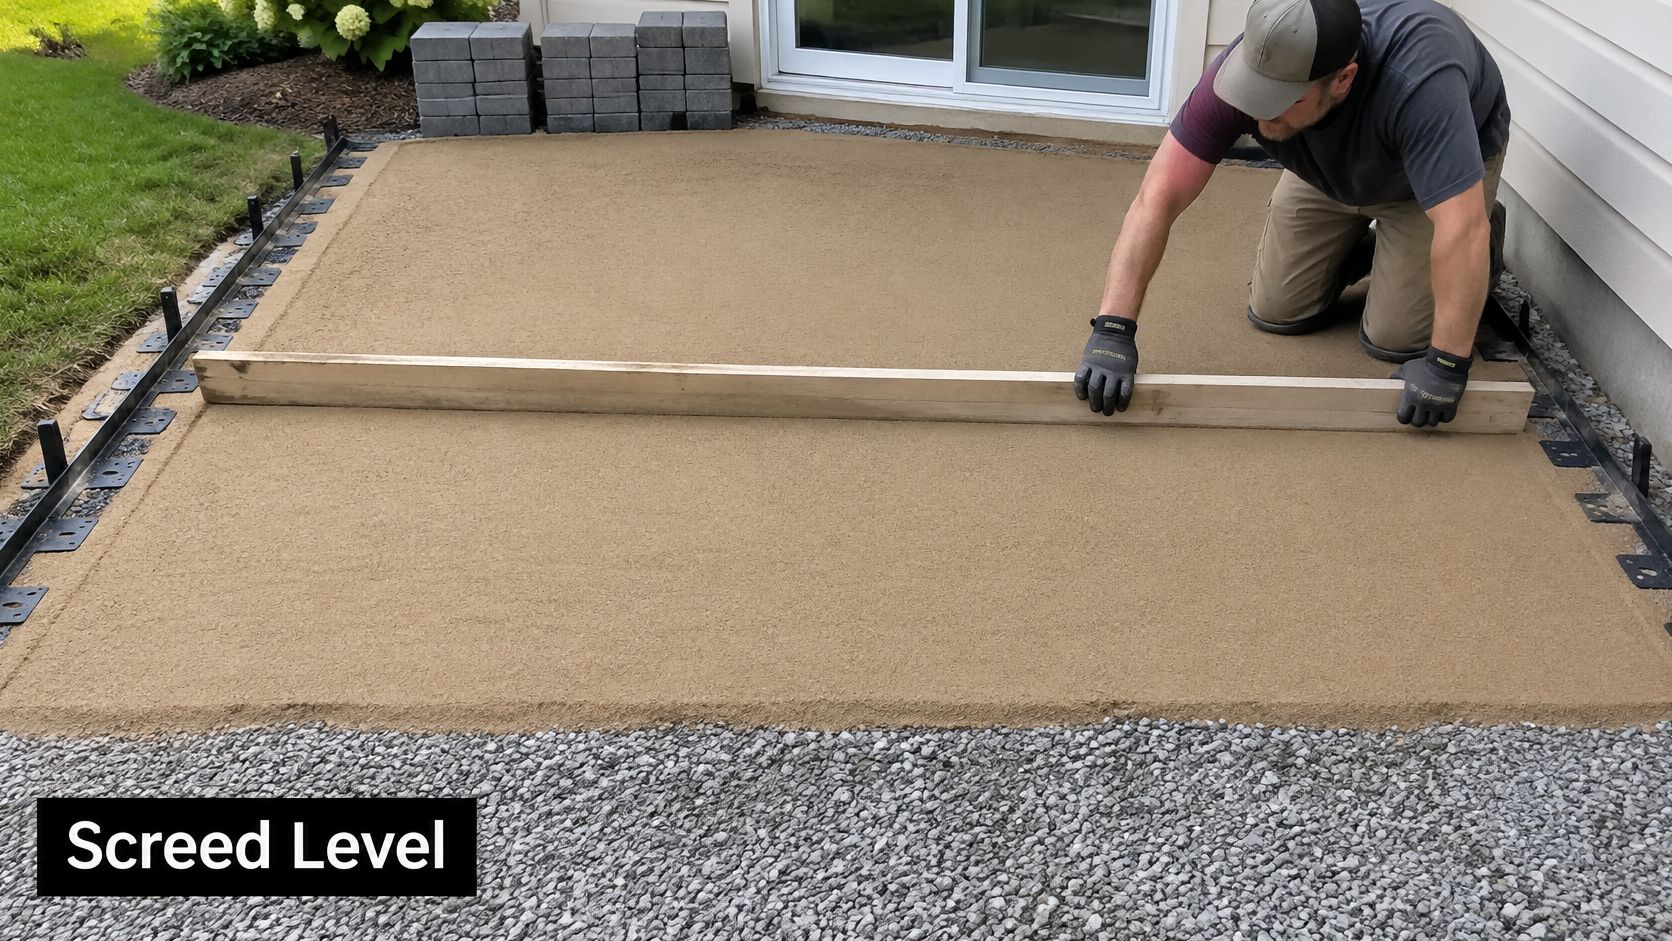
Laying Pavers in Six Steps
- Set the edge restraints first. Aluminium or plastic edge restraint spiked into the compacted base is what stops the field from spreading. Pavers without restraint creep outward and open their joints.
- Screed the sand bedding off the restraints. Use the restraint as your reference height and stay off the screeded bed. A footprint is a 1/4-inch dip under a paver.
- Lay from a fixed corner and keep joints at 1/8 to 3/16 inch. Consistent joints are what let sand lock the field together. Check the pattern against the plan every few rows before you commit to a long run.
- Cut edge pieces with a wet saw. Fit them tight against the restraint, and try to land a full paver at every corner.
- Compact the surface with a plate compactor fitted with a protective pad. Run it in two directions, then check each paver with a straightedge and your hand. Anything that rocks comes up now, while the fix is still cheap.
- Sweep joint sand or polymeric sand into the joints and mist it. Follow the product's watering instructions and stay off it until it sets. A joint that stays full keeps the field locked; an empty one gives meltwater a place to sit.
Pouring a Slab in Six Steps
- Set forms to the fall you staked. Check each form board with a line level and brace the forms so they don't shift under the screed.
- Place reinforcement as the design specifies, lifted into the middle of the slab. Mesh lying flat on the subgrade does nothing.
- Pour, spread and screed without adding water to the surface. A crew adding water to make finishing easier weakens the top layer, and the top layer is what scales.
- Wait for bleed water to leave before floating or troweling. Finishing while bleed water sits on the surface causes scaling and dusting, one of the most common mistakes on a residential slab.
- Cut control joints about 8 to 10 feet apart, to a quarter of the slab depth. The slab will crack somewhere. Joints decide where.
- Keep traffic off it for roughly 24 to 48 hours and cure it damp. Cover it and keep it moist during early curing rather than letting it dry in the sun.
A slab's finish is also its drainage. A smooth, dense surface sheds water the way you staked it; a scaled, dusty one holds it in pores and shallow dips. If drainage and finish work are the parts you want more detail on, these concrete patio drainage and finishing tips go further into slope and surface work.
For the mix itself, ask for air-entrained concrete specified for freeze-thaw exposure. The Federal Highway Administration cites approximately 6% air content, a specific surface of at least 24 mm²/mm³ and a spacing factor no greater than 0.20 mm as commonly cited benchmarks for freeze-thaw-resistant air-entrained concrete (FHWA on air-entrained concrete). Air content alone doesn't guarantee durability, since void size, distribution and stability all matter, as do mix proportions, mixing time, transport, vibration and finishing.
A short walkthrough of the surface stage helps before you rent anything:
Tools worth having lined up before either job starts:
- Plate compactor with a protective pad: sets pavers without chipping them, and the pad is the part that matters.
- Wet saw with a diamond blade: rent it for a one-time patio rather than buying.
- Straightedge and 4-foot level: checks bedding and finished surface in both directions.
- String line and line level: holds elevations and keeps rows straight.
- Rubber mallet and screed rails: seats pavers and pulls bedding flat.
- Knee pads: the item people skip and regret by mid-afternoon.
Watch for the surface faults that show up after a season rather than on day one. Edge chipping usually means the restraint wasn't set tight or the compactor ran across an unsupported edge. Joint washout means the sand went in dry and never got misted. White efflorescence on pavers or a new slab is mineral salt migrating out of the material, and it brushes away once the surface stops shedding it. Under Midwest freeze-thaw, each of these faults gets more expensive: an open joint, a flaking surface or a low corner is a spot where meltwater sits instead of moving off.
Decide Between DIY and a Professional Site Check
A gravel or paver patio on ground that already drains, with light use and no permit trigger, is a reasonable DIY project for a careful builder. The work is physical and repetitive rather than technically hard, and the sequence above is the whole method.
Bring in help when the site adds conditions a guide can't see. A patio that needs a drain run to a distant outlet, a yard that has to be regraded before anything is built, a permit that counts disturbed area, a permeable design with an underdrain, a slab poured tight against the foundation, or a retaining wall holding up the grade nearby. Those are the cases where base depth and outlet design stop being steps and become decisions.
- Flat lot, sandy or gravelly soil, no wall, small patio: DIY, and put the money into a compactor rental rather than labour.
- Clay soil, a low spot, or roof water crossing the site: get the drainage designed before you order stone.
- A door threshold within a step of the finished grade: get the elevations checked, because getting this wrong means a wet sill or a trip hazard every day.
- Any retaining wall above knee height: that's engineered work, not a patio detail.
A site check is only as good as what you hand the person doing it. Bring the downspout map, a rough sketch of the yard with the house, door thresholds and property lines marked, and the permit threshold your city or county office gave you. A useful visit covers grading, base depth and drainage outlets, the three things that decide whether the patio lasts.
Two States Exteriors LLC installs decks and patios in the Kansas City metro, and you can request a free on-site inspection where the project gets assessed and a plan comes back to you. Expectations on price also shift with region and with how much of the total is base work rather than stone, and this breakdown of patio installation cost in Dublin shows how much of a quote sits below the surface.
This week, finish the pre-dig checklist, gather those three inputs, and get the site check done before you buy a single paver.
Two States Exteriors LLC builds decks and patios across the Kansas City metro and has handled exterior work in Kansas and Missouri since 1997, which means the crew has seen what freeze-thaw does to a base that wasn't built for it. If your lot has a slope, a downspout that dumps where the patio would go, or a door threshold that worries you, request the free on-site inspection and get a written plan for grading, base depth and drainage before anything gets ordered. Visit Two States Exteriors LLC to start the conversation.