
A May storm rolls across the Kansas City metro, and the gutter above your basement window starts pouring like a faucet. Water sheets down the wall, collects in the clay beside the foundation, and finds the one low spot near the window well. By the time the rain stops, the basement smells damp and the mulch at the corner has washed into the driveway.
That scene usually leads to a quick search for downspout installation instructions. The better starting point is different. In Kansas City, the downspout layout has to account for building-code drainage rules, freeze-thaw movement, clay soil, roof area, and storm-damage documentation before anyone cuts metal. A pipe that looks straight can still send water toward the house, overflow during a hard storm, or disconnect from rotted fascia.
Why KC Homeowners Rethink Downspout Installation
On a Leawood split-level, a storm can expose a drainage problem before the gutter visibly fails. Water stands in a basement window well, a loose strap pulls the downspout away from the fascia, and the corner loses mulch until bare soil slopes back toward the house. Those signs point to a layout and attachment problem, not merely a missing extension.
Kansas City homes face repeated movement from weather and soil. Clay-heavy ground swells when wet and shifts as it dries, pushing against basement walls and moving shallow extensions out of grade. Winter freeze-thaw cycles open small cracks and disturb fittings, leaving the foundation more exposed during the next heavy rain.
Three failure patterns show up repeatedly:
- Basement dampness: A discharge point too close to the wall keeps saturating soil beside the foundation. Water may first appear at a window well, a wall joint, or an existing crack.
- Fascia rot: A disconnected outlet or loose downspout sends water behind the gutter. The fascia softens, fasteners lose their grip, and a replacement pipe attached to damaged wood will not stay secure.
- Washout: Concentrated flow at a corner strips soil, exposes edging, and can carve a route back toward the foundation.
A system can also become undersized after a roof addition, gutter replacement, or roofline change. The original downspout may now serve a larger roof plane, while a narrow outlet and widely spaced drops struggle during intense rainfall. In practice, the discharge route matters as much as the vertical pipe.
Field rule: Treat the discharge path as part of the foundation protection system, not as a decorative finish at the bottom of the pipe.
Code requirements reinforce that approach. Modern gutter and downspout provisions address roof-water movement, including property-line considerations and continuous drainage slope. One cited standard specifies a minimum slope of 1/8 inch per foot to limit standing water. The U.S. gutters and downspouts sector was estimated at about $8 billion in 2024, with a projection of $8.3 billion by 2027 and projected demand of roughly 2.1 billion linear feet in 2027. These market figures Modern gutter and downspout provisions do not replace a site check, especially where KC clay, frost movement, and storm damage are involved.
For homeowners, the practical takeaway is direct: downspout installation starts as a code-and-climate drainage decision, then becomes a DIY task only if the existing structure and discharge route can support it. Document damaged fascia, displaced extensions, and washout before repairs, since clear storm records can matter when discussing an insurance claim.
Planning the Layout Before You Cut Anything
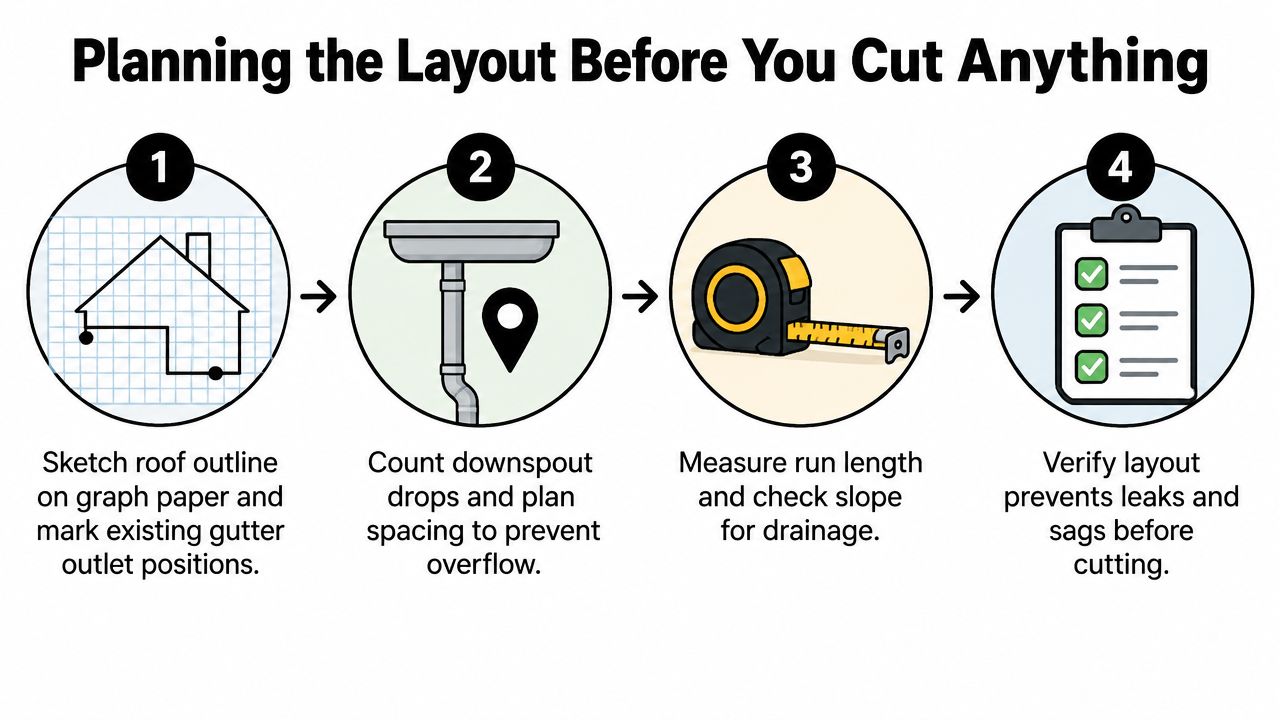
Kansas City downspout work starts with a roof-and-site plan, not a ladder. Sketch the roof outline, mark each gutter run and outlet, then trace every possible discharge route to grade. Rule out paths across walkways, beside basement windows, or toward a neighbor's property.
Size the system around the roof area and gutter capacity. A common guideline uses roughly one downspout for about 600 square feet of roof area in standard rainfall regions. It pairs 2×3-inch downspouts with 5-inch gutters and 3×4-inch downspouts with 6-inch gutters. Review the sizing details in this downspout and gutter size guide. Broad or steep KC roof planes deserve a conservative layout, particularly when one outlet collects runoff from several sections.
Mark the drops and check the grade
Measure from each gutter outlet to grade. Check the wall, trim, windows, and nearby paving before fixing the vertical route. A tall run may require more than one elbow to return the pipe cleanly to the wall, so dry-fit the elbows before ordering the final sections. Two broad-angle elbows usually make a cleaner offset than several tight bends forced into a short space.
One code reference includes downspout spacing of no more than 40 linear feet, while other building guidance commonly places spacing between 20 and 50 feet, depending on the roof and drainage system. Code guidance for roof gutters and downspouts is a useful reference, but spacing alone does not settle the layout. Roof area draining to each section, gutter size, outlet capacity, and storm intensity all affect the result.
Select the termination before purchasing pipe. A splash block can suit a well-graded lawn. KC clay absorbs water slowly, so a longer surface extension may provide better separation from the foundation. If the route crosses a walkway, plan an underground line with a cleanout and a visible daylight or emitter outlet. Frost movement can shift buried sections, making access and positive drainage part of the layout rather than an afterthought.
Two planning errors cause frequent callbacks:
- Undersized drops: The gutter overflows before the downspout carries the incoming runoff.
- Backward discharge: The pipe looks complete, but the final outlet sends water toward the foundation.
Check the complete route with a level and string line. The outlet, vertical run, elbow offset, lateral pipe, and terminal outlet must work as one system. A straight downspout can still fail when the last few feet sag or hold a low spot. Photograph existing washout or displaced components before cutting, since that record can support a later storm-damage insurance discussion.
Tools and Materials Worth Having on Hand
You don't need every tool in a gutter contractor's truck, but you do need the right materials for a secure, serviceable run. For a typical Kansas City replacement, buy the downspout sections, a matching gutter outlet, two elbows, fasteners, sealant, straps, and a proper discharge component before you climb the ladder.
Use vinyl-sealed rivets or exterior-rated zip screws for the joints. Keep an exterior-grade TriPolymer sealant or equivalent on hand for outlet and seam details. Aluminum straps should support the vertical run at the scheduled spacing and at each elbow or transition that puts extra stress on the pipe.
| Item | Buy | Borrow |
|---|---|---|
| Downspout sections and matching outlet | Yes | No |
| Elbows, screws or rivets, and exterior sealant | Yes | No |
| Aluminum straps and splash block or extension | Yes | No |
| Offset crimper and magnetic hex driver | Usually optional | Sometimes |
| Extension ladder | No, unless regularly needed | Yes |
| Tin snips, power shear, and long level | No, for a single project | Yes |
A chalk line helps with longer runs, while an offset crimper makes cleaner transitions where the pipe must move around trim. A caulk gun and magnetic driver save time, but they won't correct a bad layout.
Before ordering, compare the system dimensions with gutter and downspout sizing information for Kansas City projects. Regional suppliers such as ABC Supply may offer aluminum material that fits local rooflines more cleanly than a few standard stock lengths. The advantage is a better match and fewer awkward seams, not a guarantee that every home needs custom production.
Ladder safety deserves more attention than it gets. Wet clay soil can shift under a ladder foot, particularly beside a recently watered bed or after a storm. Set the ladder on stable ground, keep a second person nearby, and don't work alone while handling long metal sections overhead.
Safety point: If the ladder footing moves, the job stops. No downspout repair is worth improvising a support surface.
Cutting and Attaching the Downspout Run
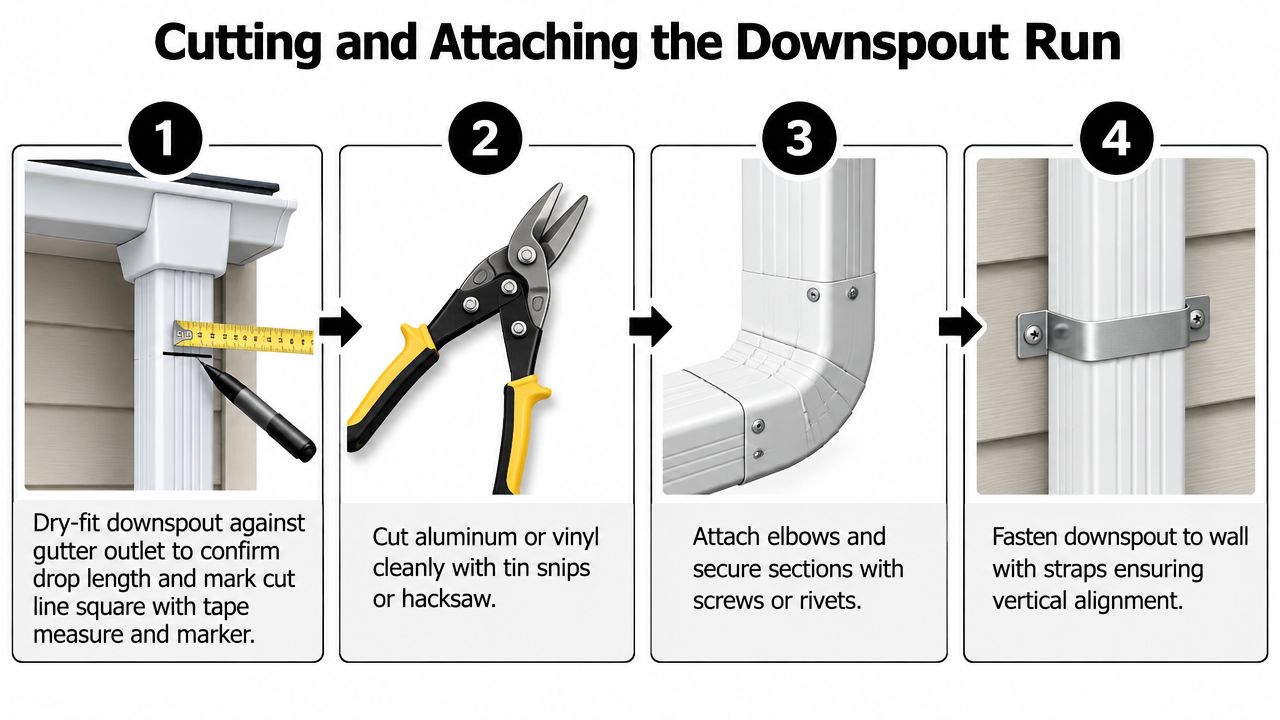
A downspout that looks straight on the ground can lean once it is attached to the gutter. Dry-fit the outlet, upper elbow, offset, and lower elbow before cutting. Check the wall clearance and overlap first, then mark the final drop. A square cut lets each joint seat correctly. A crooked cut twists the pipe, which can leave a leaning run, an open seam, or a weak connection when Kansas City frost shifts the surrounding materials.
Measure twice, then mark the cut line around the pipe. Tin snips or a fine-tooth hacksaw usually handle aluminum and vinyl. Steel calls for a powered shear or nibbler if you want to avoid crushing the sidewalls. File away burrs after cutting so the pieces slide together without catching sealant or deforming the outlet.
Assemble the offset on the ground
Push the top section into the gutter outlet or drop outlet. Connect the upper elbows so the downspout returns parallel to the fascia, then dry-fit the lower elbow and vertical section. Each connection should have at least a 1-inch overlap. Secure every seam with two sheet-metal screws, one on each side of the downspout wall, or use compatible sealed rivets.
Keep screw tips out of the water path. A fastener that reaches too far can catch leaves and debris, slowing drainage during a heavy storm. Apply sealant where the outlet manufacturer specifies it, especially around a cut opening or a joint exposed to direct splash.
Masonry requires fasteners suited to the wall rather than ordinary wood screws driven into brick or block. A hammer drill and masonry anchor may work, but thin brick veneer needs a different attachment method because the veneer may not support the load alone. Stop before drilling if the wall construction is uncertain, and identify the structural backing first. That documentation can also help if storm damage later becomes an insurance question.
Keep the run plumb
Use a level on both the front and side of the downspout. Fasten aluminum straps or hidden brackets at roughly 4 to 6 feet along the vertical run, adding support at elbows. Anchor into sound fascia, framing, or suitable masonry with the correct fastener. Rotting fascia needs repair before the pipe goes up.
Vinyl requires closer support because heat can make it sag. Recut the offset, adjust the elbows, or move the outlet instead of twisting a section into alignment. At the base, keep the pipe about 1.5 inches above grade so soil and mulch do not block the opening.
A guide to installing continuous gutter systems can help when a downspout repair reveals separated gutter joints, poor pitch, or damaged fascia. The downspout cannot correct a gutter that holds standing water.
Run a hose into the gutter before calling the installation complete. Watch each joint for movement or leakage, and check whether water slows at an elbow. Make corrections while the run remains accessible, before the first winter freeze exposes a weak connection.
Routing Discharge Away From the Foundation
A downspout that ends beside the wall has only moved the water problem from the roof edge to the foundation. Choose the termination after checking grade, Kansas City's clay soil, foot traffic, and the outlet allowed by local rules. The right detail protects the foundation and avoids creating a storm-damage issue later.
A splash block works on established grade when it sits on firm, undisturbed soil and remains stable. Shape the surrounding ground so water leaves the wall instead of pooling beside it. Concrete generally holds up better than lightweight plastic in exposed areas, especially where lawn equipment, snow, and shifting soil can move the block.
On many Kansas City clay lots, a longer surface extension handles discharge better than a short block. Dense subgrade absorbs concentrated flow slowly, so use a 10-foot extension where the property allows it. Aim the extension toward a downhill swale or stable drainage area, never across a neighbor's walkway or toward another foundation.
Choose an underground route carefully
Bury the discharge when a surface pipe creates a trip hazard or interferes with mowing. Use non-perforated pipe so water reaches the planned outlet instead of soaking soil along the foundation. The line needs a continuous outward slope, including at least 1/8 inch per foot, and cleanouts give you access if sediment or roots obstruct it.
Set the pipe on a stable base, preserve the outward pitch, and test the flow before backfilling. The outlet may daylight into a safe lower area, connect to an approved stormwater system, or serve a suitable catchment design. Keep roof runoff out of a perforated foundation drain, because that setup can direct water into soil beside the foundation.
| Discharge Method | Best Use | Effectiveness in KC Clay |
|---|---|---|
| Splash block | Short, visible discharge on established grade | Adequate only when the grade carries water away |
| Surface extension | Open lawn, swale, or planting bed edge | Stronger than a block where soil absorbs slowly |
| Buried non-perforated pipe | Walkways, mowing paths, or concealed routing | Effective when continuously sloped and accessible |
| Dry well or storm connection | Designed drainage system with approved outlet | Suitable only when local rules and site conditions allow it |
Keep the final outlet at least 10 feet from the house where the site and design require that distance. Underground catchment designs may use different termination distances, so local requirements control. Rules vary by municipality. Some areas favor ground discharge, while others require an approved storm connection or permit, and many prohibit sanitary-sewer discharge. The PNNL guidance on gutters and downspouts explains why the permitted outlet depends on the municipality, not just the homeowner's preference.
DIY vs Hiring a Pro in the KC Metro
A single-story replacement on accessible ground is a reasonable project for a homeowner who is comfortable with a stepladder, careful measuring, and basic sheet-metal work. Plan for 3 to 5 hours per drop and approximately $40 to $90 in materials, as described in the project brief. Those figures apply to a straightforward replacement, not a job that includes gutter repair, fascia reconstruction, or underground drainage.
The project changes character on a two-story house. Long sections are awkward to control from a ladder, hidden fascia damage may not be visible until the old hardware comes off, and a poorly sealed connection can send water behind siding or into a finished wall. Re-pitching the gutter or modifying a complex roofline also requires more than attaching a vertical pipe.
| Situation | DIY may fit | Hire a contractor |
|---|---|---|
| Single-story, accessible drop | Yes, with stable footing | Optional |
| Two-story run | High ladder and handling risk | Recommended |
| Rotted fascia | Not until the substrate is repaired | Usually appropriate |
| Gutter re-pitching | Requires broader system work | Appropriate |
| Buried drainage | Requires grading and outlet planning | Often appropriate |
| Storm-related damage | Document before disturbing | Contractor and adjuster coordination |
KC Metro pricing in 2024 commonly ran $150 to $300 per downspout installed by a licensed crew, with aluminum runs priced higher when on-site forming equipment was involved. Because local rules differ, ask the municipality whether changing the drainage path requires a permit.
Ask any installer for proof of general liability and workers' compensation coverage. Get the scope in writing, including the downspout size, outlet location, fastening method, discharge termination, fascia repairs, and cleanup. Two States Exteriors LLC is one Kansas City-area option for gutters and exterior drainage work, while other qualified local contractors may also fit the project.
Decision test: If the work involves height, structural repair, or water that must travel underground, the risk usually matters more than the satisfaction of doing one more step yourself.
For storm damage, take photos before removal. Capture dents, detached straps, crushed sections, the roofline, and the gutter-to-fascia connection. Save date-stamped weather documentation and ask the adjuster to inspect the complete drainage system, not only the shingles. The order of operations can affect how an insurer evaluates a claim.
Storm Damage Insurance and Year-Round Upkeep
A hail or wind event can make a downspout look like a minor detail beside damaged shingles. That assumption can cost you documentation. Photograph dents, loose straps, separated outlets, and crushed runs before cleanup, then include the roof edge and fascia in the same set of images.
Review the policy language before authorizing replacement. Wind coverage, cosmetic exclusions, and code-upgrade endorsements can change what the carrier considers covered work, especially when damaged aluminum is replaced with a different material or a heavier system. Don't promise an adjuster that a particular upgrade will be reimbursed. Ask for the applicable language in writing.
Keep the system ready for the next storm
Use a simple seasonal rhythm:
- Spring: Clear pollen, seed pods, and sediment before heavy rain returns.
- Summer: Inspect straps and joints after heat expansion, severe wind, or a large storm.
- Fall: Flush the gutters and downspouts before the first hard freeze. This safe gutter-cleaning guide covers ladder setup and cleaning precautions.
- Winter: Watch north-facing eaves for ice buildup and check that discharge points haven't frozen into a blockage.
- After grade changes: Recheck extensions after late-summer clay movement, landscaping, or trench settlement.
A clean gutter still fails if the outlet is loose or the extension has shifted back toward the wall. Look for new erosion, standing water, staining below joints, and straps pulling out of the fascia. Those signs usually deserve attention before the next major weather system.
For storm repairs, use a contractor who is licensed where required, insured, familiar with applicable ICC-based code provisions, and willing to provide a written scope. Confirm who handles the gutter, fascia, siding, roof edge, and insurance documentation. A complete repair should leave the drainage path functional, accessible, and directed to an approved discharge point.
Two States Exteriors LLC provides Kansas City-area gutter installation, downspout repairs, and exterior storm-damage inspections, with written project planning for homes affected by drainage or hail issues. Visit Two States Exteriors LLC to request an inspection and discuss a code-aware downspout solution for your property.


