
Getting several bids and choosing the cheapest licensed contractor isn't enough. A crew can replace every visibly damaged board and still leave the leak untouched. When you're comparing house siding repair contractors, the deciding question is what they'll do behind the siding, not how closely the new panels match.
For a Kansas City homeowner, that means connecting the inspection, written scope and insurance deductible before signing anything. A sound repair should address the water entry point, preserve drainage and give you a clear record of what the crew repaired.
Spotting Siding Damage That Needs a Pro
Start with a ground-level walk-around in good light. Stand back far enough to see waviness across the wall, then move closer to inspect joints, bottom edges and the areas below windows. Use binoculars for upper walls rather than climbing a ladder to investigate.
Separate cosmetic damage from functional damage. Fading or a shallow surface chip may leave the siding able to shed water. A split panel, soft board or opening through the wall assembly needs closer investigation, especially when you notice daylight, drafts or dampness inside.
Siding damage, cause and typical fix
| Damage | Usual cause | Typical fix |
|---|---|---|
| Cracked or split vinyl panel | Impact, thermal stress or a nail driven too tight | Replace the panel |
| Buckled or wavy panels | Heat expansion with no room to move, or nails set too tight | Re-fasten or replace, and check nailing |
| Swollen or cracked fiber cement | Water absorbed through unsealed cut edges or failed flashing | Replace the board and seal every cut edge |
| Soft or rotted wood siding | Long-term water exposure at the sill or near grade | Replace boards and inspect the sheathing behind them |
| Hail dents on aluminum or vinyl | Hail impact | Replace if damage is functional; cosmetic dents may not qualify for a claim |
| Peeling paint or failing caulk at trim | UV exposure and aged caulk joints | Re-caulk or repaint if the substrate is sound; investigate recurring failure |
| Damp interior wall behind siding | Failed housewrap, flashing or damaged sheathing | Open the affected assembly and inspect before cosmetic work |
Look beyond the damaged face
Siding is a water-shedding surface, not the wall's primary waterproof barrier. A Florida building-authority evaluation found significant water penetration through vinyl and conventional fiber-cement siding assemblies, while properly installed weather barriers and flashing showed virtually no visible penetration.
Check the interior wall opposite the damage for stains, peeling paint or a musty smell. Outside, pay attention to window corners, door heads, penetrations and roof-to-wall intersections. Soft sheathing usually requires selective opening by the contractor to confirm its condition.
For a limited maintenance issue, GrandviewGuide.com's directory of home repair professionals in Grandview can help you identify local candidates. Suspected concealed leakage calls for someone who can document and rebuild the wall's drainage details, not merely apply caulk.
Before anyone arrives, take dated overview and close-up photographs. Record accessible measurements and label each concern surface damage or suspected water-path damage without pulling panels apart yourself.
How to Repair Siding Without Trapping Water
A good repair follows an order: expose the problem, restore sound backing, rebuild water management, then install the finish. Reversing that order hides defects and makes the next investigation harder.
Use this process graphic as a discussion aid during the inspection, not as a substitute for the siding manufacturer's instructions.
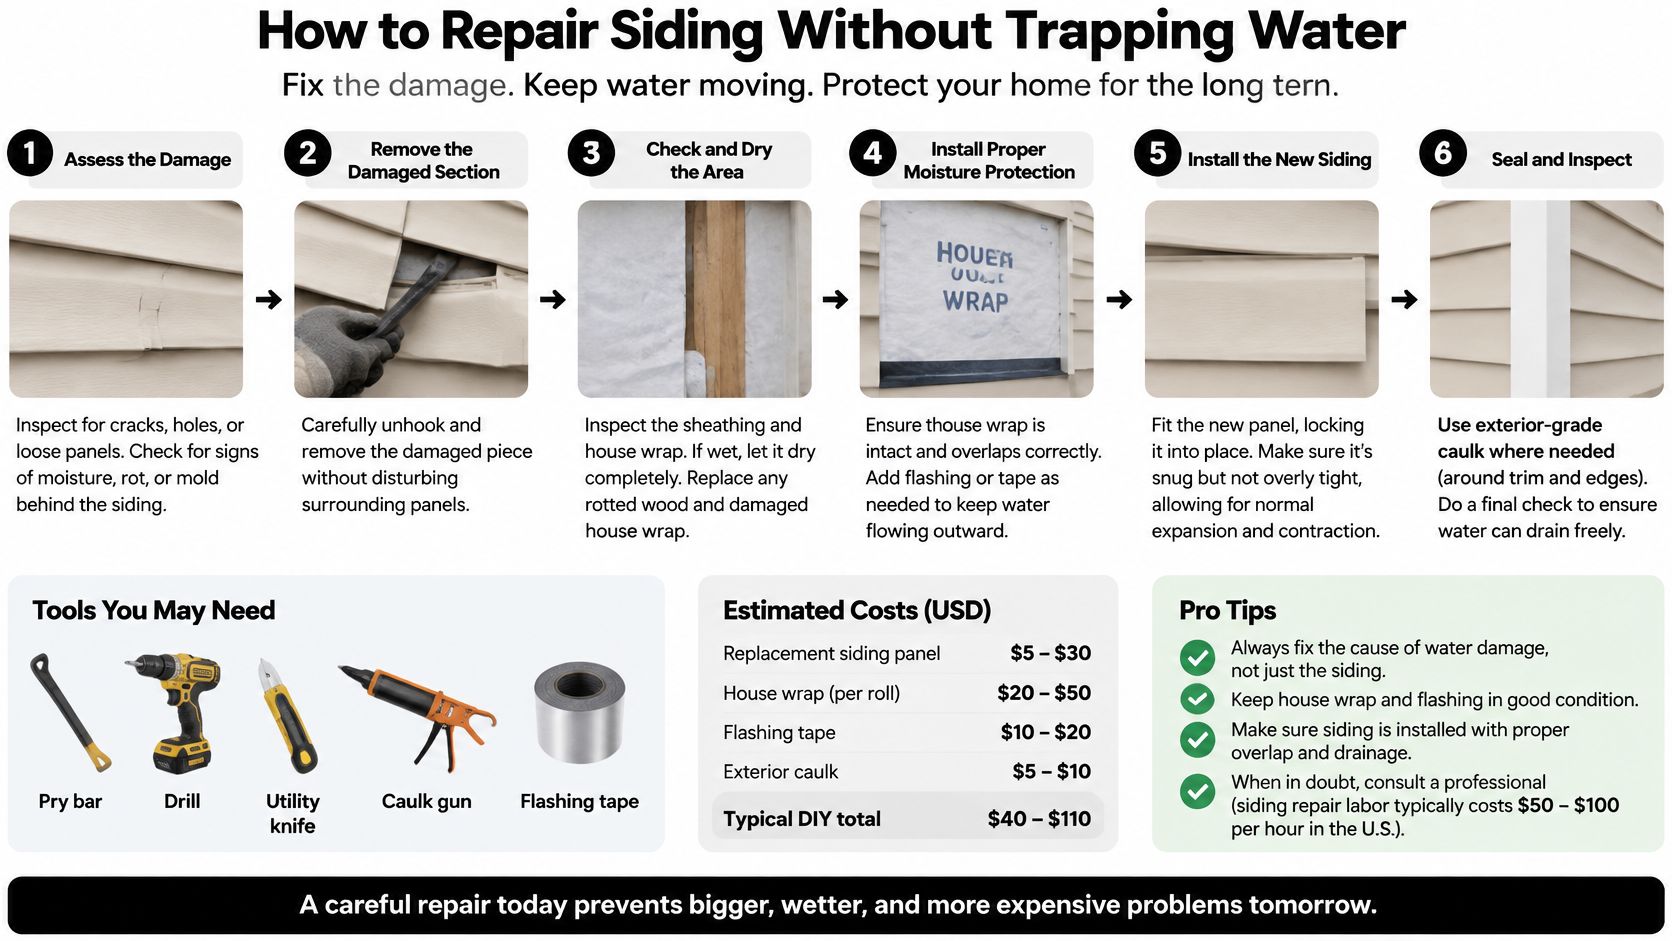
The repair sequence to put in the scope
Identify and document the product. Photograph the wall and locate the installation guide for the actual siding line. Vinyl needs freedom to move at its fastening slots, while fiber cement has its own fastening, joint and clearance requirements.
Remove damaged pieces without sacrificing adjacent material. A vinyl release tool helps release interlocked panels; lap boards require careful fastener removal rather than aggressive prying. Inspect exposed sheathing and framing, and resolve wet or deteriorated backing before covering it.
Rebuild the weather-resistive barrier from the bottom upward. Patch or replace torn housewrap with compatible materials, placing upper layers over lower layers so water drains outward. A patch tucked behind the wrong edge can direct runoff into the wall even when its tape looks neat.
Integrate flashing with the barrier. Window and door flashing needs an outward drainage path, and roof-wall intersections need kick-out flashing that directs runoff toward the gutter. Smearing sealant over the siding face doesn't correct a missing concealed flashing connection.
Treat fiber-cement cuts and joints correctly. Prime or otherwise seal field-cut edges before fastening, and use the required butt-joint flashing or specified joint treatment. Don't substitute face caulk for a flashing detail the product requires.
Provide movement space at trim transitions. The Pro Builder fiber-cement construction guide describes approximately a 1/8-inch movement gap with flexible sealant meeting ASTM C920 Class 25 or better, and roof-clearance benchmarks of roughly 1 inch in southern conditions and 2 inches where northern snow accumulation is expected. These are reference details, not permission to override the product's instructions or select a Kansas City clearance by guesswork.
Check the roof intersection against the actual exposure. Keep siding out of standing water, debris and roof runoff, using the clearance specified for that assembly. Ask the crew to show the applicable detail before cutting the replacement board.
Preserve a drainable or ventilated space where compatible. Use the specified drainage mat or furring assembly rather than improvising spacers. Don't press new siding against damp backing or caulk shut openings intended to drain.
What the finished work should demonstrate
Ask for photographs while the wall is open and again before the siding conceals the repairs. Those images should show sound backing, properly lapped barrier repairs and integrated flashing, not just replacement boards stacked beside the house.
Our home siding installation information is a useful starting point for discussing installation scope. For a repair, require the proposal to identify which existing components will remain and which the crew will replace.
Inspection rule: Judge concealed work before it's covered. A finished photograph can't prove that the flashing behind a board was installed correctly.
At completion, look for secure panels, properly treated joints, correctly finished permitted face fasteners and unobstructed drainage exits. Fresh paint and a continuous bead of caulk aren't substitutes for those checks.
Credentials a Qualified Siding Repair Contractor Shows You
Say a homeowner accepts the lowest bid. The replacement siding looks fine until a stain appears above an upstairs window after driving rain. The crew replaced the visible damage but left the failed window detail in place.
Paperwork won't guarantee craftsmanship, but it helps establish who accepts responsibility when something goes wrong. Ask for documents under the same business name that appears on the proposal, and confirm who will supervise the actual crew.
Contractor credentials to verify before you sign
| Credential | How to verify | Red flag |
|---|---|---|
| Local business license | Request the number where required and check city or county records for the job location and business address | Required license can't be verified, or no verifiable operating address |
| General liability insurance | Have the insurer or agent send a certificate directly; confirm active coverage | Expired certificate or refusal to provide verification |
| Workers' compensation | Confirm coverage arrangements for employees and subcontractors with the insurance agent | Unexplained exclusions or no proof for the crew doing the work |
| Contractor bond | Request the bond number and surety name where required or represented | Claimed bond can't be verified |
| Manufacturer certification | Check the manufacturer's contractor directory and certification scope | Truck logo without a verifiable credential |
| Local references | Request recent, comparable repair jobs and permission to contact owners | Anonymous reviews offered instead of contactable references |
| Written workmanship warranty | Obtain coverage, exclusions, duration and transfer rules | Verbal promise only |
Verify the crew, not just the sales presentation
Don't assume a credential in one Kansas City jurisdiction authorizes work everywhere across Kansas and Missouri. Confirm applicable licensing, registration, bonding and permit requirements with the city or county where your house sits. A post office box alone doesn't prove wrongdoing, but it doesn't establish an operating address either.
Subcontractors also need careful verification. They aren't necessarily named individually on the primary contractor's insurance certificate, so ask the agent how coverage applies and whether separate certificates are needed.
The Bureau of Labor Statistics construction and extraction outlook projects about 587,000 annual openings from 2025 through 2035 across those occupations. That broad workforce demand isn't evidence against any particular company, but it makes crew assignment and supervision worth discussing.
Ask references whether the contractor provided concealed-work photos, kept the site weather-protected and returned to resolve punch-list items. A manufacturer credential should also match the work: roofing certification isn't proof of siding-specific training.
As a hiring standard, I would request the documents within a couple of business days. If the contractor can't provide them or explain a legitimate verification delay, don't advance to a deposit.
Comparing Siding Repair Estimates Line by Line
A low siding number can become an expensive water problem. Collect three bids, give each contractor the same damage photos, and ask each one to price the same measured repair so the comparison is about scope rather than sales skill.
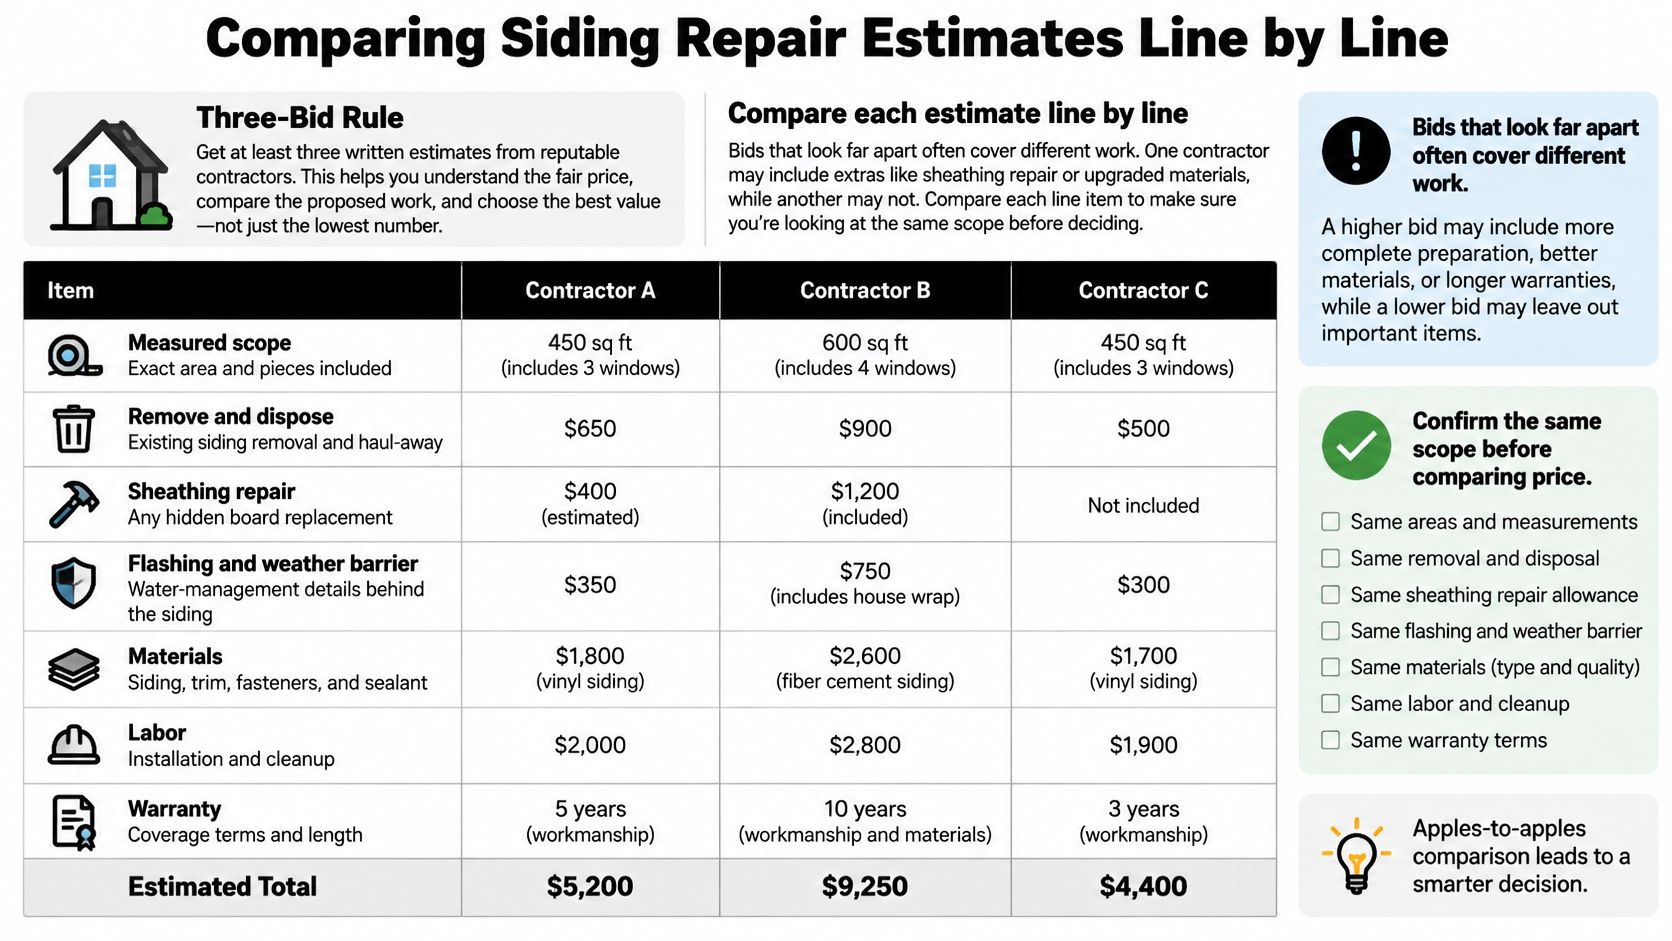
Compare scope before totals
Even national spending estimates change with definitions and coverage. A historical Census Bureau and HUD survey comparison recorded approximately $9.616 billion in owner-occupied siding expenditures in the American Housing Survey versus $4.417 billion in the C50 survey for the 2000–2001 comparison. Those figures show why a category label alone does not prove two bids cover the same wall, the same layers or the same water path.
Lay the bids beside each other on the same sheet:
Bid comparison sheet
| Line item | Contractor A | Contractor B |
|---|---|---|
| Bid total | Lower total, incomplete scope | Higher total, documented scope |
| Measured scope (sq ft or linear ft) | General wall description | Measured area and individual pieces |
| Siding product, line and color match | Closest available siding | Named product with approved sample |
| Housewrap and drainage layers | Left untouched | Repair at opened wall areas |
| Flashing at windows, doors and roof-wall intersections | Excluded | Affected transitions itemized |
| Trim, caulk and paint | Touch-up unspecified | Materials and finish limits stated |
| Tear-off and disposal | Not stated | Removal and haul-away included |
| Permit responsibility | Not assigned | Responsible party identified |
| Crew schedule and start date | Scheduling promise only | Written start window and duration |
| Warranty terms | Verbal assurance | Written coverage and exclusions |
| Payment schedule | Large signing deposit | Draws tied to completed work |
The cheaper proposal may buy board replacement while the other buys a complete repair. Ask every bidder for organized descriptions, exclusions and payment terms in writing. GetBill's estimate writing guide for independent contractors shows those estimate parts from the contractor side, which helps you recognize when a homeowner bid is missing the same fields.
Hidden sheathing damage needs its own pricing rule. A written unit price, measured allowance or approval step gives you control when the crew opens the wall and finds soft OSB, stained studs or flashing that was never tied into the wrap.
Reject pressure to sign before inspection. Missing measurements, omitted flashing and an unexplained deposit deserve clarification, not a same-day commitment.
Use the video alongside the written proposals, and require the contractor to explain the details specific to your wall.
Choose the proposal that keeps water moving out at the wrap, flashing and transitions, then puts enough detail on paper to hold the crew accountable.
Storm and Hail Claims for Siding Damage
Filing a claim isn't automatically the sensible next move after hail. A covered repair can still fall below your deductible, and a visible dent isn't automatically covered functional damage.
An insurance-industry warning published through the Des Moines Register describes cosmetic-damage exclusions and wind or hail deductibles potentially ranging from 1% to 5% of insured value, equivalent to $4,000 to $20,000 on a $400,000 home. This is industry-provided reporting, not a neutral government coverage determination; confirm every term against your policy.
Deductible math on a $400,000 home
The table applies those rates to the stated insured value. The last column is only the deductible hurdle, not a guarantee that filing will produce a payment.
| Deductible rate | Out-of-pocket on $400,000 | Claim makes sense when repair estimate is above |
|---|---|---|
| 1% | $4,000 | $4,000 |
| 2% | $8,000 | $8,000 |
| 3% | $12,000 | $12,000 |
| 5% | $20,000 | $20,000 |
Establish coverage before promising yourself a payout
Confirm whether the percentage applies to the dwelling's insured value rather than its market value. Then compare the deductible with the estimate for potentially covered work, not every improvement you'd like completed.
A small repair may be better paid directly. Filing can also become part of your claims history and may affect future underwriting, so ask your agent how an inquiry or claim would be recorded. Don't delay necessary mitigation or miss your policy's reporting requirements while comparing options.
Prepare a clean claim record:
- Photograph before cleanup. Capture whole elevations, close-ups, debris and associated interior damage without climbing onto unsafe surfaces.
- Describe function accurately. Document cracks, holes, displaced panels and compromised attachments separately from appearance-only dents.
- Align the estimates. Ask for quantities, material descriptions, labor operations and affected elevations in a format you can compare with the adjuster's scope.
- Confirm settlement terms. Ask whether payment uses actual cash value or replacement cost, how depreciation applies and what documentation releases any recoverable depreciation.
Matching doesn't guarantee full replacement
An insurer may approve only the damaged elevation. When the original siding is unavailable, policy language and applicable requirements govern whether a comparable substitute is acceptable or broader replacement is owed.
Request the proposed replacement sample and the insurer's written matching determination before authorizing expanded work. Our storm-damage siding repair information can help you frame the inspection request, but neither a contractor's opinion nor an adjuster's initial estimate replaces the policy's terms.
Contract and Warranty Terms to Confirm Before Work Starts
The contract should repeat the chosen estimate's measured scope. A detailed proposal doesn't help if the signed agreement reduces it to siding repairs as discussed.
Keep approved samples, drawings and scope attachments with the signed contract. Require written approval before substitutions, and make sure the company's legal name matches its insurance documentation.
Put responsibilities into the agreement
- Materials and appearance. Specify product, profile, color, trim and any approved substitute, including where a visible mismatch is acceptable.
- Schedule and weather protection. Record start and completion expectations, delay notification and the agreed remedy for avoidable delays. Identify how the crew will protect an opened wall overnight.
- Hidden conditions. Require photographs, a written description and your approval of price changes before additional permanent work proceeds.
- Permits and inspections. Identify who determines permit requirements, obtains permits, schedules inspections and closes them.
- Insurance paperwork. Establish who prepares supplements, who authorizes them and who receives payment, including any mortgage-company endorsement requirements.
Separate workmanship from product coverage
The contractor's warranty addresses installation responsibilities; the manufacturer's warranty addresses qualifying product defects under its terms. Neither should be described as a lifetime guarantee without the actual document.
Use our explanation of what a workmanship warranty covers to frame questions about exclusions, claim procedures and transferability. Obtain the actual project warranty, including what happens if you sell the house.
Tie payments to completed milestones rather than calendar dates. Question large upfront demands, and collect appropriate lien waivers from the contractor and major suppliers as payments are made, using a process consistent with local requirements.
Before final payment, complete a walk-through and written punch list. Require debris removal, a magnet sweep where metal fasteners were used, completion photographs and delivery of warranty documents.
Contract rule: If it isn't in writing, don't treat it as part of the contract.
Schedule Two Siding Inspections This Week
A photograph of damaged siding shows a contractor where to start looking. It reveals nothing about how far moisture has traveled behind the panels, which is why measured inspections beat prices quoted from a picture. Send each candidate the same dated images and location notes so every visit investigates the same concerns.
Start with contractors whose credentials you can verify before the appointment. Keep another qualified candidate in reserve in case the first choice can't produce a clear scope or fit the inspection into your schedule.
Make the booking request specific
Send a concise damage description. Identify the siding material if known, the affected elevation and any interior staining. State whether the problem followed a storm or has returned after previous maintenance.
Request an inspection of the affected assembly. Ask whether the visit covers accessible trim, flashing and drainage conditions, since failed flashing above the visible damage is often where the water got in. Confirm that opening the wall requires separate authorization.
Set the estimate format upfront. Request measured quantities, product identification, exclusions, concealed-damage pricing and payment terms. You shouldn't have to reconstruct the scope from a sales presentation.
Keep claim decisions separate from sales pressure. Compare the proposed covered repair with your deductible and confirm policy requirements before authorizing claim-related commitments.
Two States Exteriors LLC is one candidate to evaluate alongside other house siding repair contractors: the company offers siding installation in Holton, KS, and Kansas City, KS, operates 24/7 for roofing repairs and installations, and is a GAF Certified Contractor. Verify that credential in GAF's contractor directory, and treat it as roofing certification rather than proof of siding-specific qualifications. Our contact form routes requests through Roof Services, Insurance Claims or Siding Installation, which puts your inspection request in front of the right crew.
Judge follow-through by what arrives after the first call: a named contact, a confirmed appointment window and a written response to your request. Contractors know that missed calls lose jobs, and Heyline's contractor answering service comparison shows how they manage that intake. A quick answer gets the appointment on the calendar; the inspection and the written scope determine whether the repair stops the water.
Two States Exteriors LLC offers siding installation and exterior services for homeowners evaluating damaged siding. Visit Two States Exteriors LLC and select Siding Installation or Insurance Claims on the contact form, then send your damage photos and request an inspection that addresses the wall behind the panels.