
You've got three bids on the kitchen table, and they don't agree on anything. One's a single total. One lists vinyl by the square foot. One mentions a water barrier and flashing the other two never bring up. The color samples are the easy part. The hard part is figuring out whether you're comparing the same job at all.
That's where most Kansas City siding decisions go wrong. For context, siding was the reported major outside-wall construction for 48.12 million U.S. housing units in the 2024 U.S. Energy Information Administration Residential Energy Consumption Survey, about 41.4% of the housing stock included. It's a mainstream exterior, which means material choice matters less than how the wall behind it is built. Compare bids line by line on tear-off, barrier, flashing, and drainage, and the right exterior siding installation gets much easier to spot.
Siding Materials Compared by Cost, Lifespan and Hail Resistance
These prices are approximate installed costs and shift with region, labor, stories, and trim work. Use them to narrow your shortlist, not to replace a local line-item bid.
Siding materials at a glance
| Material | Installed cost per sq ft | Typical lifespan | Hail and impact resistance |
|---|---|---|---|
| Vinyl | $3-$8 | 20-40 years | Moderate; can crack under large hail |
| Fiber cement | $7-$14 | 30-50 years | Strong; heavy board that needs periodic repainting |
| Engineered wood | $6-$12 | 15-30 years with sealing | Fair; swells and rots if sealing lapses |
| Aluminum | $4-$9 | 30-50 years | Dents under hail but does not rot |
| Steel | $5-$10 | 40+ years | Good rust resistance; dents show |
What each material trades away
- Vinyl: It's the budget winner and it's light to install, but cold, large hail can crack panels instead of bouncing off. I would put it on a rental duplex or a straightforward single-story where upfront cost rules and individual panels can be swapped after a storm.
- Fiber cement: It's heavy, needs skilled cutting with dust control, and costs more, but it resists rot, fire, and impact better than vinyl. If you're weighing it seriously, read the fiber cement siding pros and cons before you commit to repaint cycles. It suits a two-story long-term home where you'll repaint on schedule.
- Engineered wood: It gives you a natural wood look with more consistency than solid boards, but cut ends and joints must stay sealed. Let that sealing lapse and edges swell. It suits an older bungalow where appearance matters and the owner will inspect joints yearly.
- Aluminum: It doesn't rot and handles moisture well, yet it dents, and dents read clearly in flat light. It suits a home where moisture resistance matters more than a perfect, dent-free face.
- Steel: It resists rust when its coating stays intact and it lasts, but dents also show and scratches need prompt touch-up. It suits an owner who wants metal longevity and accepts visible hail marks as cosmetic.
Don't pick by lifespan alone. A longer rated life only helps if the wall can dry and damaged pieces can be replaced without tearing apart trim and corners.
Decision filter: How much upkeep will you realistically do each year, not in a good year, but in a busy one?
If the honest answer is almost none, cross off anything that depends on perfect sealing. If you'll repaint, inspect caulk, and photograph damage after storms, fiber cement and engineered wood stay in play. That one answer narrows the field faster than color samples do.
What Drives Siding Installation Cost in Kansas City
Start with a national benchmark, then test local bids against it. The average U.S. homeowner paid between USD 11,679 and USD 21,250 to replace existing home siding in 2024, according to Fixr. That's a national figure, so get at least three Kansas City bids and compare them with each other before you treat the range as a target.
Factors that change the siding price
| Cost factor | How it changes the price | Kansas City example |
|---|---|---|
| Wall area and stories | Price scales with square feet; a second story adds lift and scaffolding | Two-story homes with wood trim cost more per square foot |
| Tear-off of old siding | Removing one or two layers adds labor and disposal | Older homes often have two layers |
| Rotted sheathing repair | Replaced boards are billed by the sheet or linear foot | Found only after tear-off; ask for a unit price up front |
| Trim, soffit and fascia | Wood trim replacement adds material and paint | Common on mid-century and older Kansas City homes |
| Windows and doors | Each opening needs flashing and trim detail | More openings means more labor hours |
| Material grade and profile | Premium profiles and textured finishes cost more | Choose a profile that matches the home's style |
| Permits and inspection | Fees and scope depend on the city or county | Confirm with the local building department before work starts |
Why the middle bid can move
Say a single-story house has about 1,600 square feet of wall in a hypothetical example, one layer of old siding to remove, and two windows to reflash. On paper it sits near the middle of the national range. Then tear-off exposes soft sheathing below a bathroom window and at the wall base. Those board replacements, plus new trim and paint, push it toward the top without any upgrade in siding profile.
That's not a contractor trick by itself. Rot often can't be confirmed until the old cladding is off. The protection is a unit price agreed in advance for replacing soft boards, billed by the sheet or linear foot, with photos before anyone covers the repair.
Ask every bidder to split the price into tear-off, sheathing, water barrier, flashing, trim, and cleanup. If one quote bundles those items and another itemizes them, you aren't comparing prices. You're comparing levels of disclosure.
Why the Water Barrier Behind Siding Matters More Than Color
Think of siding as an umbrella, not a sealed box. It sheds most rain, but it doesn't stop all of it. Building Science Corporation guidance on moisture control states that all exterior claddings allow some rain penetration, so installers should create a continuous water-resistive barrier, or WRB, behind the siding and connect it with flashings at windows, doors, wall bases, roof intersections, and penetrations.
Barrier sheets should be shingle-lapped so upper layers drain over lower layers, or joints should be sealed in a barrier-style installation. That overlap direction is not cosmetic. A reverse lap funnels water behind the sheet below it.
The crew installs that barrier before the visible siding goes on, and this is your one chance to inspect it easily.
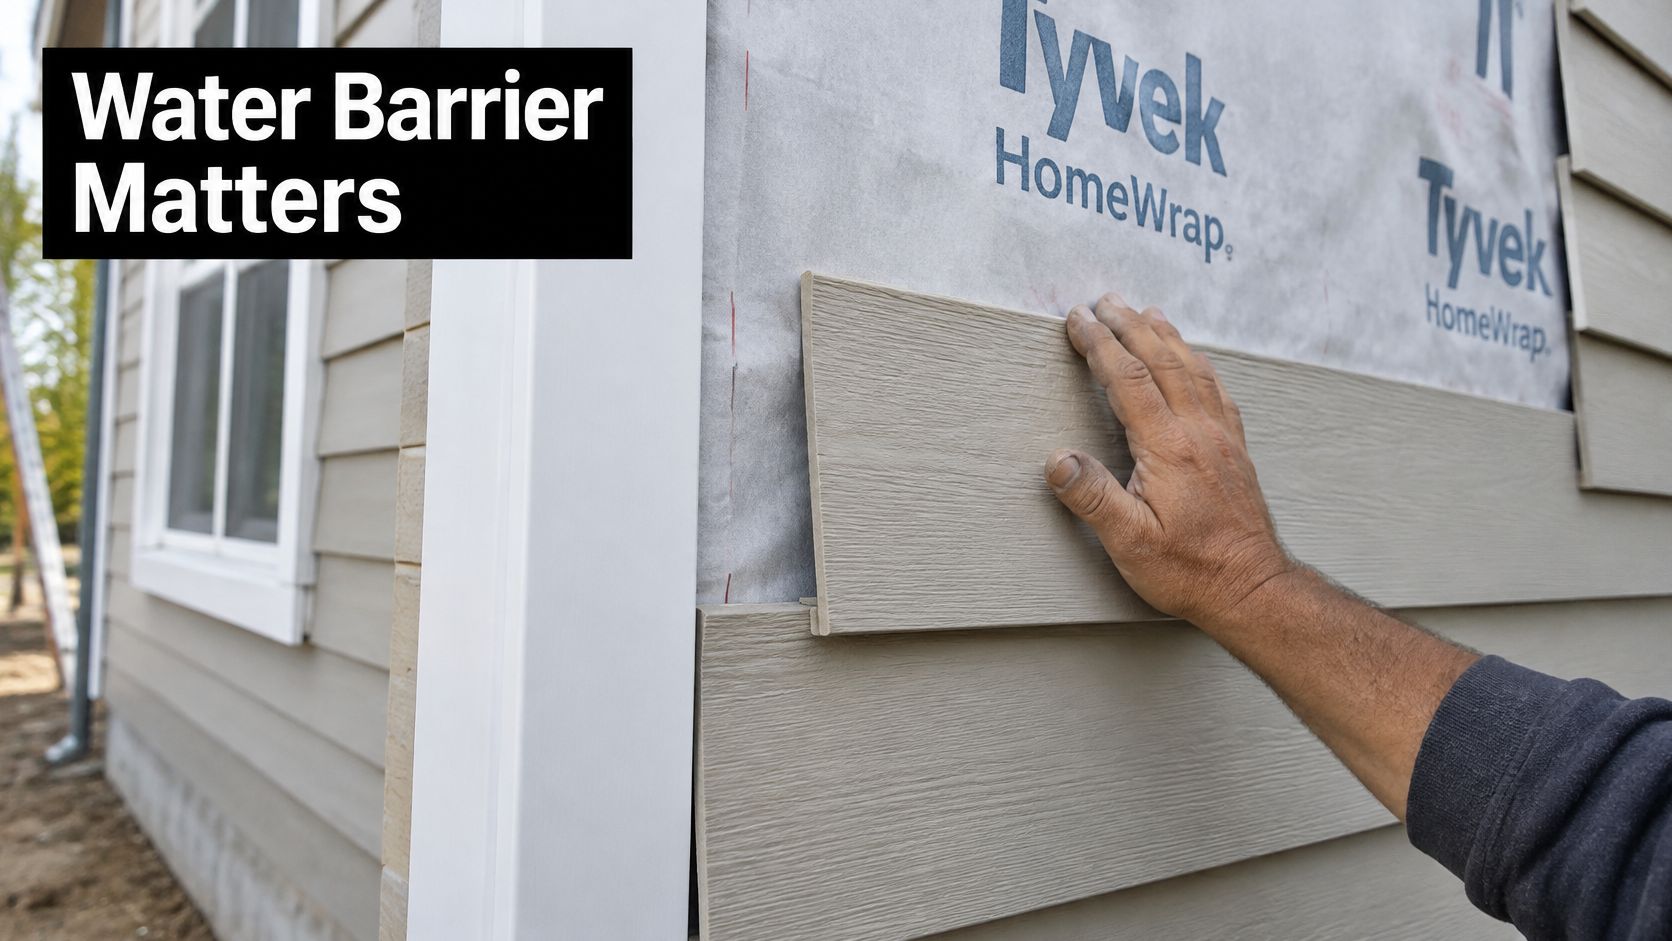
When continuity breaks, water reaches the sheathing and wall cavity. Repeated wetting raises the risk of wood decay, corrosion, insulation degradation, and interior moisture damage. In Kansas City, wind-driven rain pushes water sideways into joints, and freeze-thaw cycles widen small cracks so the next storm gets in easier.
Siding sheds water, and the barrier behind it keeps water from reaching the wall.
Separate immediate repairs from watch items
Before siding covers the wall, photograph exposed sheathing and flashing from several angles. Photograph each window corner, door head, wall base, and roof-to-wall joint. Those photos become your record if a leak shows up later.
- Repair now: Soft trim, staining below windows, peeling paint at the wall base, and missing or unlapped flashing point to water already moving where it shouldn't.
- Monitor: Hairline caulk cracks and faded finish are usually maintenance items, unless they're paired with soft wood or staining.
- Check the sequence: Lower flashings should drain outward, window and door flashing should integrate with the WRB, and penetrations should be sealed without blocking drainage paths.
A faded panel is cosmetic siding damage. A failed drainage plane is different, because it lets water sit against sheathing storm after storm. Only the second one drives wall rot, and fresh siding over it hides the problem instead of fixing it.
How to Vet a Contractor and Compare Siding Estimates
Verify credentials before you discuss deposits. You need a current license for the work and the city, proof of liability insurance and bonding, manufacturer certification for the chosen product, and references from recent local jobs. We're licensed, bonded and insured, and any bidder you consider should hand you the same paper without being chased.
Keep the two warranties separate. A product warranty covers manufacturing defects in the siding itself. A workmanship warranty covers the installation, including flashing, fastening, andlaps. A long product warranty doesn't rescue a wall that was flashed backward.
Use this visual checklist when you line up the paperwork.

Ask every bidder the same questions
Some contractors use tools such as Exayard roofing estimating software to organize measurements and line items. Software doesn't make an estimate honest, but it can make missing items easier to spot when each cost sits on its own line.
Require separate lines for:
- Full tear-off: How many layers come off, and where does disposal sit in the price?
- Sheathing allowance: What's the unit price for replacing soft boards, and who approves extra sheets?
- Water-resistive barrier: Which product, how are laps handled, and is tape or sealant specified?
- Flashing: Is new flashing included at every window and door, plus kick-out flashing where a roof meets a wall?
- Drainage: Is furring or a drainage mat included where the product calls for it?
- Trim and cleanup: Are corner boards, soffit, fascia, caulk, and debris removal priced separately?
Drainage questions change by material. Building Science Corporation guidance on drainage planes explains that a drainage plane cannot function effectively unless a space exists between the WRB and cladding, and it recommends vertical furring or a drainage mat for wood and fiber-cement siding to form a drained cavity. For stucco, that guidance identifies a minimum 3/16-inch space or a drainage layer with at least 90% drainage efficiency under ASTM E2273 or ASTM E2925. Vinyl and aluminum generally have more pronounced rear drainage geometry, but installers must still preserve drainage openings and avoid sealing the bottom edge.
If you're also sorting repair work from full replacement, the same line-item test applies to house siding repair contractors. A repair quote should name the wall area, the flashing detail, and whether sheathing inspection is included.
Red flags are plain. No written scope, a large deposit before work starts, refusal to show insurance, and a price far below every other bid all point to missing scope or risk you'll carry later. Require every change order in writing before repairs proceed, with a price and a photo of the condition that caused it.
Preparing Your Home, Permits and Insurance Claims
Prep in this order: site first, approvals second, insurance record throughout. If you reverse it, you'll schedule a crew before you know whether the color is even allowed.
Clear the work area
Move patio furniture, grills, planters, and hoses away from the walls. Trim branches that touch the siding so the crew can set ladders and lift panels without forcing material through shrubs. Remove shutters and light fixtures only if the crew asks, and label where each one came from.
Tell the crew lead where vehicles should park, which gate pets use, and where a dumpster can sit without blocking a driveway you need. Inside, take fragile items off exterior walls. Hammering and panel removal travel through framing more than many homeowners expect.
Confirm permits and neighborhood rules
Check with your city or county building department whether exterior replacement needs a permit, and ask the contractor who pulls it and schedules inspections. Don't assume the contractor handled it because the start date is set. Get the permit number if one is required.
If the house sits in an HOA, confirm color, profile, and material rules before ordering. A rejected color after delivery costs return fees and time that nobody budgeted.
Document storm damage before anyone repairs it
If hail or wind caused the work, photograph damage from several angles, keep the date and a weather report, and write down every adjuster conversation with names and times. Detailed notes on siding damage from hail help you distinguish cracked panels, dents, and loose trim before pieces get thrown away.
Insurance usually pays for storm damage repair, not upgrades like a new color or a better profile. Keep the repair scope and the upgrade scope on separate lines so you know which dollars are yours. Get the contractor's written scope in hand before the adjuster's visit, and never sign over claim payment before you read the terms.
Print-ready prep list: clear walls, label fixtures, assign parking and pet areas, confirm permit ownership, confirm HOA approval, photograph damage, save the storm date, and file the written scope.
How a Siding Installation Unfolds From Tear-Off to Cleanup
A clean process has a visible order. If panels go up before you ever see barrier or flashing, the order is already wrong.
Follow the sequence at a glance first, then use the numbered checks below on site.
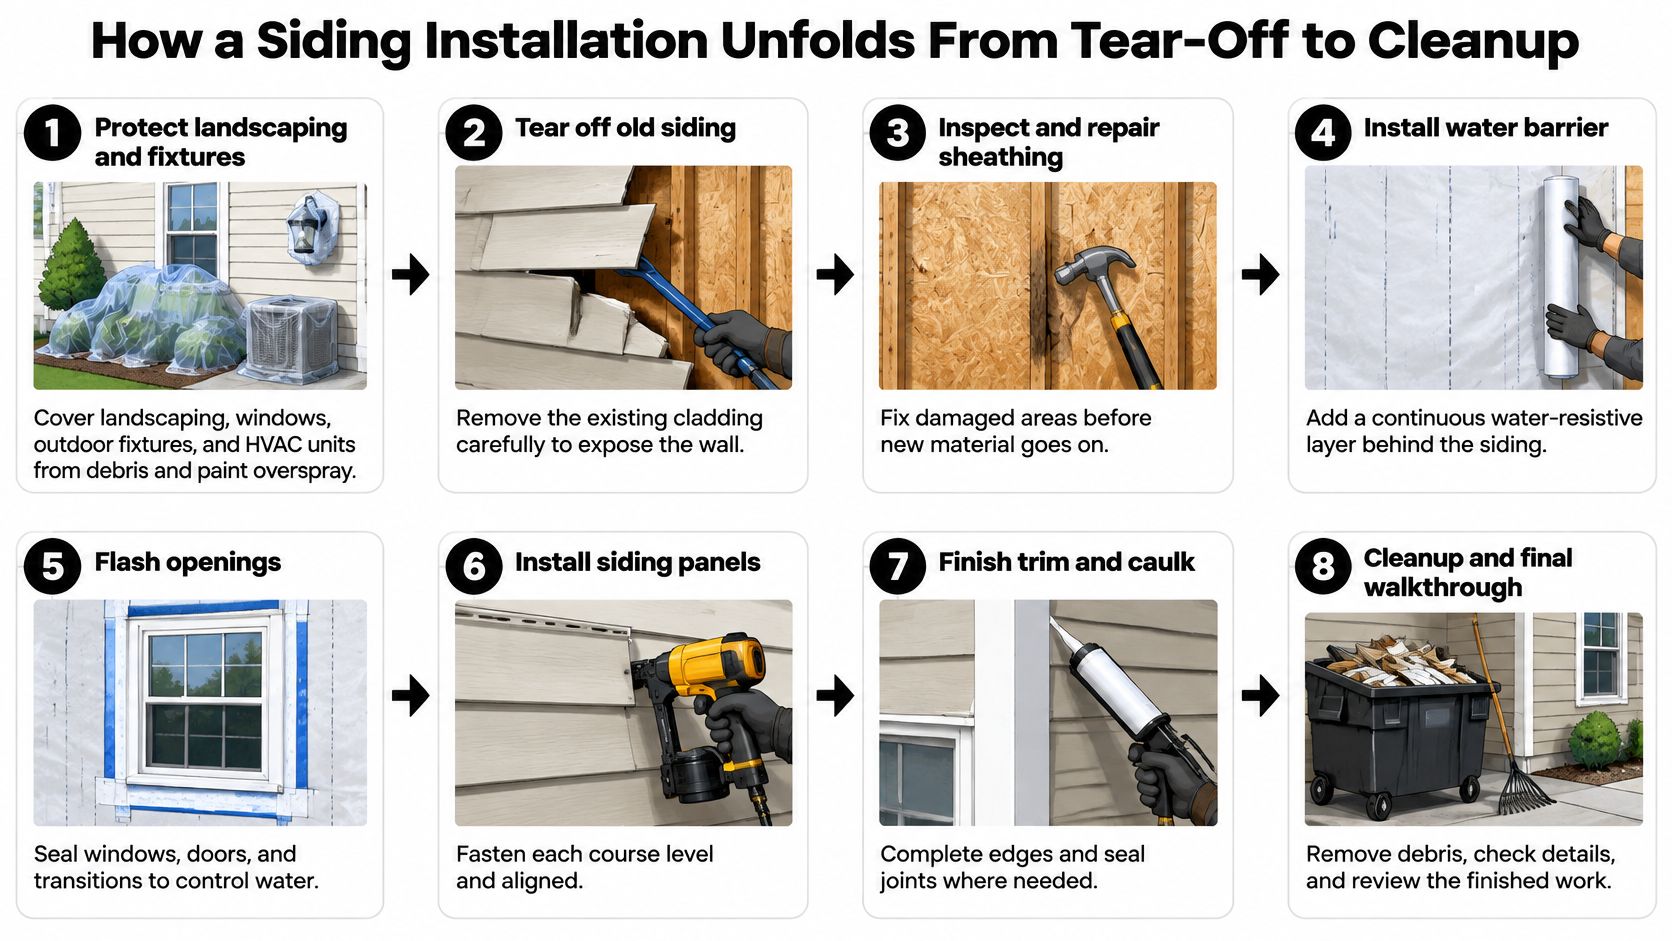
- Protect the site. The crew covers landscaping, windows, outdoor fixtures, and HVAC units so debris and paint overspray don't create a second repair list.
- Remove old siding. Workers pull old cladding, trim, and loose fasteners to expose sheathing. Fasteners left proud will telegraph through new panels or puncture barrier material.
- Inspect and repair sheathing. Soft, delaminated, or moldy boards come out before anything new goes on. HomeFixx's installation guide reports that a typical replacement may take 5 to 10 working days because preparation and weather-barrier work are often underestimated.
- Install barrier and flashing bottom-up. Each layer sheds water over the one below it, and flashing at openings ties into the barrier instead of sitting on top as decoration.
- Add drainage where specified. Furring strips or a drainage mat create the path for water that gets behind cladding to exit at the base.
- Set starter strip, panels, and trim. Crews keep courses level and leave expansion gaps for vinyl and aluminum, because both move with temperature and buckle when pinned tight.
- Seal penetrations and recheck openings. Vents, faucets, light blocks, windows, and doors get sealed or flashed without closing drainage exits.
- Clean up and walk the job. You walk the property with the crew lead, run a magnet sweep for nails, and collect product and warranty paperwork before final payment.
This short video helps you picture panel handling and pace before your own crew arrives.
At the end of each day, you should see exposed sheathing covered by barrier, debris cleared, materials stacked off the ground, and a written note for any scope change. Concealed sheathing damage and incomplete flashing can expand scope and schedule after tear-off, especially on older Kansas City homes. Weather delays happen. Silent scope changes shouldn't.
Before and After Siding Replacements in Kansas City
These are composite examples drawn from typical local conditions, not documented client jobs. Each one shows the same pattern: the visible siding wasn't the main cost driver.
Composite 1 a 1950s bungalow with two layers
Before, bubbled paint and a musty smell showed up along the kitchen wall, but the outer layer looked mostly intact. After tear-off removed two layers, soft sheathing appeared beneath that wall. The crew replaced boards, installed a new barrier, reflashed the back door, and clad the wall in fiber cement.
The cost driver was sheathing and double tear-off, and the schedule gained time for board replacement and drying checks. Lesson: a musty smell is a wall symptom, not a paint problem. Photograph the exposed sheathing before the new barrier covers it.
Composite 2 a two-story vinyl home after hail
Before, hail-cracked panels covered the south and west elevations, while the first insurance scope listed only scattered panel replacement. After, a written scope covered full elevation replacement and new flashing at every window on those walls, with dated photos logged for the adjuster.
The cost driver was elevation-wide labor and flashing detail, not panel price alone, and the schedule depended on adjuster approval before ordering. Lesson: matching discontinued profiles across a whole elevation changes the job. Get the scope settled before materials arrive.
Composite 3 a rental duplex with yearly caulk patches
Before, the owner patched caulk below two windows every year and repainted the stain. After tear-off showed original flashing was missing, the fix became a continuous barrier, new sill flashing, and drainage furring so water could exit instead of sitting behind trim. Staining stopped because the water path changed.
The cost driver was flashing labor at two openings, and the schedule barely moved because sheathing was caught before rot spread wider. Lesson: recurring caulk failure usually means caulk is doing flashing's job. Replace the detail, not just the bead.
Maintenance Schedule That Protects Siding Through Kansas City Weather
Siding doesn't need heavy projects every season. It needs small checks before water, sun, and overflow turn a joint into a repair. Put dates on a calendar and log each visit with photos from the same spots.
Siding maintenance schedule
| Task | How often | Why it matters in Kansas City |
|---|---|---|
| Rinse siding and wipe down | Twice a year | Removes road salt, grime and mildew that hold moisture |
| Check caulk at windows, doors and trim | Every year | Failed caulk lets wind-driven rain behind the cladding |
| Clear gutters and downspouts | Spring and fall | Overflow wets the wall base |
| Inspect for hail dents, cracks and loose panels | After every hailstorm | Early damage is cheaper to fix and easier to claim |
| Check bottom edge and vent openings | Yearly | Blocked openings trap water that should drain out |
| Repaint or reseal wood and fiber cement | Every 5-10 years, per product | Coatings slow damage from freeze-thaw cycles and sun |
How to do the checks without causing damage
Rinse with a garden hose and a soft brush, working top-down. Don't aim a pressure washer upward into laps, because you'll drive water exactly where the wall is trying to shed it. Mild detergent handles road grime and mildew on most surfaces.
Check caulk with your eyes and a fingertip. Cracks, separation from trim, and hard, crumbly beads mean it's time to remove and replace that joint, not smear new caulk over old. Focus on window heads, door trim, corner boards, and penetrations for vents and faucets.
Gutters matter to siding more than people think. Overflow dumps water at the wall base, splashes soil onto the bottom course, and keeps the lowest trim wet after every rain. Clear downspout elbows too, since a clean gutter with a plugged elbow still overflows.
After hail, walk the south and west walls first, then check soft metals like vents and fascia for dents that prove impact size. Photograph cracks, chips, and loose panels with a coin or ruler for scale. That record helps whether you file a claim or pay for a small panel replacement yourself.
Freeze-thaw cycles and summer sun shorten coating life, so wood and fiber cement need repainting or resealing on the product schedule, often in that 5 to 10 year window in the table. If coating peels early on one wall, check for trapped moisture behind it before you blame paint quality.
Confirm Your Estimate Before You Sign a Siding Contract
Don't sign the lowest total. Sign the estimate you can audit after tear-off exposes the wall.
- Pick two or three materials that fit your upkeep. Use the comparison to match hail exposure, repaint willingness, and budget. If nobody in the household will inspect sealant, remove options that punish neglect.
- Request the same written, line-item estimate from each bidder. It should show tear-off, sheathing unit price, barrier, flashing at openings, drainage detail, trim, permits, and cleanup. Confirm licensing, insurance, and bonding before you compare totals, and reject any scope you have to interpret from a verbal promise.
- Book an on-site inspection before signing. The contractor should check sheathing clues, soft trim, window staining, wall bases, and roof-to-wall joints in person. That visit won't reveal everything hidden, but it reduces surprise change orders because likely repair areas get priced as unit costs.
You can ask Two States Exteriors LLC for the same documents and a line-item estimate for exterior siding installation. We offer siding installation in Holton, KS and Kansas City, KS, and we're licensed, bonded and insured. Ask us, and every other bidder, to put the barrier product, flashing scope, drainage gap, and sheathing unit price in writing.
Sign the estimate that shows the water barrier, flashing and drainage details clearly, even when it is not the cheapest.
That rule protects you because cheap jobs usually fail in concealed places. Clear details let you hold the crew to the wall assembly you paid for, not just the color you picked.
Two States Exteriors LLC offers siding installation for Kansas City area homeowners who want the barrier, flashing, and drainage details spelled out before work starts. Visit Two States Exteriors LLC to request an on-site inspection and a written, line-item estimate you can compare against any other bid. Bring your photos, your questions, and your maintenance limits, and we'll price the wall assembly that fits them.