
The rain has stopped in Kansas City, but the brown ring on your ceiling keeps growing. You check the shingles from the driveway and they look fine, so you grab a tube of sealant and wonder where to put it. Don't. That stain is a symptom, not a diagnosis, and smearing caulk over the nearest joint is how a manageable roof flashing repair turns into rotted decking and wet insulation.
Why Roof Flashing Repair Requires a Closer Look
A homeowner in Liberty calls after wind-driven rain because water is dripping from a bedroom light fixture. The fixture sits nowhere near a chimney or vent. That disconnect is normal. Water enters at a failed transition, travels along decking, framing, or underlayment, and shows up where gravity and a ceiling penetration finally give it an exit.
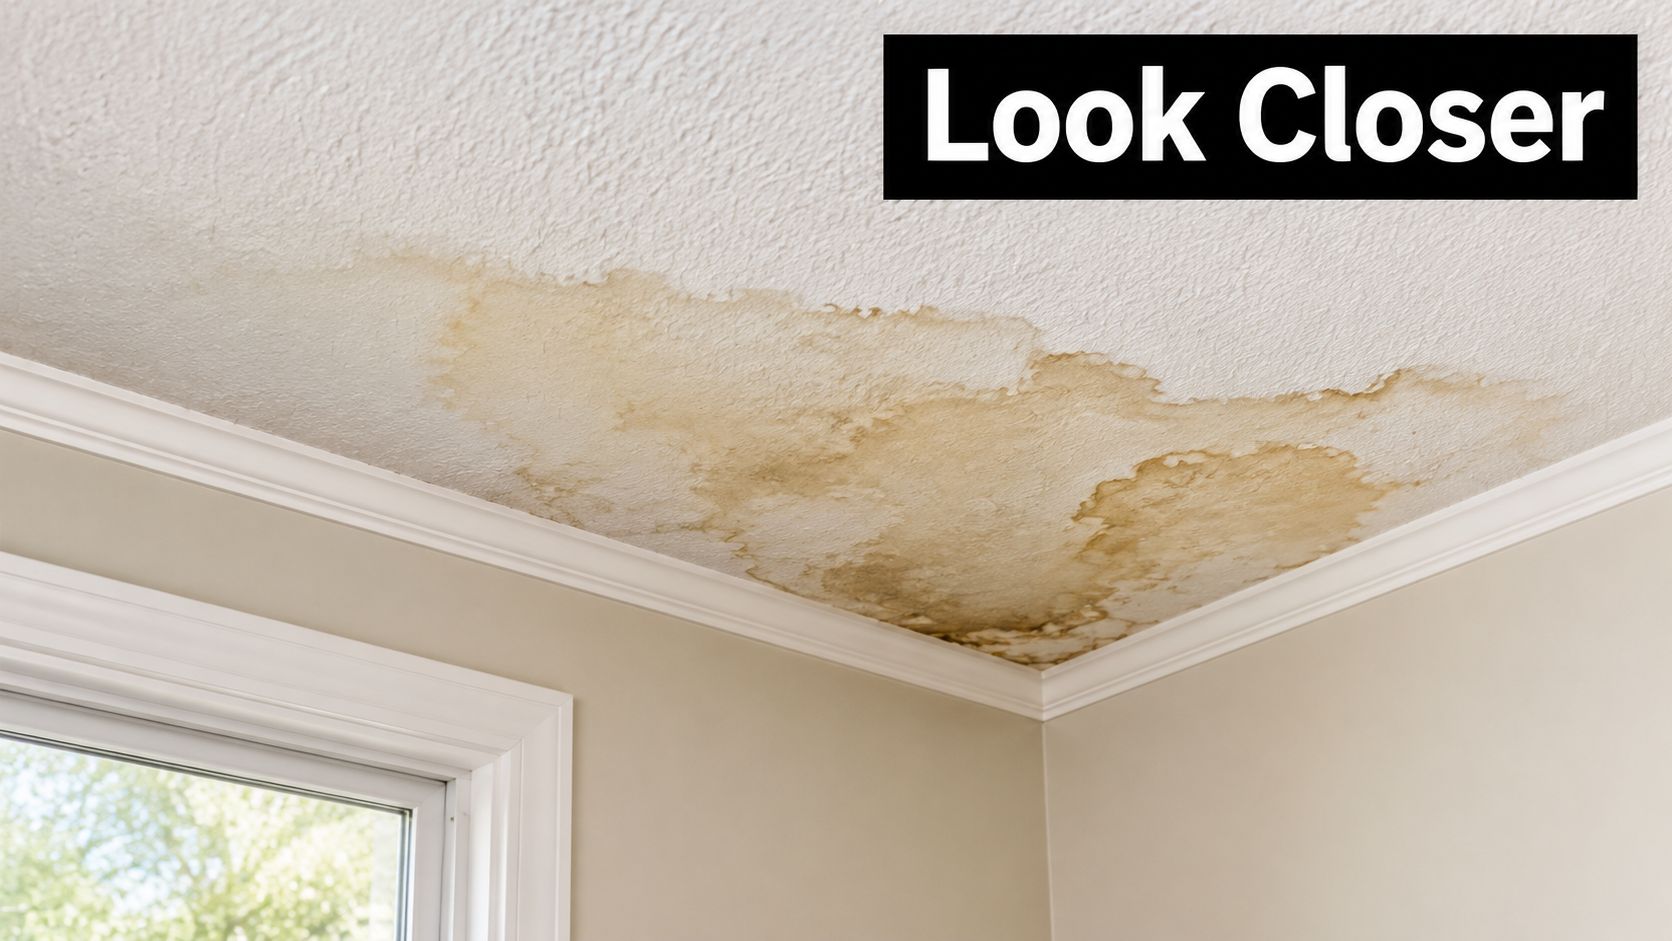
Flashing is the material that protects places where the roof meets walls, chimneys, skylights, parapets, dormers, vents, and other penetrations. Its job isn't to plug a hole. It's to direct water over the roof covering and toward drainage, never behind it. A flat roof field sheds water predictably. A transition interrupts that flow, and that's where trouble starts.
This isn't a new insight or a cosmetic trade. The National Roofing Contractors Association published its first technical manual in 1969 and later expanded it into multi-volume guidance covering architectural metal flashing, joinery, coatings, and material compatibility. Flashing has been treated as a specialized discipline for decades because the details are unforgiving.
Why a Small Gap Causes Outsized Damage
Historical failure data makes the point bluntly. In a Southern California study of 163 roof leaks, 68% were flashing-related compared with 13% from membrane leaks, and separate Factory Mutual data tied 85 of 145 failures to inadequate perimeter flashing. Those figures come largely from commercial and low-slope work, but the lesson transfers directly to your house. Transitions fail first.
A bead of sealant over a wrongly lapped joint doesn't fix drainage. It hides the evidence while water keeps moving underneath.
A durable repair restores the whole assembly. That means flashing integrated with shingles or membrane, sound underlayment beneath it, and a substrate that isn't already soft. Your path is straightforward: identify the detail, control active water, inspect what's concealed, repair in the correct sequence, and document storm damage before anyone disturbs materials.
Common Roof Flashing Types and Failure Signs
You can't choose a repair until you know which detail you're looking at. Start from the roof covering and work outward to every place the plane changes direction or something pokes through it.
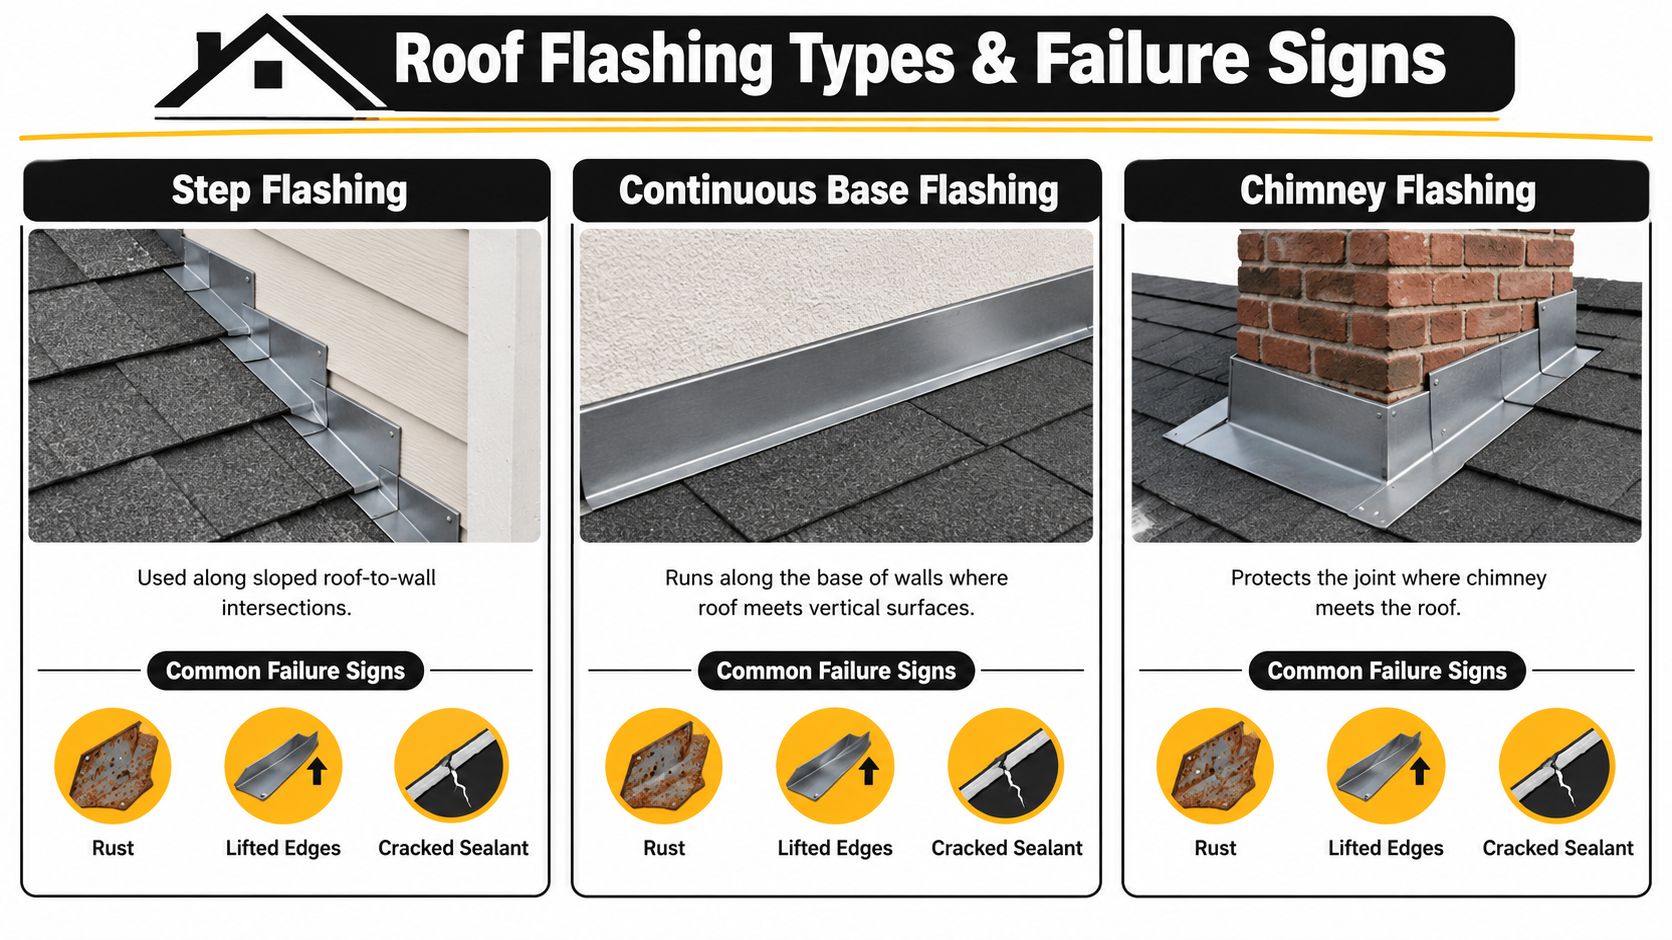
Step flashing runs where a sloped roof meets a vertical wall, at dormers and sidewalls. Individual L-shaped pieces layer with each shingle course so water steps down and out. If you're unsure how that layering works, review how step flashing is installed on a roof before you lift anything. Lifted shingles along a wall, visible gaps, or a stain that appears only during sideways rain point here.
Counterflashing is a separate piece, often set into masonry, that caps and sheds water over the step or base flashing below it. Homeowners miss this distinction constantly. Replacing step flashing while leaving cracked, separated counterflashing in a chimney joint solves nothing. Look for open mortar joints, loose metal edges, and sealant that's split away from brick.
Penetrations, Valleys, and Edges
- Pipe boots and collars: These seal plumbing vents and similar penetrations. A rust-colored streak below a vent or a cracked, brittle boot collar is a classic tell.
- Chimney and skylight flashing: These wrap all sides of an opening, including a head detail upslope that diverts water around it. Stains in ceiling corners beside a chimney chase usually start here.
- Valley metal: Valleys concentrate runoff from two slopes, so debris, displaced shingles, or corroded metal here moves a lot of water fast.
- Parapet and coping flashing: On low-slope sections and porches, failed coping joints let water behind wall assemblies where you won't see it until damage is advanced.
The video below walks through how these pieces fit together on an actual roof, which helps before you start matching symptoms to locations.
Treat every surface crack as a question, not an answer. Separated sealant might be the whole problem, or it might sit over torn underlayment and punky decking. You won't know until you look beneath the finish layer, which is why diagnosis comes before any repair material touches the roof.
Diagnose the Leak Before Opening the Roof
Gather evidence from inside first, where it's safe and dry. Note exactly when dripping occurs. A leak that appears only with wind from one direction points toward a wall transition or counterflashing joint. A leak in every steady rain suggests an opening in the direct drainage path, such as a split boot or a valley problem.
Check accessible attic space if you can do it safely. You're looking for damp insulation, dark staining on the underside of decking, and musty odor upslope of the ceiling stain. Mark the stain location, then measure its position relative to exterior walls so you can correlate it with roof features above.
Match the Symptom to the Likely Detail
| Interior or Exterior Sign | First Detail to Inspect |
|---|---|
| Stain beside a chimney chase | Counterflashing, step flashing, mortar joints |
| Drip below a bathroom | Plumbing vent boot or collar |
| Stain along an exterior wall | Step flashing at the roof-to-wall joint |
| Wet spot under a slope intersection | Valley metal and adjacent shingles |
| Stain ringing a skylight | Skylight curb and perimeter flashing |
Federal building guidance supports this wider search pattern. Guidance hosted through the Building America Solution Center emphasizes inspecting transitions, penetrations, curbs, walls, skylights, and drains rather than focusing only on the interior stain. That wider net matters because water rarely drops straight down.
Inspect From the Ground Before You Climb
Use binoculars from the yard after rain. Look for lifted or displaced shingles near transitions, rust streaks, separated sealant, and debris damming a valley. Shaded details stay wet longer and reveal active paths you'd miss at noon. If the pattern doesn't add up, a structured roof leak detection inspection will trace the water path before materials get torn apart guessing.
Practical rule: If you can't explain how water gets from the suspected opening to the ceiling stain, you haven't found the leak yet.
Finally, judge the scope accurately. One failed boot on a sound roof is a localized defect. Widespread corrosion, multiple active leaks, soft decking, or failing shingles around every transition signals a broader failure. That distinction drives every decision that follows, including whether you should be on the roof at all.
Perform a Durable DIY Flashing Repair
Work only in dry weather, on a roof you can access safely, with a stable ladder and someone on the ground who knows you're up there. If the slope, height, or surface condition makes you hesitate, stop. No flashing detail is worth a fall, and wet or icy shingles give you no margin.
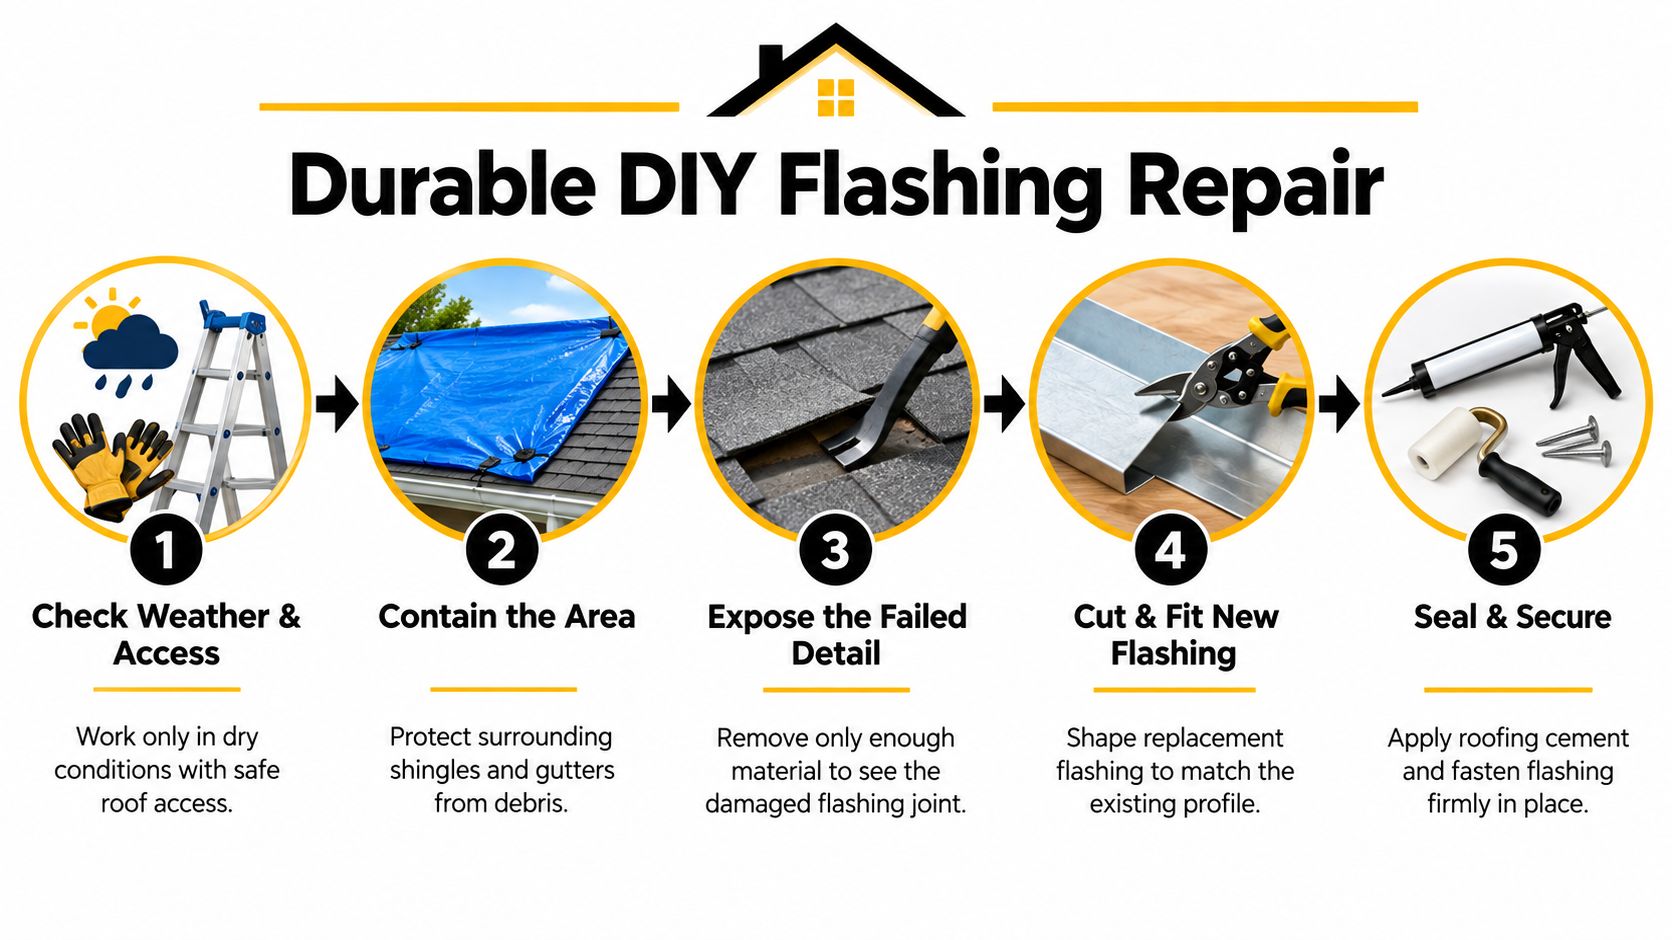
Expose only enough of the failed detail to see the cause. Lift surrounding shingles carefully with a flat pry bar, preserving sound pieces for reinstallation. What you find underneath decides the job. Torn underlayment, deteriorated decking, or framing damage must be repaired first, because new flashing over a failed substrate just traps the problem under fresh metal.
Rebuild the Layers in Drainage Order
Remove failed or incompatible material completely. Old roofing cement, mismatched metals, and cracked sealant don't become reliable because you covered them. Clean and dry every bonding surface with a wire brush, then repair the substrate so fasteners hold.
Install corrosion-resistant metal and compatible self-adhered flashing membrane in a shingle-style sequence. The rule is absolute: upslope layers drain over downslope layers, and the roof covering laps the flashing without blocking drainage. Reverse one lap and you've built a funnel into the assembly instead of a shed over it.
Code-based guidance for these details specifies corrosion-resistant flashing material with fasteners no more than 6 inches on center along edges unless a more restrictive requirement applies. Follow your local code and the manufacturer's instructions where they're stricter.
Pipe Penetrations Need a Tight Collar
Around pipes, form the membrane collar snugly against the pipe and overlap it onto the fully adhered downslope membrane. Then install the manufactured boot or metal counterflashing exactly as its instructions direct. A loose collar that relies on sealant to bridge the gap will open up with thermal movement, and Kansas City temperature swings guarantee that movement.
- Fasten correctly: Keep fasteners out of the direct water path where the detail allows, and respect the spacing limit noted above.
- Seal last: Compatible sealant finishes a correctly lapped joint. It never substitutes for one.
- Check compatibility: Dissimilar metals in contact invite galvanic corrosion, so match or isolate materials.
Verify before you call it done. Water-test the repaired detail with a hose, starting low and working upslope while someone watches inside. Then inspect the interior again after the next real rainfall. A repair you haven't tested is a hypothesis, and you'll pay for the experiment if it's wrong.
Handle Emergencies and Know When a Patch Is Temporary
Active water coming through a ceiling changes your priorities. Protect people and belongings first. Move furniture, set containers under drips, and relieve a bulging ceiling pocket of water carefully if it's sagging. Interior damage control buys you time to make a sound roof decision instead of a panicked one.
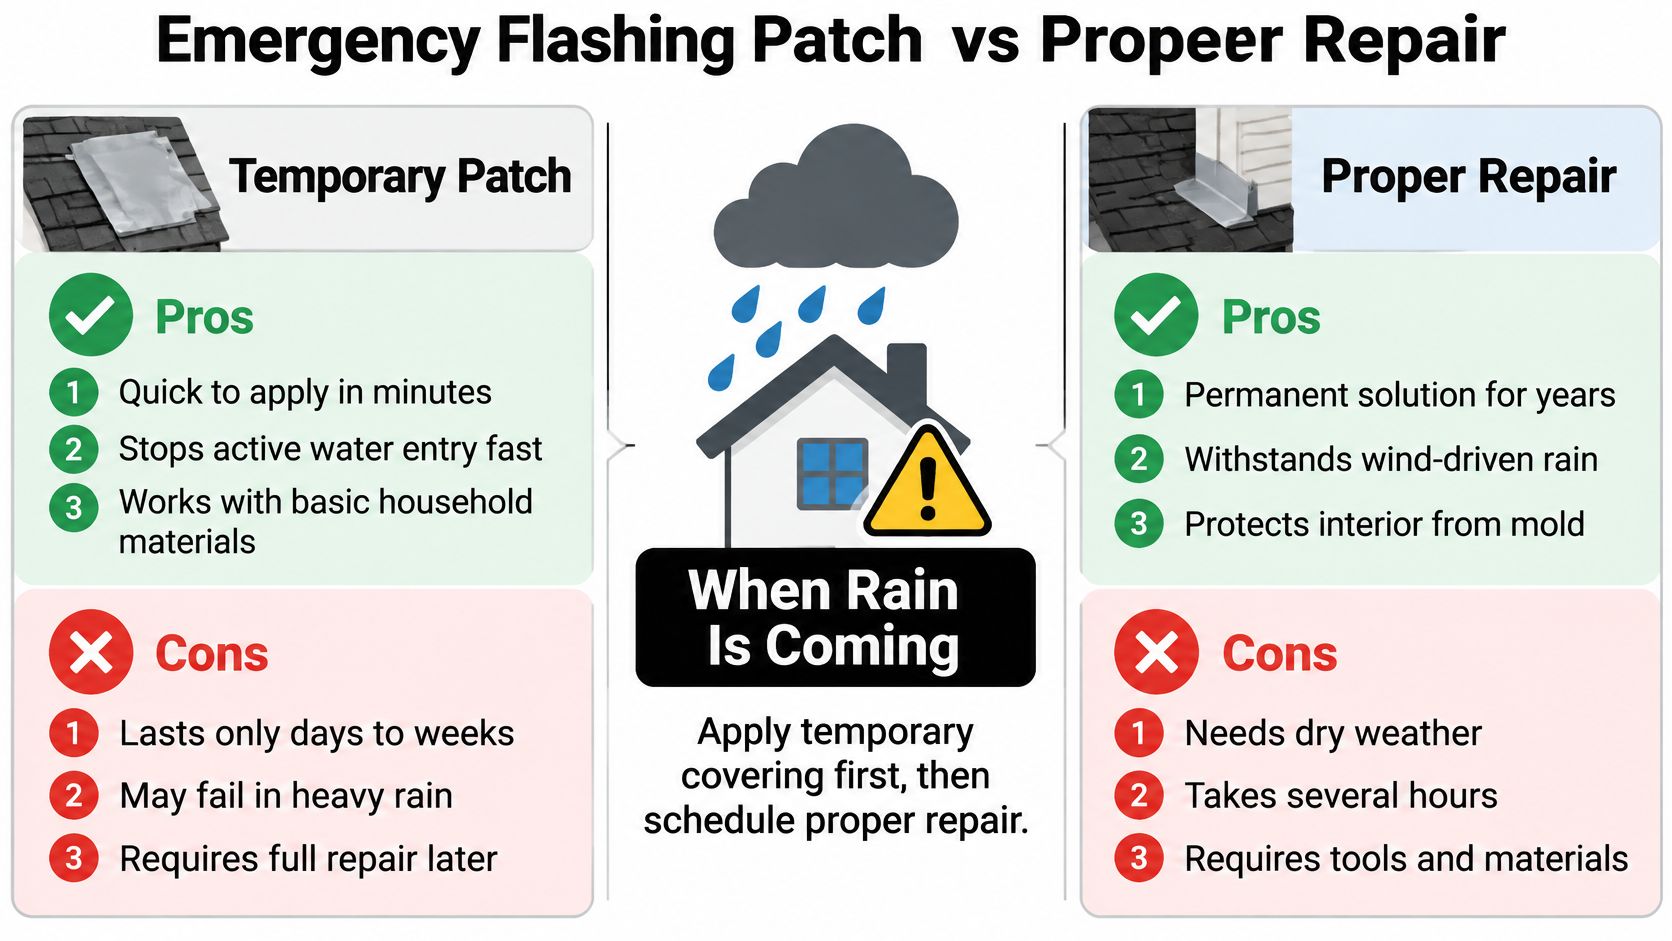
A properly secured temporary covering over a lifted flashing section can shed water until conditions allow real work. That's legitimate emergency protection. What's not legitimate is troweling roofing cement over a wet, dirty joint in the rain and treating the job as finished. Exposed cement can mask a missing lap, incompatible metal, or failed substrate while the drainage geometry stays wrong underneath.
Two Scenarios, Two Different Answers
A single cracked pipe boot on a low, accessible roof with sound surrounding shingles justifies prompt permanent replacement in dry weather. It's localized, the drainage sequence is simple, and verification is easy. That's a reasonable homeowner repair if you're competent on a ladder.
An opening along a steep roof-to-wall transition is different. Correcting it may require removing shingle courses and siding or cutting into masonry, all while working at height. Cover it temporarily if you can do so safely from a ladder, then schedule the permanent repair. Don't climb onto a wet, steep surface because rain is forecast.
A temporary patch earns its keep by protecting the house until the real repair. The moment you start trusting it as the repair, it's costing you money.
Emergency Do and Don't List
- Do photograph everything: Capture the damaged flashing, interior stains, and affected rooms before temporary work or cleanup.
- Do dry the interior: Ventilate and remove wet materials that will hold moisture against framing.
- Don't seal blindly: Caulk over an undiagnosed joint destroys evidence your contractor or adjuster needs.
- Don't delay verification: Book the permanent inspection while the temporary cover is still fresh.
Choose Repair, Replacement, or a Licensed Contractor
Stop thinking in terms of price per leak. Cost follows documented scope: access and safety setup, flashing removal, substrate and underlayment repair, new material, masonry or siding work, cleanup, and verification. A cheap quote that skips the substrate line isn't cheaper. It's incomplete.
| Observed Evidence | Likely Scope | Recommended Next Action |
|---|---|---|
| One cracked boot, sound shingles and decking | Localized replacement | Repair in dry weather, then water-test |
| Separated counterflashing, sound step flashing | Joint and masonry repair | Rebuild the counterflashing detail |
| Rust through metal at several transitions | Broad flashing replacement | Get a written contractor scope |
| Soft decking or wet insulation found | Substrate repair plus re-flashing | Open, dry, and repair before closing |
| Repeated leaks after prior patches | Incorrect drainage sequence | Full detail rebuild, not more sealant |
| Multiple leaks, aged and failing roof covering | Possible roof replacement | Compare remaining roof life first |
Replacement of the flashing makes sense when metal is corroded through, laps were installed backward, or the same detail keeps leaking after honest repairs. Full roof replacement enters the conversation when the covering around the flashing can't be removed and reinstalled without crumbling, or when failures are spread across the whole system. One bad penetration on an otherwise healthy roof doesn't justify a new roof, and any contractor who jumps straight there owes you evidence.
Safety and Licensing Thresholds
Don't walk steep, wet, icy, high, or visibly unstable roofs. Don't remove shingles or open masonry joints if you don't know what's beneath them or how the layers rebuild. The moment concealed damage extends beyond a small, contained area, you're outside DIY territory.
For Kansas City metro work, verify that your contractor is licensed, bonded, and insured for the Kansas or Missouri side where your property sits, and get the scope in writing before work starts. If you're comparing bids, guidance on how to choose a roofing contractor will help you separate a documented assembly repair from a vague promise to stop the leak. Require photos of concealed conditions and a water test in the scope. Contractors who document their work rarely fear verification.
Document Storm Damage and Finish With a Durable Result
Insurance coverage turns on cause and policy language, not on the mere fact that flashing is damaged. A storm-created opening from wind, hail, or a falling limb is a different claim conversation than corrosion, age, poor maintenance, or freeze-thaw wear. Don't let anyone promise you reimbursement before that distinction is documented.
Photograph everything before temporary work or cleanup: the damaged flashing, surrounding roof covering, interior stains, exposed substrate if the area is opened, and every affected room. Record measurements of damaged flashing, keep records of prior repairs, and get a written cause-of-loss opinion. Note whether a code-compliant repair requires disturbing adjacent shingles, underlayment, masonry, or decking, because adjusters scope what they can see and document.
Read Your Policy Before You Argue With It
The National Roofing Contractors Association notes that coverage for code-required upgrades depends on whether the policy includes ordinance-or-law language, and required upgrades can otherwise become a nonreimbursable homeowner expense. That matters when storm repairs expose older construction that predates current flashing or drip-edge requirements in your municipality.
Review your replacement-cost or actual-cash-value terms, deductible, matching provisions, and ordinance-or-law coverage directly in the policy. A denied flashing line item doesn't automatically mean the leak is unrelated to a covered storm. It may mean causation or code-upgrade treatment wasn't documented clearly enough, and clear documentation is something you control.
Your Finished Repair Checklist
- Drainage sequence restored: Every upslope layer drains over the layer below it.
- Compatible materials installed: Metals and membranes won't corrode or debond against each other.
- Substrate repaired: Decking and underlayment beneath the flashing are sound and dry.
- Performance verified: The detail passed a water test and an interior check after rainfall.
- File complete: Photos, measurements, invoices, and monitoring notes are saved together.
Monitor the repaired detail through the next few storms and after freeze-thaw cycles. Small movement at transitions is normal, but new staining, odor, or separated sealant means you reopen the investigation early while the fix is still small.
If your flashing leak involves steep access, concealed deck damage, masonry counterflashing, or a storm claim that needs documented scope and photos, Two States Exteriors LLC provides free on-site inspections, detailed written project plans, and end-to-end insurance claim support for Kansas City metro homes on both the Kansas and Missouri sides. Their licensed, bonded, and insured crews handle roof repair and replacement with a No Money Upfront policy and 24/7 emergency availability, so you can request an inspection today and get a clear, documented plan before committing to the work.