
If you're staring at a wall that needs new siding, you're probably thinking about boards, nails, and color. Fair enough. But with Hardie, that mindset gets people in trouble.
A good Hardie job is a moisture-management system first and a siding install second. The boards matter. The finish matters. But the long-term success of the wall usually comes down to the details most quick how-tos skip: where water exits, how cut edges get treated, whether clearances are maintained, and whether flashing was installed like someone expected rain to hit the house sideways.
James Hardie treats installation as a living technical standard, not a one-time pamphlet. The company keeps a centralized library of installation guidance and technical documents, and the current installation guidance page shows a last-updated date of 2026-09-14 on its installation instructions and technical docs library. That's the right way to think about this work. Product lines change. Wall assemblies change. Codes change. The install method has to keep up.
Tools, Materials, and Jobsite Preparation
The job usually goes sideways before the first board is on the wall. A crew starts cutting in the driveway, stacks boards on wet ground, skips a wall check, and treats Hardie like heavy wood siding. Then the callbacks show up later. Swollen cut edges, cracked corners, wavy courses, and water getting hung up where it should have drained out.
Hardie install starts with control. Control of dust, control of layout, and control of water.
Build the tool setup around clean cuts and repeatable layout
Fiber cement punishes sloppy setup more than vinyl does. Vinyl will flex and hide a little. Hardie will not. If your saw wanders, your depth is off, or your benches rock while you cut, the wall will show it.
The core kit should cover four jobs at once:
- Cutting tools for fiber cement: a saw built for fiber cement, dust collection, the correct blade, and shears or score-and-snap tools for cuts where you want less airborne dust and a cleaner edge
- Safety gear that gets used all day: respirator, eye protection, hearing protection, and a vacuum tied into the cutting station
- Layout tools: tape, chalk line, laser, stud finder, speed square, and long levels for checking walls and trim runs
- Fastening and metal tools: siding nailer or finish nailer as the detail requires, snips, hand tools for flashing, utility knife, and rollers for tape
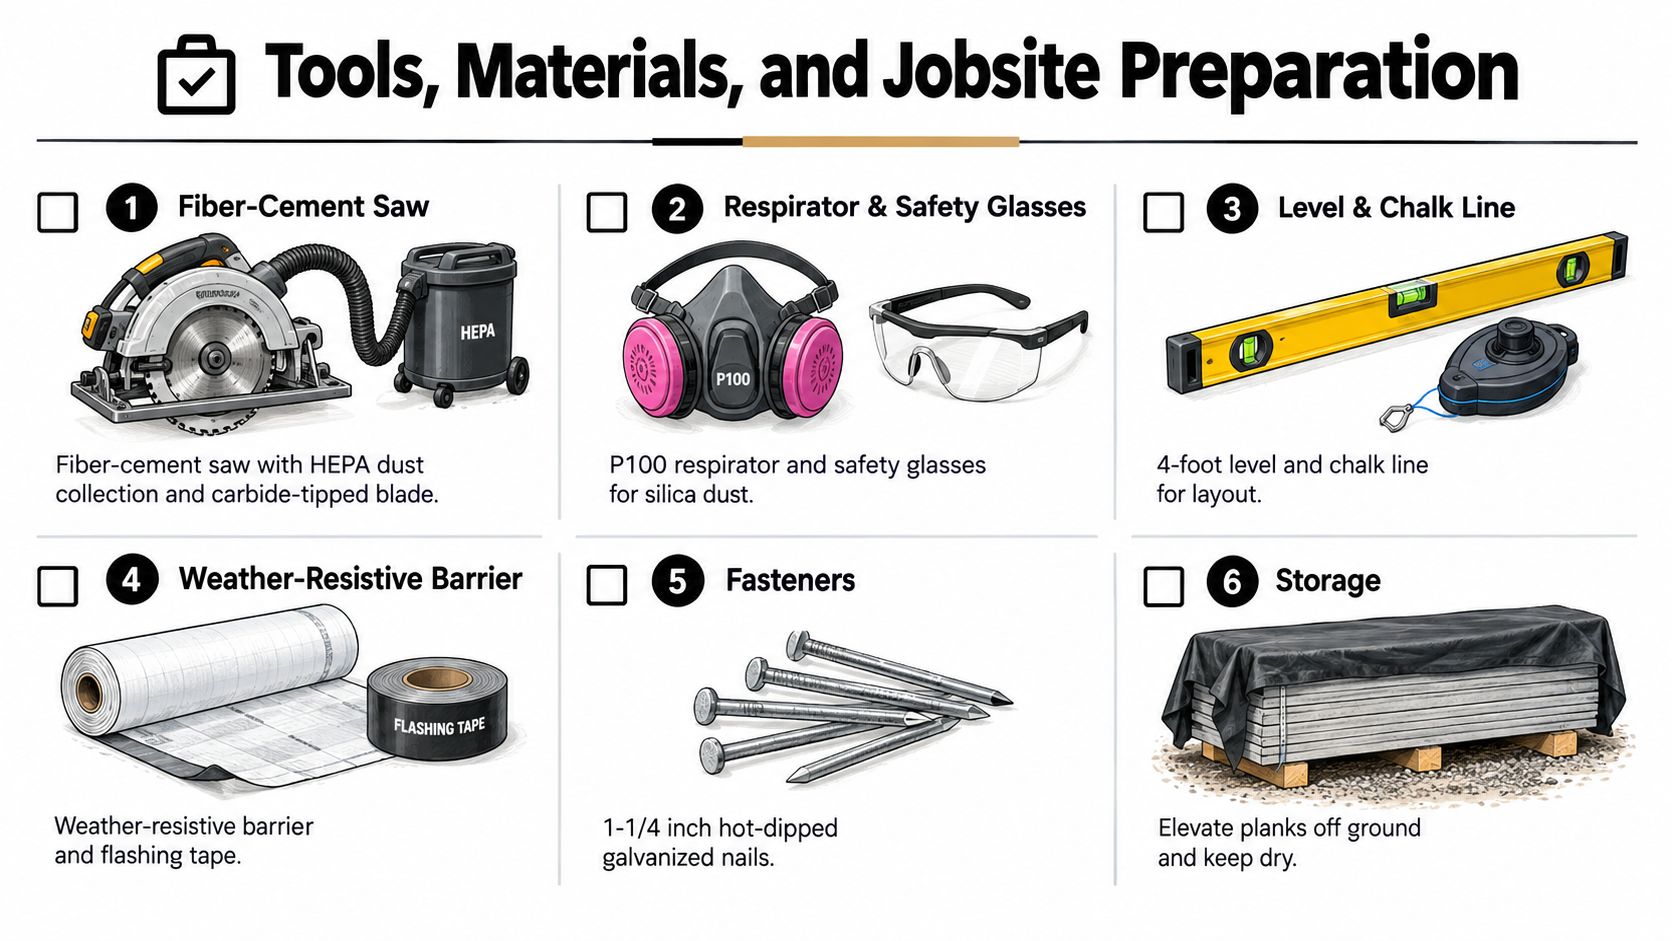
A good cutting station saves boards and keeps the install cleaner. I would rather spend extra time setting up tables, cords, vacuum, and offcut handling than fight chipped edges for the next two days.
Stage materials by wall function, not by pallet
Crews work cleaner when the material pile matches the assembly. Hardie is part of a water-managed wall, so staging should follow that logic.
Sort materials into working groups:
- Cladding: planks, panels, shingles, starter pieces, and trim
- Fasteners: the correct corrosion-resistant nails or screws for the exposure and framing
- Water management: weather-resistive barrier, joint flashing, flashing tape, Z-flashing, kick-out flashing, and metal for heads, penetrations, and transitions
- Drainage components: furring or rainscreen products if the assembly calls for an air gap behind the siding
- Finish items: factory-finished touch-up materials where allowed, paint for field-finished products, and sealant only where the detail calls for it
That staging method keeps the crew focused on what the wall needs next, not what happens to be closest to the trailer.
If you're still sorting out scope before ordering, this Hardie siding installation cost guide is useful for separating real assembly costs from a bare siding number that leaves out flashing, trim, and prep.
Prep the wall like it is going to see wind-driven rain, because it will
Hardie jobs separate from quick reside work. The siding goes on the outside, but the wall has to be ready underneath it. Check the sheathing for damage, find low spots and proud framing, mark studs clearly, and make sure openings are flashed before cladding starts. A flat wall matters for appearance. A dry wall matters more.
Store boards off the ground and out of standing water. Keep cut stations away from glass, cars, and finished hardscape because fiber-cement dust travels. Protect landscaping early. Cleanup gets harder once dust mixes with mud and paintable surfaces.
For vertical products such as HardiePanel, manufacturer guidance calls for a wall that is level, square, and plumb over an approved substrate, with the water-resistive layer in place before the panels go up. The same guidance also requires flashing details at control joints and maintained clearance above trim. Those details are easy to treat like accessory work on bid day. On the wall, they are what decide whether water drains out or gets trapped behind the siding.
That is the jobsite mindset to bring into every Hardie install. Fasteners matter, but field edges, clearances, and flashing details decide how the wall ages.
Measuring Walls and Planning the Layout
A clean Hardie job usually looks easy when it's done. It looked hard before the first course went up.
Start with the baseline, not the first plank
The wall needs one reference line that governs everything else. Find the lowest point of the sheathing, then establish a level baseline around the house that respects the required clearances at grade and any transitions to masonry, stone, or brick. If the house is out of level, and plenty are, your baseline keeps the finished courses visually straight even when the framing doesn't cooperate.
From there, measure wall heights and work backward from your planned exposure. Don't accept a tiny top rip just because the math landed there on the first pass. Slight adjustments in exposure across a long wall usually produce a better-looking result than forcing a sliver under a soffit or above a head trim line.
Openings and corners decide whether the wall looks intentional
Windows and doors interrupt the rhythm of the courses. Good layout keeps those interruptions looking planned instead of accidental.
Use these habits:
- Mark vertical control lines: snap plumb lines at window and door edges so joints don't die in awkward places behind returns.
- Set corner trim first: inside and outside corners should already be established so your courses can die cleanly into them.
- Plan gable cuts ahead: don't leave yourself a tiny tapered scrap at the rake because you never checked the final courses.
- Use a story pole: one stick with all course marks saves a lot of remeasuring and keeps multiple elevations consistent.
A story pole does more for consistency than arguing over tape readings on every wall.
Dead rails and exposure planning
On long runs, a dead rail can help hold the first working course perfectly straight while the wall gets established. After that, the story pole and chalk lines keep everyone honest.
Below is a simple planning example for course counts. This isn't a manufacturer table. It's a field-planning table that shows the logic behind avoiding ugly slivers at the top of a wall.
| Wall Height | Standard 8" Exposure (courses) | Adjusted Exposure to Avoid Slivers | Result at Head of Window |
|---|---|---|---|
| Short wall | Fewer courses | Slightly increased or reduced exposure as needed | Courses land more cleanly at trim |
| Medium wall | Moderate course count | Exposure adjusted evenly across wall | Better alignment at window head |
| Tall wall | Higher course count | Small exposure change across all courses | Avoids narrow top rip |
| Gable wall | Varies with rake | Pre-plan taper before install | Final cuts stay workable |
The key point is consistency. If one wall gets adjusted, adjoining walls need to reconcile visually. That's where layout discipline separates a professional-looking install from one that feels off even when the homeowner can't explain why.
Cutting Fiber Cement Without Creating Problems
Most Hardie failures blamed on "the product" start at the saw.
Choose the cut method based on the piece, not convenience
Straight cuts in lap pieces often go best with score-and-snap or shears. That reduces airborne dust and gives you a controlled edge. Rip cuts, notches, outlet openings, and shaped cuts usually need a circular saw set up specifically for fiber cement.
Recent James Hardie guidance puts more focus on safe cutting with dust collection and on priming or sealing cut edges, because the vulnerable part of the piece is often what happens after the board is cut, not before it's nailed, as noted in James Hardie's lap siding installation tips for pros.
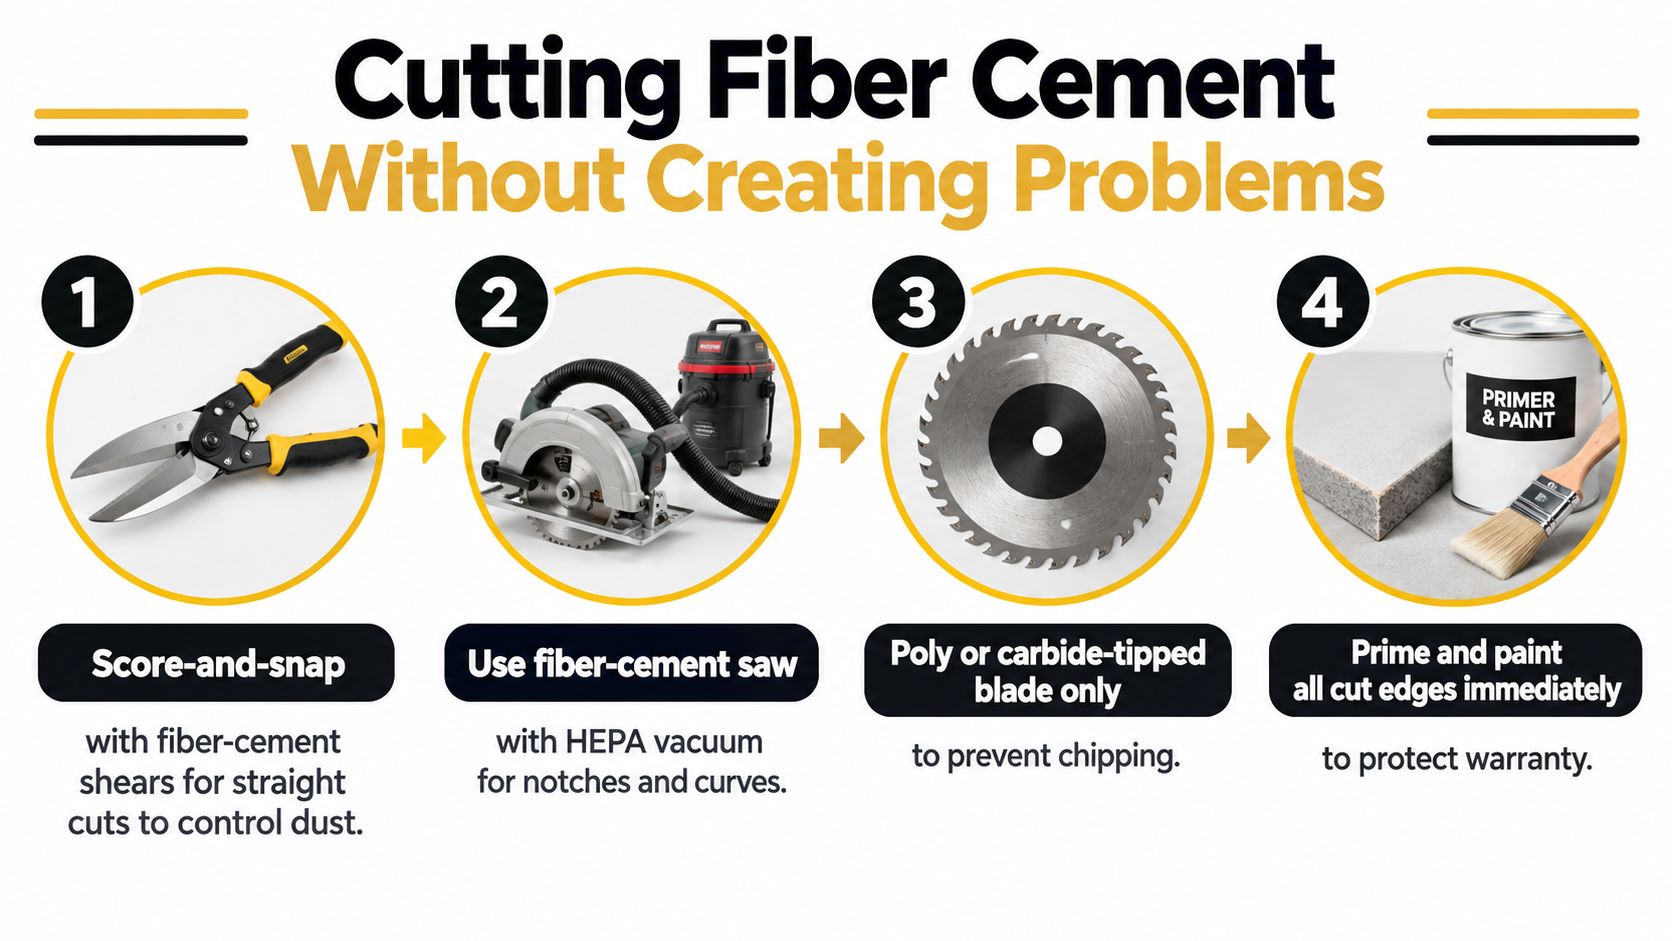
Dust control isn't optional
Fiber-cement dust belongs outside and under control. Set up a dedicated cutting station away from windows, doors, and neighboring properties when possible. Tie the saw into a vacuum system and wear proper respiratory and eye protection.
A sloppy cutting station creates three problems at once:
- Worker exposure: dust gets into lungs and eyes fast.
- Finish contamination: dust settles on trim, windows, and painted surfaces.
- Bad edges: unsupported offcuts break ragged and leave more field repair work.
Support both sides of the board so the waste piece doesn't snap early and tear the edge. Slow, controlled cuts beat forcing the blade.
Every cut edge needs treatment
This is one of the most skipped steps in homeowner content. Factory edges arrive finished. Field cuts don't.
After cutting, inspect every edge, hole, and notch. Prime or seal them before the piece goes on the wall. That includes ripped edges that started as factory-finished material and lost their seal when you changed the profile. If a piece will sit tight to trim or flashing, make sure the edge treatment is complete and cured before fastening.
Unsealed cut edges are small details on day one and expensive details later.
Crews that rush this part usually also rush cleanup, and that's how cutoffs, dust, and damaged corners end up mixed in with install stock. Keep a clear workflow: cut, seal, cure, install. Hardie rewards that discipline.
Fastening Patterns and Nailing Technique
A Hardie wall can look fine at lunch and be trouble by the end of the day if the gun is set wrong. Overdriven heads bruise the face, missed studs leave loose sections, and a bad fastening pattern can telegraph movement at joints long before anyone blames the nails.
On this part of the job, speed costs more than it saves. Fiber cement is less forgiving than vinyl, and it does not flex like wood trim. The fastener has to hold the board flat without crushing it, and the placement has to respect the panel edges that are already doing moisture-control work. Once those edges crack or flare, water has a place to sit.
For vertical products, keep fasteners back from the edges and out of the corners, as noted earlier in the manufacturer instructions. Corner nailing is a common failure point. It concentrates stress right where the panel is weakest, especially if the board was handled hard, cut rough, or installed over a wall that is not lying flat.
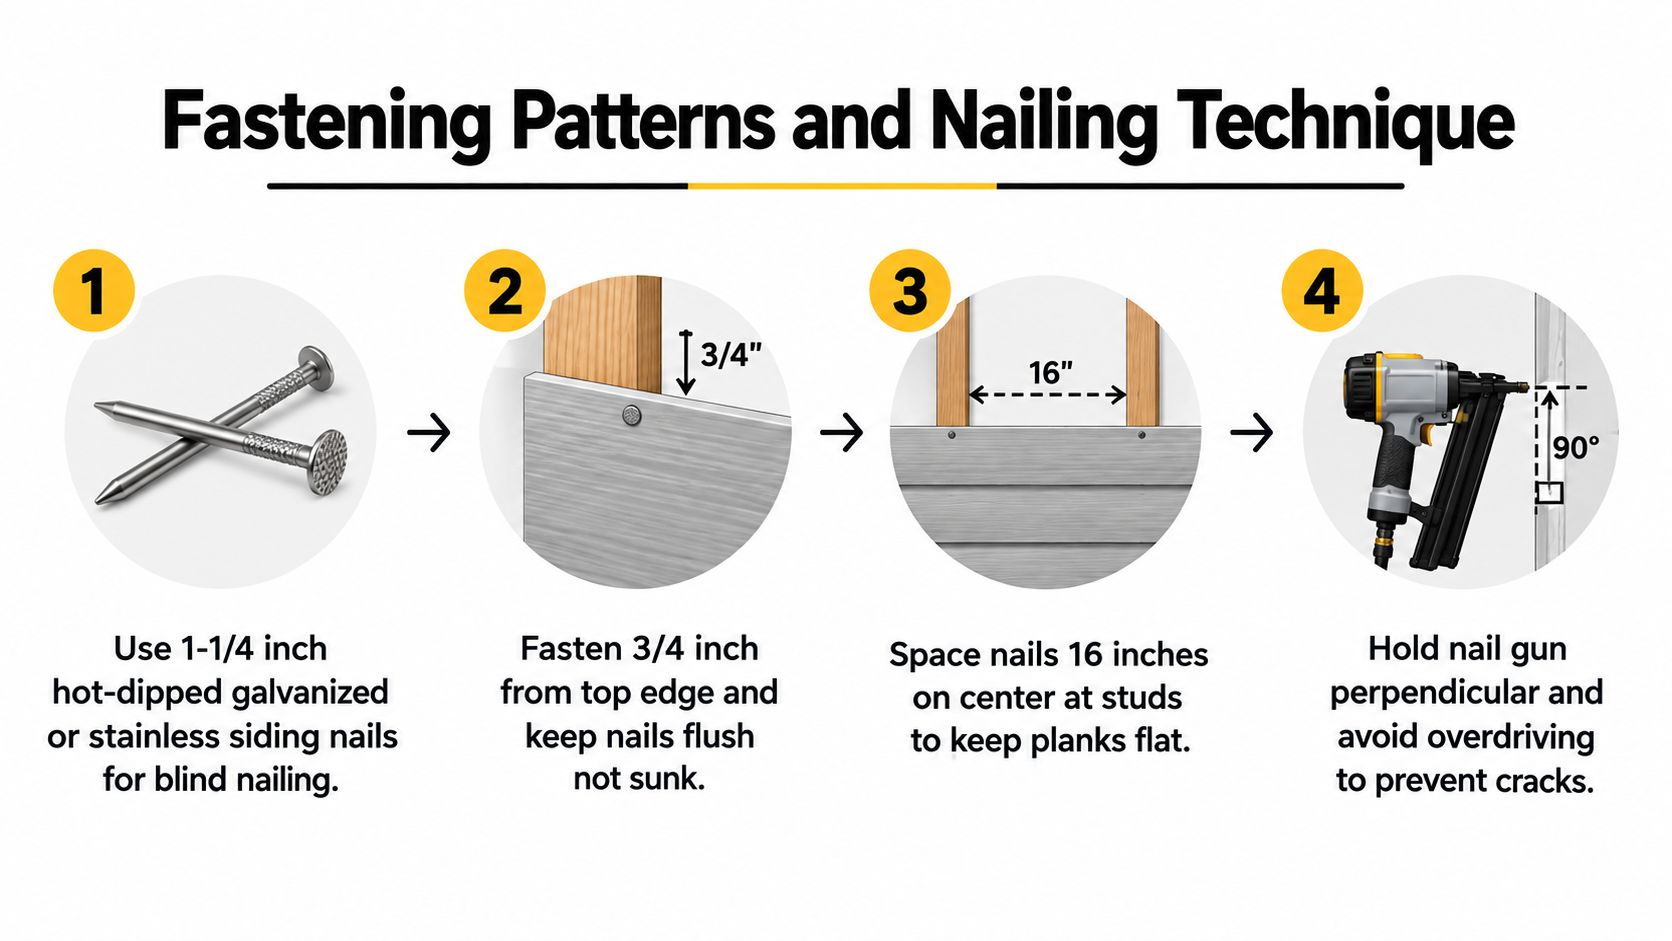
Good nailing has a look to it before you ever pull a tape. Nail heads sit flush with the surface. The gun stays square to the wall. Stud lines are marked so the installer is fastening into framing instead of hoping. If face nailing is part of the detail, the pattern stays consistent across the wall instead of wandering board to board.
A quick field check helps. Run your hand across the course and look along the wall in low-angle light. Crushed material around the head, slight mushrooming, or hairline cracks usually mean the pressure is too high or the gun nose is bouncing. Proud nails are a different problem, but still a problem. They hold the board off the wall, which can affect joint fit and leave openings where wind-driven water gets more opportunity than it should.
This installation video gives a useful visual reference for sequencing and gun control:
The backing matters too. James Hardie has long tied fastening requirements to the wall assembly behind the siding, including framing layout and conditions such as continuous insulation. That is the right way to look at it in the field. Fastening is part of the drainage and drying strategy, not just a way to hang boards. If the substrate is wavy, the stud layout is unclear, or the trim and joint details are forcing the siding out of plane, fix that first. A clean fastening pattern cannot rescue a wall that was not prepared to manage water.
Flashing, Weather Barriers, and Clearance Details
A lot of Hardie failures start on walls that looked clean the day the crew packed up. Six months later, the bottom edge stays damp, a roof-to-wall joint stains out, or a window head starts showing movement. The fasteners usually get blamed first. More often, the wall was missing a drainage path.
Hardie siding has to be installed as a water-management assembly. The boards are only one layer. The weather-resistive barrier has to stay shingled correctly, flashings have to kick water back to the face, and every bottom edge needs room to dry instead of sitting against soil, concrete, or trim.
James Hardie's installation instructions catalog is useful here because it puts WRB sequencing, flashing details, and clearance rules in the same conversation. That matches what shows up in the field. The callback rarely comes from the middle of a wall. It comes from an intersection someone treated like a caulk joint.
Here are the spots I check hardest before siding goes on and again before the job closes:
- Roof-to-wall intersections: kick-out flashing has to throw runoff clear of the cladding, not let it sheet behind the last course.
- Horizontal trim and band boards: install Z-flashing above them and keep the upper material detailed to drain over, not into, the trim.
- Window and door heads: head flashing and WRB lapping do more than sealant ever will.
- Decks, porch roofs, and ledger areas: these details often get framed tight, then the siding ends up too close to a water-holding surface.
- Masonry, slabs, and walks: direct contact at the cut edge keeps the board wet and shortens the life of the paint and the siding edge.
Clearance is where generic how-tos usually get sloppy. Hard surfaces such as walks, steps, and decks need a visible gap below the siding. HardieShingle guidance also calls for grade to slope away from the house and warns against contact with standing water. The exact number matters less than the habit: leave drying space, and do not let landscaping erase it later.
A simple field rule helps. If a detail relies on sealant alone, it is not finished yet. Water needs overlap, gravity, and a path out.
| Adjacent Surface | Minimum Clearance | Why it matters |
|---|---|---|
| Paths, steps, decks, and other hard surfaces | 2 in. | Limits splashback and keeps the lower edge from staying wet |
| Finished grade | Keep grade pitched away from the wall | Reduces water buildup and wicking at the base of the cladding |
| Horizontal trim at control joints for panel systems | 1/4 in. above trim with Z-flashing | Prevents water from parking on top of the trim |
Caulk still has a place. Use it where the manufacturer calls for it, at the right joint and with the right prep. Just do not treat it like flashing in a tube. On Hardie, the details that last are the ones that let water drain and let the assembly dry.
Common Installation Mistakes and How to Avoid Them
A wall can look clean on day one and still be set up to fail. I see it when the siding is treated like finish material only, instead of part of a water-control assembly. Hardie usually gives you trouble at edges, transitions, and cut points long before a field of boards in the middle of the wall does.
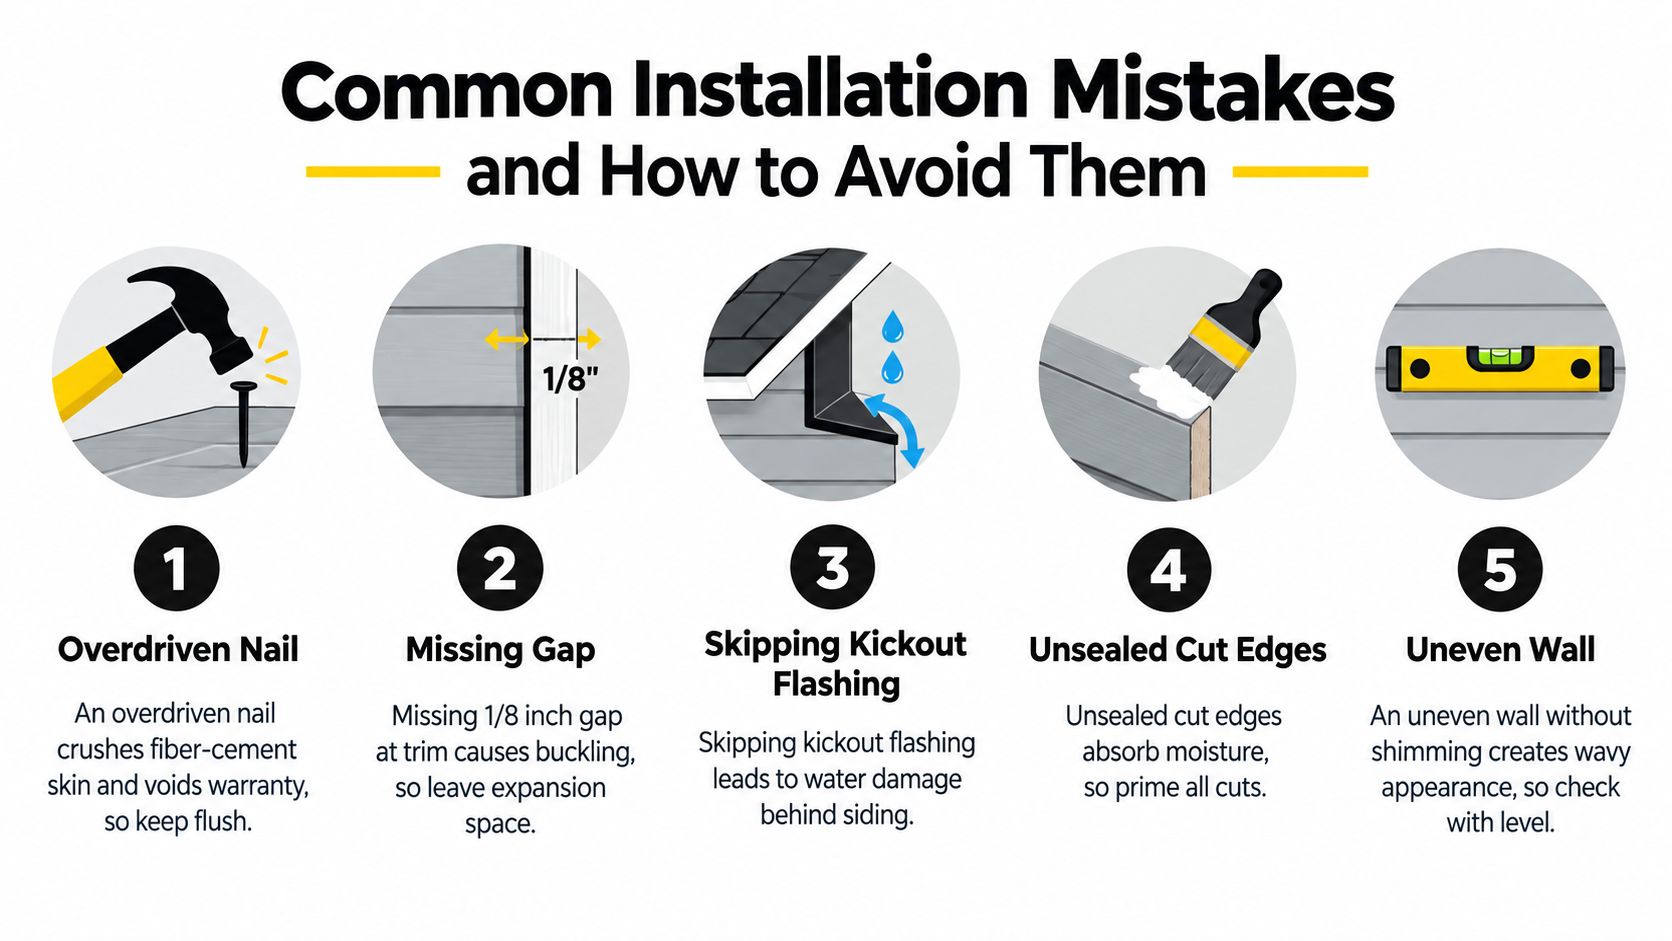
The expensive callbacks usually come from small decisions that looked harmless during install. An overdriven nail crushes the face and weakens the hold. A cut edge around a light block gets left raw. A roof-to-wall tie-in gets skipped because the siding covers it from view. None of those mistakes stay small once water starts working on them.
Two failure patterns show up over and over in the field.
First, installers trust the siding to hide a bad surface. It will not. If the framing is out, the sheathing is proud at a seam, or the wall has a belly in it, fiber cement follows that shape. The finished wall ends up with waviness, joints that never sit consistently, and courses that start drifting by the time you reach a window head or gable break.
Second, crews focus on fastening and miss drainage details. That is where Hardie differs from vinyl. Vinyl has more forgiveness because it moves and hangs. Fiber cement is rigid. If you crowd trim, bury the bottom edge in mulch, leave cut edges exposed around penetrations, or let shingle courses repeat their keyways, the problem shows up fast and tends to stay visible.
A few checks catch a lot:
- Press on suspect nail lines. Overdriven or high nails often show up by feel before they stand out from the street.
- Sight down long courses from one end of the wall. Drift is easier to see in raking light than from straight on.
- Look closely at penetrations, mounting blocks, and light fixtures. Those field cuts and small joints age faster when they were rushed.
- Check patterned products for layout discipline. Starter support, consistent gaps at trim, and staggered joints matter because they affect both appearance and drainage.
Shingle-style products deserve extra attention here. If the starter detail is sloppy or the course layout wanders, the wall telegraphs it immediately. You also lose the clean water-shedding pattern those courses are supposed to create.
Walk the wall up close with a flashlight and a tape measure. Check roof-to-wall intersections, penetrations, lower courses, butt joints, and any place one material changes to another. Curb appeal can hide a lot. Moisture problems usually start where the eye does not linger.
If you want a realistic owner-level comparison before committing to repairs or a full reside, this guide to fiber cement siding pros and cons gives useful context on where the material performs well and where details matter more than people expect.
Most siding defects are obvious from two feet away and invisible from the street.
Maintenance, Inspections, and When to Call a Pro
A Hardie wall can look fine from the driveway and still be taking on water at one bad cut, one failed sealant joint, or one buried clearance line. That is why maintenance starts with moisture control, not appearance. Paint and cleanliness matter, but the wall lasts or fails at edges, transitions, and places where water slows down.
Start inspections where water has the best chance to get trapped. Check bottom edges near grade, roof-to-wall intersections, window heads, light blocks, hose bibs, dryer vents, and butt joints that see a lot of weather. Hardie does not forgive the same shortcuts vinyl sometimes hides. If a lower course is too close to a roof, mulch bed, patio, or deck, that is not just a cosmetic miss. It changes how the wall sheds water and how long those cut edges stay sound.
Cleaning should stay gentle. Use a soft brush or soft-wash method, mild soap if needed, and a low-pressure rinse. Keep the spray aimed so you are washing the face of the siding, not driving water up under laps or into trim joints.
A homeowner inspection routine that catches real problems looks like this:
- After storms: check for chipped corners, cracked boards, loose pieces, and impact damage near lower walls and outside corners.
- During seasonal walkarounds: confirm ground and roof clearances are still open, especially where mulch, new concrete, patios, or new plantings may have crept upward.
- At paint touch-up time: inspect field-cut edges, penetrations, and exposed joint lines for coating wear or swelling.
- After other exterior work: look at areas touched by electricians, deck crews, gutter crews, and other contractors. These trades often close off clearances or disturb flashing without realizing it.
Some defects are maintenance items. Others point to a wet wall assembly. A single damaged board from an impact can usually be repaired in place. Repeating stains below joints, persistent swelling at cut ends, soft trim at the same location, or caulk joints that keep reopening usually mean water is getting behind the cladding and not draining back out.
Keep records. Save leftover boards, color information, and product labels from spare material. If siding is going on a new section of the house or a repair is opened up, photograph the flashing and weather-resistive barrier details before they get covered. That helps later when a contractor needs to match materials or figure out whether the problem started at the siding, the trim package, or the wall assembly behind it.
Call a pro when the repair decision depends on what is happening behind the boards, not just on the surface. That includes recurring leaks, staining that returns after repainting, movement at trim joints in more than one area, or any location where clearance and flashing details look wrong together. For Kansas City area homeowners weighing repair against replacement, a local siding replacement contractor near you can sort out whether the issue is isolated or tied to the larger water-management details of the wall.
James Hardie updates its installation requirements over time, so check the current technical library noted earlier before approving repairs or replacement details.
Two States Exteriors LLC handles Hardie siding replacement and installation as a full exterior assembly, not just a board swap. If you want a crew to inspect the wall for flashing, clearance, and moisture-detail issues before new siding goes up, visit Two States Exteriors LLC.


