
You're standing in the driveway on a Saturday morning with paint cans lined up beside a starter strip of siding. The color is chosen, the weather looks promising, and you're deciding whether to climb the ladder or call a painter. The decision isn't the color. It's whether you have the exterior house painting supplies to clean, repair, reach, coat, and finish the work properly.
A missing caulk gun, the wrong roller nap, or a brush that sheds can turn a promising project into peeling trim, uneven coverage, or mildew-stained siding after a Kansas City winter. Exterior painting is a system, and every part of that system has to suit freeze-thaw cycles, spring storms, summer humidity, and damp north-facing walls.
The modern roller itself became a major exterior-painting milestone in the early 1940s. Historical accounts credit Canadian inventor Norman Breakey with developing a cylindrical fabric-covered tool in 1940, while Richard Adams later refined the design and filed an early patent, as described in Purdy's history of the paint roller. The lesson still applies: the right tool changes the work.
Why the Right Supplies Make or Break an Exterior Paint Job
A homeowner can buy excellent paint and still get a poor result. The failure usually starts underneath the finish, with dust, mildew, loose paint, open joints, damp wood, or a surface that was never properly inspected.
That matters in the Kansas City area because exterior materials expand, contract, absorb moisture, and dry at different rates. A rigid repair over a moving joint cracks. Paint applied over contaminated siding loses adhesion. A damp wall can trap moisture beneath the coating, where the damage stays hidden until the film blisters or peels.
Practical rule: Spend first on preparation and access. Paint can't compensate for a dirty, wet, or unstable substrate.
The cheap shortcut shows up later
A bargain brush may look acceptable while you're cutting around a window. Once bristles begin releasing into the finish, the surface needs more sanding and touch-up. A thin roller cover leaves inconsistent coverage on textured siding, while a missing extension pole encourages unsafe ladder stretching and missed areas.
Caulk is another common omission. Open joints around windows, trim, fascia, and siding transitions let wind-driven rain reach vulnerable edges. In a Midwest climate, those small gaps get tested repeatedly by wet weather and temperature changes. A quality elastomeric caulk and a controlled application are cheaper than repairing failed trim later.
Surface preparation deserves particular respect. Sherwin-Williams guidance attributes up to 80% of coating failures to inadequate preparation, including failure to remove mildew, oil, dust, dirt, loose rust, and peeling paint, as explained in its surface preparation guidance. Clean, dry, scrape, sand, repair, inspect, and prime before applying the finish.
Build the kit around the job
A useful supply list has six working parts:
- Coating materials: Exterior paint, primer, compatible caulk, and repair compounds.
- Preparation tools: Scrapers, sandpaper, cleaners, brushes, sprayers, and rinse equipment.
- Application tools: Quality brushes, roller frames, covers, extension poles, buckets, and shields.
- Access equipment: Ladders, stabilizers, scaffolding, and footing protection.
- Safety gear: Eye protection, gloves, respirators, and head protection.
- Cleanup supplies: Wash buckets, rags, waste containers, labels, and storage materials.
The right purchase isn't always the most expensive item on the shelf. It's the item that matches the surface, the weather window, and the way you'll work.
Choosing Paint and Primer for Midwest Weather
Kansas City-area exteriors face freeze-thaw movement, humid summers, spring storms, and mildew pressure. Choose a coating that can stay bonded while wood, fiber cement, and trim expand and contract. For most residential siding, 100% acrylic latex exterior paint remains a dependable choice because it combines flexibility with weather resistance. Cheaper vinyl-acrylic blends may suit protected areas, but repeated moisture and seasonal movement make them a weaker bet for exposed walls.
Finish selection should follow both the surface and its exposure. Flat paint hides minor texture. Satin sheds dirt more readily and gives siding a modest washability advantage. Semi-gloss works well on trim, doors, soffits, and other detail areas that need frequent cleaning. A north-facing wall that stays shaded and damp usually benefits from a mid-sheen finish rather than an extremely flat one, since grime and mildew staining are easier to remove from the smoother film.
Match the primer to the substrate
Primer seals porous areas, improves adhesion, reduces flashing, and gives the topcoat a more even base. Bare wood exposed during scraping or repair should be primed as soon as practical, preferably the same day. Leaving fresh wood exposed through a Kansas or Missouri weather shift gives moisture another opportunity to enter.
Buy primer for the material underneath:
- Raw or scraped wood: Use an exterior wood primer. Add stain-blocking capability where cedar or redwood may bleed tannins.
- Older brick foundations: Choose a masonry primer made for porous, alkaline surfaces.
- PVC repairs: Use a bonding primer specifically rated for slick plastics.
- Fiber cement repairs: Select a compatible acrylic or bonding primer according to the manufacturer's requirements.
- Bare or repaired areas: Prime these sections separately. A paint-and-primer-in-one product does not remove the need for a dedicated adhesion layer on difficult or newly exposed surfaces.
A quality primer can extend the service life of a finish on raw or scraped wood, but it cannot stabilize rotten material or replace proper repairs. Read the technical data sheet for approved substrates, surface conditions, application limits, and recoat guidance before purchasing.
Compare the climate factors
| Climate Factor | Affected Surface | Recommended Product Type | Why It Matters |
|---|---|---|---|
| Freeze-thaw movement | Wood, fiber cement, trim joints | Flexible 100% acrylic coating and elastomeric caulk | Helps accommodate movement and seals exposed joints |
| High humidity | Shaded siding, soffits, foundations | Mildew-resistant exterior coating and compatible primer | Supports a cleaner, more durable surface in damp areas |
| Spring rain | Bare wood and repaired sections | Exterior primer plus weather-rated topcoat | Protects porous repairs before moisture reaches them |
| Strong temperature swings | Mixed siding and trim | Flexible acrylic system | Reduces stress on the coating film as materials move |
| Brick or masonry exposure | Brick foundations and masonry walls | Masonry primer and masonry-rated coating | Addresses porosity and alkaline conditions |
Sherwin-Williams and Benjamin Moore products are common choices through Kansas City dealers, but the label matters more than the logo. Check approved substrates, application temperature, recoat requirements, and mildew-resistance instructions. For a broader comparison, review the best exterior paint brands before choosing a system for the house.
Surface Preparation Tools and Materials
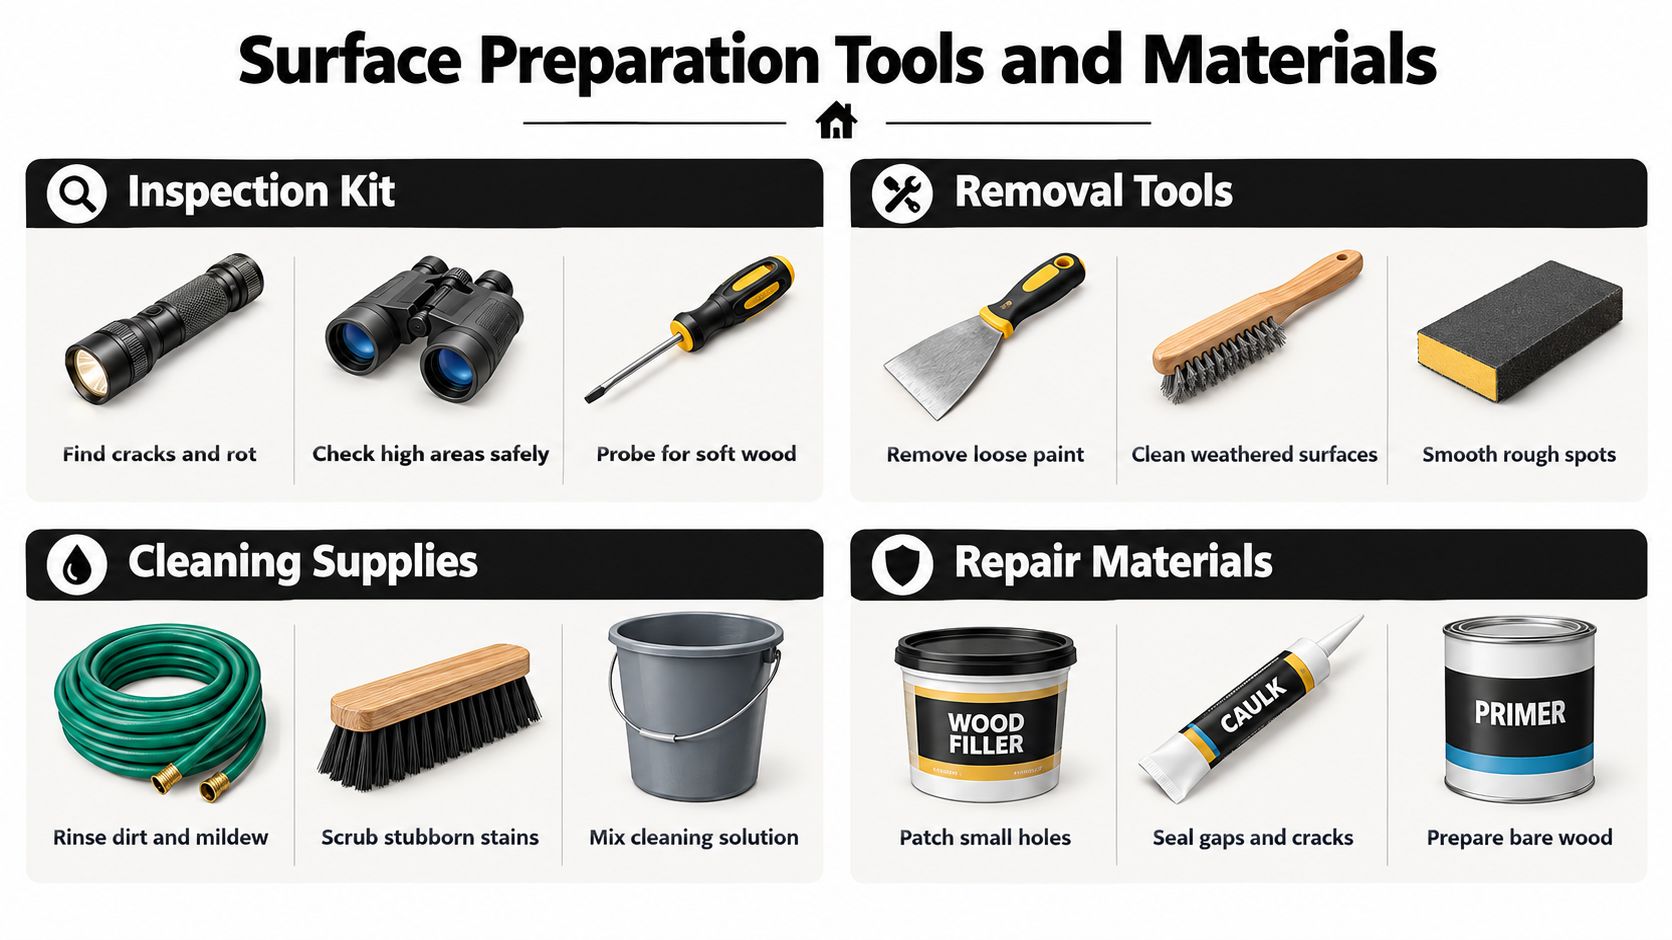
Preparation is where an exterior project earns its durability. Start with an inspection kit, not a paint tray. A bright flashlight helps reveal cracks and shadowed mildew, binoculars let you examine upper trim without immediately climbing, and a probing screwdriver identifies soft wood around window sills, fascia, and lower siding edges.
Walk the entire exterior before ordering materials. Mark failed caulk, peeling paint, loose fasteners, cracked masonry, soft trim, and areas where water collects. That inspection tells you whether you're planning a repaint or a repair project with paint included.
Remove failing material before washing
Use rigid and flexible putty knives for loose edges, a wire brush for weathered or flaking areas, and sandpaper suited to the transition you're creating. Coarser paper helps remove rough edges, while finer paper smooths the feathered boundary before priming. A random-orbit sander can save time on broad wood surfaces, but it needs controlled pressure so it doesn't carve dips into the siding.
For mildew and dirt, a garden pump sprayer, oxygenated exterior cleaner, stiff cleaning brush, bucket, and low-pressure rinse nozzle form a practical setup. Bleach can discolor surrounding materials and damage vegetation if handled carelessly. Use a product labeled for the surface and follow its dilution and dwell-time directions.
Surface check: If the wall is still damp, chalky, or powdery after cleaning, it isn't ready for primer.
Repair, seal, and protect
Keep these repair materials on hand:
- Exterior spackle: For small, stable surface imperfections that don't move.
- Two-part wood filler: For sound wood with localized damage, not for structural rot.
- Backer rod: For deep joints where caulk alone would be too thick.
- Elastomeric exterior caulk: For joints exposed to movement and weather.
- Dripless caulk gun: For controlled beads and less wasted material.
- Masking supplies: Use painter's tape in both narrow and wider widths, plastic sheeting, and canvas drop cloths.
Tape windows and fixtures only after surfaces are clean and dry. Plastic protects larger areas, but canvas drop cloths stay put better on walkways and porches. Don't use masking as a substitute for careful brush control around delicate trim or landscaping.
A detailed walkthrough of the sequence appears in this guide to how to prep a house for painting. The order matters: inspect, clean, scrape, sand, repair, caulk, protect, prime, and then paint.
Application Tools From Brushes to Sprayers
Brushes provide control where siding meets windows, trim, soffits, doors, and architectural details. A 2.5- to 3-inch angled sash brush handles most cutting-in work without forcing you to overload the bristles. Keep a dedicated trim brush separate from the one used on rough siding so grit and dried paint don't transfer to visible detail work.
For broad siding, a 9-inch roller frame with a 3/8- to 1/2-inch nap generally gives better contact than a thin cover on textured or weathered surfaces. A 4-inch mini-roller is useful for narrow lap sections and tight areas where a full roller can't move smoothly.
Choose the application method honestly
Brush-and-roll is usually the most forgiving approach for a homeowner. It produces less overspray, makes it easier to monitor coverage, and works well around windows, landscaping, and neighboring surfaces. An airless sprayer can cover large two-story walls quickly, but wind, masking, hose management, and overspray turn it into a poor choice for an inexperienced operator.
A hybrid method can work well on cedar lap siding. Spray the coating, then back-roll it into the grain while the film is wet. That extra step improves contact with the textured surface, particularly when humidity makes drying slower. It also increases labor and requires disciplined timing, so don't choose it because spraying looks faster.
Useful accessories include an extension pole, a 5-in-1 tool, a paint-bucket hook, a spray shield, and a clean container for keeping the working edge of a brush usable. Skip cheap chip brushes, foam rollers, and roller covers that shed lint. They create finish defects and cost time in touch-ups.
| Siding Type | Primary Tool | Secondary Tool | Notes |
|---|---|---|---|
| Cedar lap | Roller or controlled sprayer | Back-roll brush or roller | Work coating into the grain and monitor lap edges |
| Fiber cement | Roller | Angled sash brush | Keep pressure even and avoid heavy buildup at seams |
| Brick | Masonry roller | Stiff brush | Work coating into mortar texture and pores |
| Stucco | Deep-nap roller | Block brush | Follow the coating label for texture and crack movement |
Safety and Access Equipment for Two-Story Homes
Access equipment should follow the height, terrain, and surface exposure of the job. A single-story ranch may need only a 6- or 8-foot fiberglass stepladder and an extension pole for reachable areas. Even there, don't stand on the top step or stretch sideways to save a reposition.
Two-story work is different. An extension ladder with a stand-off stabilizer can keep the rails away from gutters, while footing pads help prevent movement on hard surfaces. A multi-position articulating ladder is useful around stair landings and uneven lots, but it still needs a stable setup and a clear working area.

For long two-story walls, pipe scaffolding or pump-jack systems can provide a more stable platform than repeatedly moving a ladder. A spotter is especially valuable on sloped driveways or ground softened by freeze-thaw conditions. If the work requires walking on a roof, use a harness and properly installed roof anchor system rather than improvising a tie-off.
Protect yourself from the materials as well as the height. Wear eye protection, nitrile gloves when using caustic cleaners, a hard hat for overhead work near soffits, and a NIOSH-rated dust and mist respirator when sanding or handling airborne contaminants. A paper mask doesn't provide the same protection.
Set an extension ladder at the manufacturer's recommended angle, verify that both feet sit on firm, level footing, and keep the work zone clear of children, pets, and passing traffic. Aluminum or steel siding may also need non-marring ladder pads to prevent scratches and dents.
Estimating Quantities and Budgeting Your Project
Start with the actual paintable surface, then use a benchmark only as a reasonableness check. For a 2,000-square-foot benchmark, public exterior-painting planning guidance gives a starting allowance of roughly 10 to 15 gallons of topcoat, 5 to 8 gallons of primer, and $100 to $200 in ancillary supplies. That supply allowance covers common items such as rollers, brushes, tape, caulk, sandpaper, and drop cloths. You can review the exterior painting estimate example to see how a project scope is organized.
Kansas and Missouri homes rarely match a simple square-foot figure. Siding profile, porosity, color change, trim, repairs, and the number of coats all change coverage. Freeze-thaw movement can increase caulk and patching needs, while spring storms, humid summers, and mildew pressure may add cleaning or treatment materials. Estimate primer for bare and repaired areas separately, then allow finish paint for cut-in work and future touch-ups.
Make the estimate usable
Count caulk by tube and note every joint or penetration that needs sealing. Count tape and plastic by roll, and match drop cloths to the rooms, porches, walkways, windows, fixtures, and planting beds requiring protection. Add cleaner, rags, sanding discs, replacement roller covers, filler, fasteners, patching cement, and mildew treatment. These inexpensive items often cause the last-minute supply run.
| Material | Estimated Quantity | Rough Cost Range | Notes |
|---|---|---|---|
| Topcoat | 10 to 15 gallons | Not specified | Adjust after measuring siding, trim, porosity, and coats |
| Primer | 5 to 8 gallons | Not specified | Measure bare and repaired areas separately |
| Ancillary supplies | Project allowance | $100 to $200 | Covers common prep and application consumables |
| Caulk | Count by joint length | Not specified | Use an exterior elastomeric product where movement is expected |
| Tape, plastic, and drop cloths | Count by protected area | Not specified | Protect windows, walks, fixtures, and planting beds |
| Tools and access equipment | Job dependent | Not specified | Include rented sprayers or specialty equipment |
A professional estimate should identify preparation, repairs, primer, finish coats, access, cleanup, and the products included. Compare bids on the same scope. A low material figure may exclude the prep and labor that determine whether the coating survives the next Midwest winter.
Cleanup, Storage, and When to Call a Professional
Cleanup starts before the final coat dries. Keep separate containers for water-based wash water, solvent-contaminated materials, used rags, and leftover coating. Don't pour paint, solvent, cleaner, or rinse water into a storm drain, on the soil, or into a household sink. Kansas and Missouri disposal requirements can vary by material and location, so contact your local household hazardous-waste or solid-waste program before disposing of liquid paint, solvents, aerosol products, or contaminated absorbents.
Water-based brushes should be cleaned promptly with the appropriate water and cleaner recommended on the label. Work paint out of the heel of the brush, rinse until the water runs clear, reshape the bristles, and hang or store the brush so it doesn't rest on its tip. For rollers, remove the cover from the frame, scrape excess coating back into the container when permitted, clean the cover according to the product instructions, and let it dry fully before storage.
Protect what you'll use again
Leftover paint is valuable only if you can identify it. Seal the can, wipe the rim clean, replace the lid securely, and label the room, surface, color, sheen, and date. Store it in a climate-stable area rather than a location exposed to extreme heat, freezing temperatures, or repeated moisture.
Keep a small touch-up kit together:
- Labeled leftover paint: Use the original product and sheen when possible.
- Small trim brush: Reserve it for windows, doors, and narrow repairs.
- Compatible caulk: Keep enough for seasonal joint maintenance.
- Fine sanding material: Smooth isolated failures before touching up.
- Clean rags and a small container: Prevent contamination during minor work.
Touch-ups are appropriate for small scuffs, isolated nail holes, and limited caulk repairs. They're not a solution for widespread peeling, soft wood, recurring mildew, chalking, active leaks, or coating failure across an entire elevation.
Let supply scope guide the decision
A homeowner can often handle a low-height project with sound siding, limited repairs, a manageable weather window, and standard brush-and-roll tools. The decision changes when the supply list expands into specialized access, extensive substrate repair, chemical cleaning, spraying, or roof work.
| Project Factor | DIY Makes Sense | Hire a Professional |
|---|---|---|
| Surface condition | Siding is sound with localized preparation | Widespread peeling, rot, cracks, or failed joints |
| Access | Single-story work from stable ground or a safe stepladder | Two-story walls, steep grades, roof access, or long ladder work |
| Application | Brush-and-roll with limited masking | Large elevations requiring spraying and back-rolling |
| Weather exposure | You can wait for clean, dry conditions | The home needs coordinated scheduling around moisture and access |
| Safety gear | Standard eye, hand, and respiratory protection is sufficient | Scaffolding, fall protection, or complex overhead hazards are required |
| Repair scope | Minor filler, caulk, and spot priming | Structural trim replacement, masonry repair, or recurring moisture |
| Cleanup | You can separate, label, clean, and dispose of materials correctly | Solvents, aerosols, large waste volumes, or regulated materials complicate disposal |
The right stopping point isn't a matter of pride. If you need to rent several specialty items just to reach the walls, or if the inspection reveals widespread rot and moisture damage, the project has moved beyond a straightforward repaint. A contractor can also identify whether paint failure is being caused by roof edges, gutters, flashing, siding movement, or persistent water entry.
Two States Exteriors LLC provides residential and commercial exterior painting along with related siding, gutter, roofing, and storm-damage services, so the supply plan can account for the condition of the full exterior rather than paint alone. Visit Two States Exteriors LLC to request an inspection and a detailed project plan for your Kansas City area home.


