
You're standing in the driveway after a Kansas City hailstorm, looking at siding that was already faded and chalky before the dents appeared. Now you're deciding whether to replace it with aluminum again, move to vinyl, or choose fiber cement or engineered wood. The right answer depends less on the panel label than on what happens underneath it and how the installer allows the material to move.
Aluminum siding installation can produce a clean, durable exterior, but it isn't vinyl siding with a different surface. Thermal movement, fastening depth, and wall flatness control whether the finished wall stays crisp or develops waves, buckles, and oil-canning after the next hot summer. This guide follows the job from tear-off and substrate repair through layout, fastening, troubleshooting, and maintenance.
Is Aluminum Siding Still Worth Considering in 2026
The homeowner in the driveway has a practical choice to make. Aluminum siding became a major residential exterior material after manufacturers began marketing it in the late 1940s. Historical building-materials documentation describes interlocking panels, baked-enamel finishes, and concave profiles developed for strength and dent resistance, while the material appealed to postwar builders because it was inexpensive and quick to install, as described in this history of siding installation.
Its popularity eventually declined as vinyl became the preferred low-cost, low-maintenance cladding. In the U.S. housing market, aluminum siding reached its highest documented use in 1972, when it appeared as the primary wall material on 15% of new single-family homes. National use had fallen to 1% or below by 1998, according to Freedonia Group's residential siding analysis. That history explains why some homeowners see aluminum as an old product, but it doesn't settle whether the material suits a particular house today.
Modern aluminum can still make sense where low weight, recyclability, non-combustibility, and paintability matter. It won't resist every hail impact without denting, and sourcing matching profiles can take more planning than it did when aluminum dominated the market. On the other hand, a well-prepared wall and properly fastened panel can deliver a stable exterior without the rot concerns associated with wood.
Practical rule: Don't choose aluminum because the panel seems easy to handle. Choose it only if the wall can be made flat and the crew understands how to leave the assembly free to move.
Color deserves attention before ordering. A partial re-side can become difficult if older panels, corner posts, J-channels, and newer trim don't match, so compare the available palette with the rest of the exterior and review options in this guide to siding colors. The project should then be judged on wall preparation, flashing, layout, fastening, and repair access, not on the panel brand alone.
Preparing the Wall for a Lasting Installation
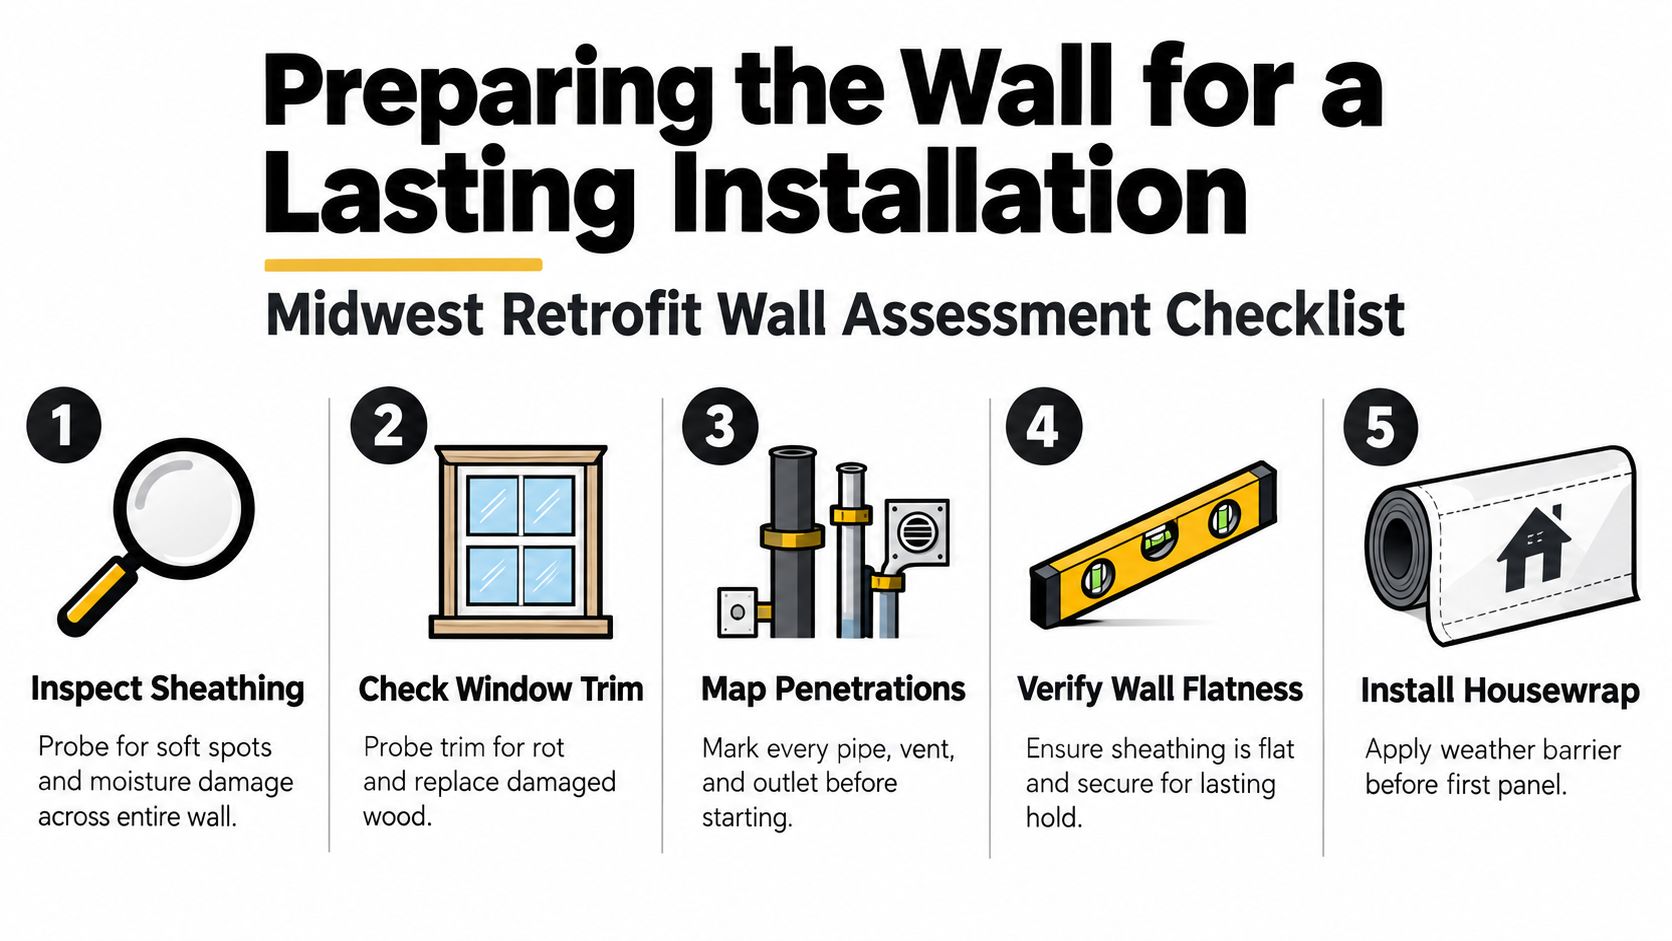
A Midwest retrofit starts with an inspection, not a nail gun. Walk every elevation and look for bowed walls, loose trim, staining, and places where water may have entered around windows, doors, hose bibs, vents, and deck ledgers. Probe exposed wood and sheathing with a screwdriver. Soft fibers, crumbling edges, or persistent dampness mean the cladding has been hiding a problem that new siding won't correct.
Strip the old exterior carefully
Remove the existing siding without destroying sound sheathing. Aluminum panels may come off with a zip tool, while older wood or vinyl often requires controlled prying and careful removal of fasteners. Pick up nails as you go, protect windows and landscaping, and don't leave sharp metal mixed into ordinary debris.
A 1950s ranch in Overland Park can look straightforward from the street while hiding sagging studs or patched sheathing. If you find isolated rot, replace the damaged wood and restore a solid fastening surface. If decay is widespread, the siding crew should stop and involve a structural carpenter. Covering broad structural deterioration with a weather barrier only postpones the repair.
Establish a dry, flat plane
Once repairs are complete, install a weather-resistant barrier over the sound wall. A mechanically attached housewrap and properly lapped felt can both serve as approaches, but the material must be installed in a way that sheds water and integrates with window and door flashing. Every penetration needs a planned transition, not a cutout made after panels arrive.
Uneven walls deserve special attention. Furring strips or carefully placed shims can create a consistent plane, especially where old sheathing changes thickness or studs have settled. The point isn't to make the wall look perfect from inside the house. The point is to keep the aluminum from spanning hollows and reflecting every irregularity as a visible wave.
Use a level string line around the structure before installing the starter strip. A crooked base course transfers that error into every course above it, while a flat, moisture-safe substrate gives the panels a chance to perform as designed.
Measuring, Ordering, and Setting Your Baseline
Measure every wall elevation as its own shape. Divide broad sections into rectangles, calculate gables and dormers separately, then subtract window and door openings. Record wall lengths, height changes, trim locations, and obstructions on a sketch. That drawing gives the installer a clear scope and helps prevent missed material.
Waste follows the house shape. A simple ranch with long, uninterrupted walls creates fewer offcuts than a home with gables, dormers, bump-outs, and narrow returns. Order a sensible allowance instead of treating the calculated wall area as the exact purchase quantity. Aluminum also needs room for thermal movement, so the order must include compatible trim and receiving channels, not only field panels.
Set the starter where the wall needs it
The starter strip fixes the bottom edge of the siding. Its height must align with the panel exposure, the foundation transition, and the weep line above the wall base. A starter set too low can place aluminum in a moisture-prone area. Set it too high, and the foundation or old transition remains exposed.
Snap a level chalk line around the structure, then compare it with the foundation and the lowest sound fastening surface. Do not use the foundation as the level reference automatically. Older Kansas City homes often have settling or uneven masonry, and carrying that variation into the starter course makes every panel above it look off.
Before the first panel arrives, stage the entire system:
- Panels and starter strip: Confirm that the panel exposure and locking profile belong to the same system.
- Trim pieces: Have corner posts, J-channels, utility trim, and soffit receivers ready, preferably in matching finishes.
- Flashing materials: Prepare head flashing and transition pieces before cutting around openings.
- Fasteners: Confirm the approved corrosion-resistant type and the nail-hem requirements for the product.
- Material storage: Support panels, protect them from excessive heat, and allow them to reach site conditions before installation.
Check the order against the elevation sketch before opening the wall. A shortage can lead to substituted trim or mixed production lots, causing visible color differences or receivers that do not fit. Resolve those problems before installation starts. A flat baseline and complete material package give aluminum room to move without making a Kansas City exterior look wavy by the next hot summer.
Hanging Panels With the Right Fastening Technique
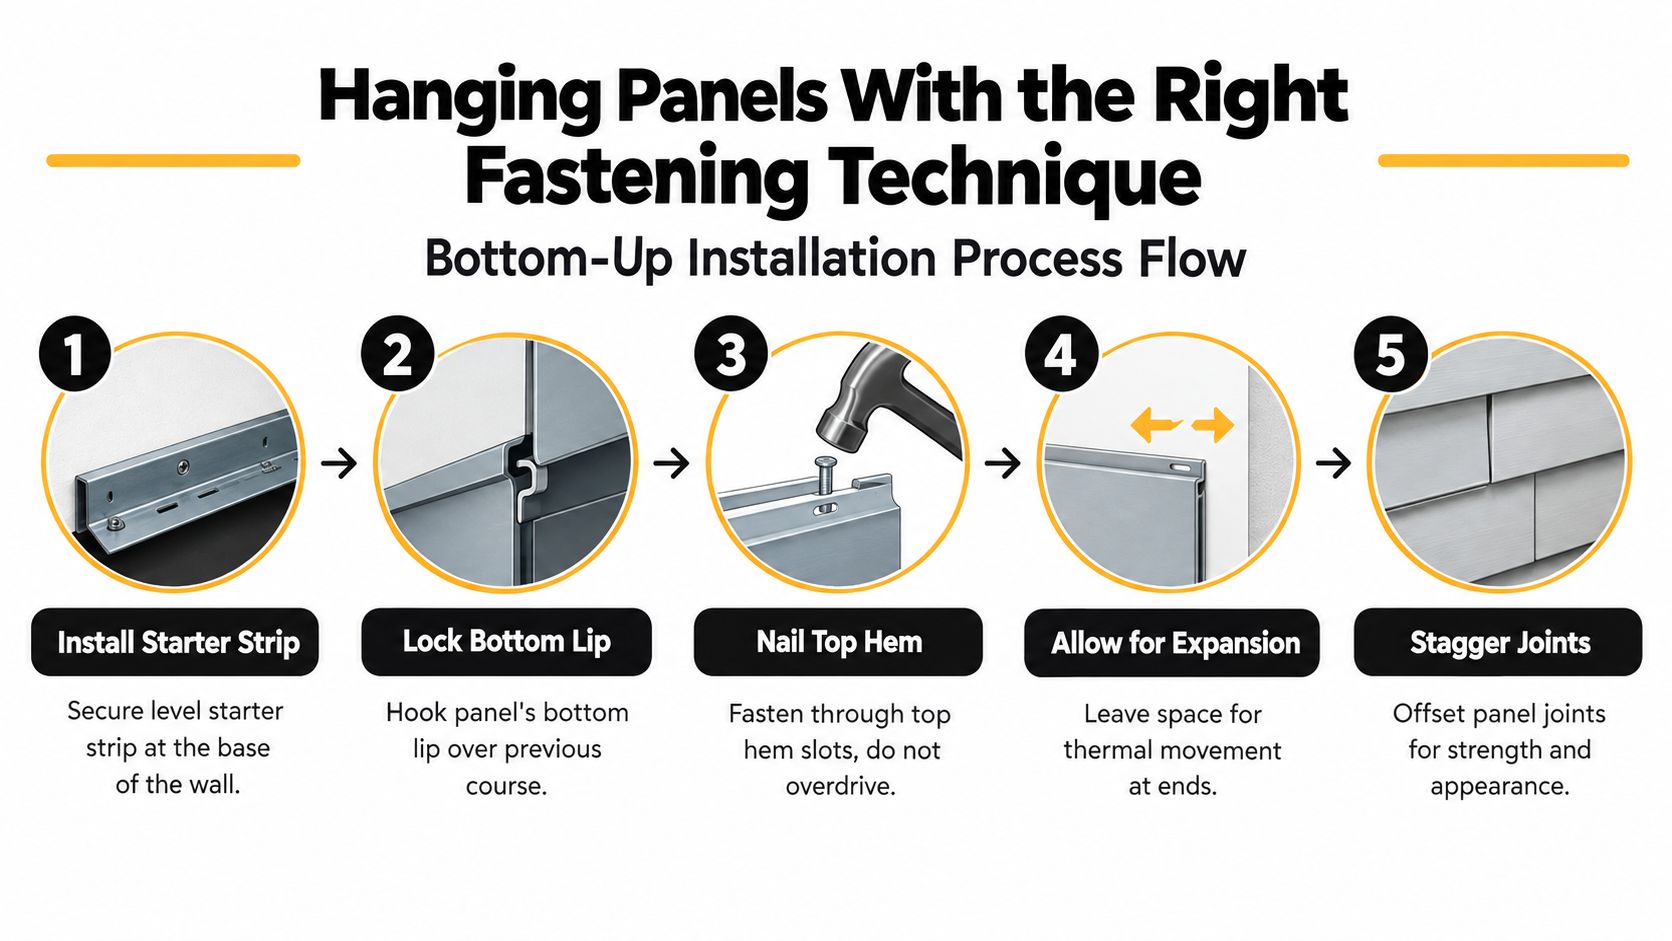
A Kansas City wall can look straight on installation day and still develop oil-canning by the next summer. Aluminum panels move with temperature, so the installation has to control fastening depth while allowing each course to shift. Work from the bottom up. Engage the first panel with the starter strip, verify its level, then fasten the top hem through the pre-punched slots.
Set every fastener in the center of the slot, away from the ends and the upturned tab. Leave the head slightly proud, approximately a 1/32-inch gap, about the thickness of a dime, so the panel can move laterally as temperatures change. The Angi installation guidance identifies centered fastening, controlled depth, bottom-up locking, and proper overlap as core installation practices.
Let the courses float
Hook the next course over the panel below and confirm the lock is fully engaged before fastening its hem. Keep the panel relaxed. Pulling it tight to hide a seam creates stored stress, especially where the ends enter receiving channels. That stress can show later as buckling or waviness.
Factory ends generally overlap by about 1 inch. Stagger seams between courses so the wall does not form a repeated vertical line. For field cuts, aviation snips and a nibbler provide better control than a rough abrasive cut, which can damage the finish or leave a contaminated edge.
Trim sequencing directs water away from the wall. Install the lower portion of a window transition first, followed by the sides and then the top, allowing upper pieces to shed over lower pieces. J-channel, corner posts, and flashing must function together as a drainage path. A neat-looking trim joint that sends water behind the weather barrier is still a failed detail.
Protect the panel from the fastener
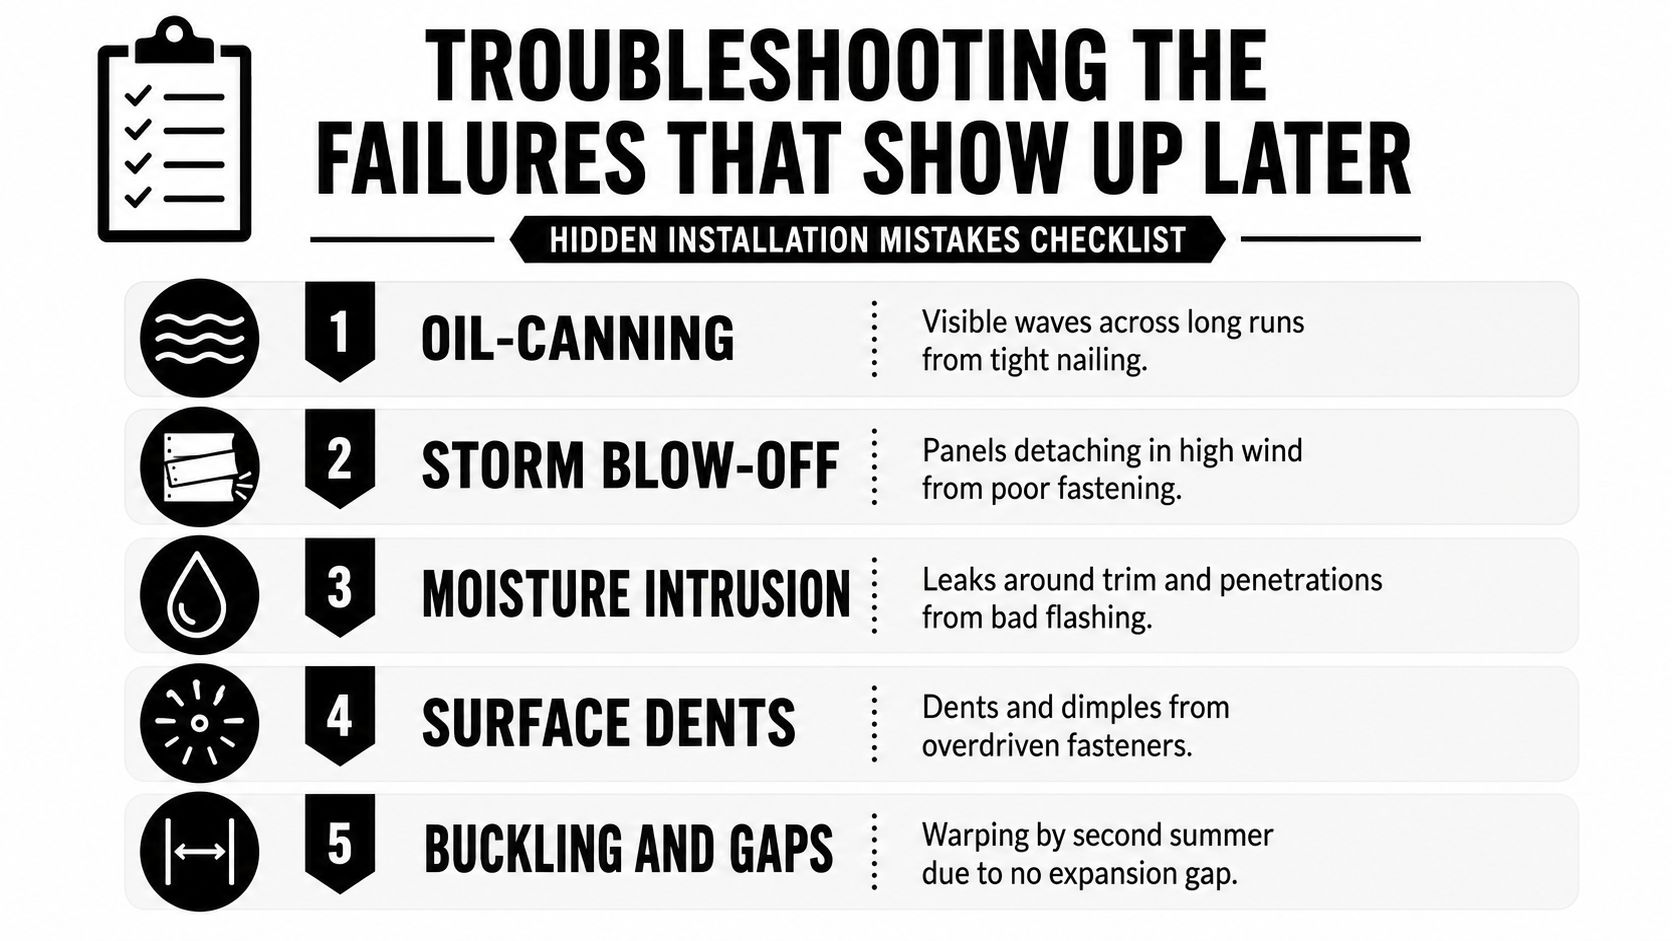
An overdriven nail dimples the hem and can clamp the panel against the wall. Face-nailing creates a fixed point that restricts lateral movement and leaves a visible hole requiring proper treatment. Keep fasteners away from material edges, and do not seal receiver joints with caulk unless the product instructions call for it. Store panels out of excessive heat.
At windows, doors, corners, and roofline transitions, cut panels to seat in their channels without force. Follow the clearance specified for the product. Flat substrate, correct fastening depth, and open movement points matter more than making every joint tight. Aluminum should look secure while remaining free to expand and contract.
Watch this short installation demonstration before attempting a small repair or planning a full wall replacement:
How Aluminum Stacks Up Against Other Midwest Siding
Kansas and Missouri homes face hot sun, cold weather, wind, hail, and repeated wetting. No siding wins every category, so compare the material against the failure you most want to avoid. Aluminum is light and non-combustible, resists insects and rot, and remains dimensionally stable in cold weather, but a hard impact can leave a dent that may be difficult to hide.
Vinyl usually wins on initial affordability and availability. Fiber cement offers a pronounced wood-grain appearance and strong impact performance, although its weight and handling requirements can raise installation demands. Engineered wood is easier to handle than fiber cement and can create a convincing wood appearance, but its moisture performance still depends on careful detailing.
| Material | Summer Heat Stability | Hail Resistance | Freeze-Thaw Cycle Rating | Paintable / Repaintable | Typical 30-Year Cost (installed, per sq. ft.) |
|---|---|---|---|---|---|
| Aluminum | Stable when fastened for movement and installed over a flat plane | Can dent, but is not typically punctured by ordinary impacts | Stable when protected from moisture intrusion | Yes | Varies by product, access, repairs, and finish |
| Vinyl | Can perform well when properly installed and ventilated, but heat can challenge weak installations | Resists many dents, but panels can crack or require replacement after severe impact | Performs well when properly installed, with movement allowed | Limited, follow product guidance | Varies by grade, design, labor, and removal |
| Fiber cement | Stable with correct detailing and ventilation | Generally stronger against impact than aluminum | Performs well when edges and joints remain protected | Yes | Varies by product, labor, painting, and wall complexity |
| Engineered wood | Handles heat when sealed and detailed correctly | Depends on product and impact location | Requires disciplined moisture control | Yes | Varies by product, finish, labor, and maintenance |
Don't treat broad climate labels as a substitute for a site inspection. A west-facing wall with little shade has different exposure from a protected north elevation, and a partial re-side may be limited by the trim profiles still available. For a deeper look at another common option, compare aluminum with these fiber-cement siding pros and cons.
Historical demand also affects repair planning. Aluminum siding usage declined sharply after its peak, so homeowners with older exteriors should confirm that replacement panels and compatible corner or window trim can still be sourced before committing to a small patch.
Troubleshooting the Failures That Show Up Later
A poor aluminum siding job may look acceptable at final cleanup. The evidence often appears after the wall experiences a full cycle of hot sun, cold nights, wind, and rain. Oil-canning, the visible waviness across a long panel run, usually points to a combination of overdriven fasteners, a tight receiver, or an uneven substrate. Reflective metal makes small wall irregularities easier to see.
Read the symptom before replacing panels
Buckling at seams often means the installer removed the material's ability to move. A panel nailed against the slot end, face-fastened, or forced tightly into a corner can push against its neighbor when the wall heats up. Cold-weather installation can make the mistake harder to spot because the panel is contracted when it gets installed.
Rust streaks deserve investigation rather than a quick coat of paint. Field cuts made with an unsuitable abrasive blade can damage the edge and leave residue, while incompatible steel accessories can create staining at fasteners and trim. Use the fastener and accessory materials approved for the system, and protect cut edges according to the product instructions.
Moisture intrusion usually begins at a transition. Missed head flashing, an improperly layered J-channel, or an unsealed penetration can send water behind the cladding. Check for soft sheathing, interior drywall staining, musty cavities, or efflorescence near foundation walls before assuming the roof caused the problem.
A panel can be sound while the wall behind it is failing. Diagnose the water path before replacing the visible siding.
Know when storm damage is separate from installation failure
A dent after hail isn't automatically evidence of faulty installation. Impact patterns, loose panels, displaced trim, and punctures require a different inspection from oil-canning or seam buckling. Homeowners dealing with a recent storm can review this guide to siding damage from hail before disturbing damaged areas.
The repair may involve releasing a panel, correcting the fastener depth, flattening or rebuilding the substrate, and reinstalling the course with the proper clearance. If the wall is wavy across a long run, patching one visible section rarely solves the cause. Correct the locked points and uneven plane first, then decide which panels need replacement.
Maintenance, Repairs, and When to Call a Pro
Aluminum siding is low maintenance, not maintenance-free. Walk the exterior after severe weather and look at corners, window trim, seams, lower courses, and penetrations. A loose panel, open receiver, or damaged flashing can let water reach the wall even when the siding surface still looks intact.
Wash the exterior with water and a mild cleaner using a soft brush. Avoid steel wool, abrasive compounds, and aggressive pressure that can damage the coating or drive water behind trim. Rinse from the top down, and keep runoff away from openings where it could enter the wall assembly.
Handle paint and dents deliberately
Older aluminum siding may chalk or fade even when the panels remain serviceable. Before repainting, clean and prepare the surface, verify that the coating system is compatible, and test an inconspicuous area. Painting can refresh a sound exterior, but it won't correct buckled seams, loose hems, or hidden moisture.
Small dents may be acceptable on a low-visibility wall. A panel in a prominent elevation or near a corner often deserves replacement because improvised flattening can stretch the metal and make the damage more noticeable. Keep spare pieces and record the product profile if matching material is still available.
Call for help when the wall tells you to stop
DIY work is reasonable for a small, accessible repair when the homeowner can identify the exact panel system and has the right removal tools. Bring in a qualified contractor when you find widespread rot, soft sheathing, complicated window flashing, multiple damaged elevations, or movement that extends across long wall runs.
A professional inspection should distinguish hail damage from installation defects and roof or gutter problems. It should also document the substrate condition, explain which trim must be removed, and identify whether a partial repair will match the existing finish. For a Kansas City home, that preparation matters more than rushing to cover the wall before the next storm.
Two States Exteriors LLC can inspect siding, identify storm and hail damage, and plan repairs or replacement with the wall preparation and flashing details aluminum requires. Visit Two States Exteriors LLC to request an exterior assessment and discuss the right siding solution for your Kansas City area home.


