
A January storm has opened a leak over your Kansas City bedroom. You've moved the bed, set out a bucket, and started wondering whether a roofer can fix the problem now or whether you're stuck waiting until spring. Roofing during winter is possible, but the right response might be temporary protection, a targeted repair, or replacement during a suitable weather window. The decision starts with the hazard and the conditions that day, not the month on the calendar.
When Winter Roofing Makes Sense and When to Wait
An urgent leak doesn't automatically justify a full tear-off, and cold weather doesn't automatically rule one out. Before booking work, separate what must happen to protect the house from what can safely wait.
Winter Roofing Go or Wait by Condition
| Condition on the day | Call | What to do |
|---|---|---|
| Deck dry, no frost or ice, dry forecast for the work window | Proceed | Follow the shingle maker's cold-weather instructions and work in the warmest part of the day. |
| Snow, ice or frost still covering the roof | Wait | Keep crews off an iced deck and schedule once the surface is clear. |
| High winds or wet weather | Postpone | Gusts and standing water raise fall and material-handling risks. |
| Active leak after a storm, full replacement not yet possible | Stabilize now | When safe access is possible, install a secured water-shedding cover that doesn't trap moisture, then schedule full work. |
| Single damaged area, shingles still pliable, deck dry | Repair | Address failed caulking, flashing or damaged shingles when materials can be handled and applied safely. |
| Full replacement, roof still frozen or shingles brittle | Wait for a thaw | Book a warmer stretch that supports safe handling and reliable sealant bonding. |
A proceed decision still requires a workable plan for the entire exposed phase. A dry morning isn't enough if precipitation arrives before the crew can protect the decking. Likewise, air temperature alone doesn't establish whether a shaded roof surface is safe.
Check the Surface, Weather and Material
The surface check comes first: the deck must be dry and free of ice and frost. The weather check asks whether the forecast gives the crew enough dry, manageable conditions to complete and protect the planned area. The material check confirms that the exact roofing product can be installed using its approved cold-weather procedures.
Manufacturer instructions matter because underlayment, adhesives and roofing components don't all have identical installation requirements. Roofing Contractor's guidance on winter attic and roof conditions emphasizes product-specific weather protection and the importance of controlling cold-weather moisture.
For the bedroom leak, emergency stabilization may be the sensible first phase. A secured covering can shed water while the contractor evaluates the damage and waits for conditions suitable for permanent work. It isn't permission to send someone onto an iced roof, and it shouldn't become an indefinite substitute for repair.
Before booking: Can this phase be completed safely and sealed reliably under today's conditions?
Ask which phase is planned for today and why. A useful answer identifies the work area, the weather window, the temporary protection and the conditions that would stop the job.
How Cold Weather Changes Shingles and Sealant
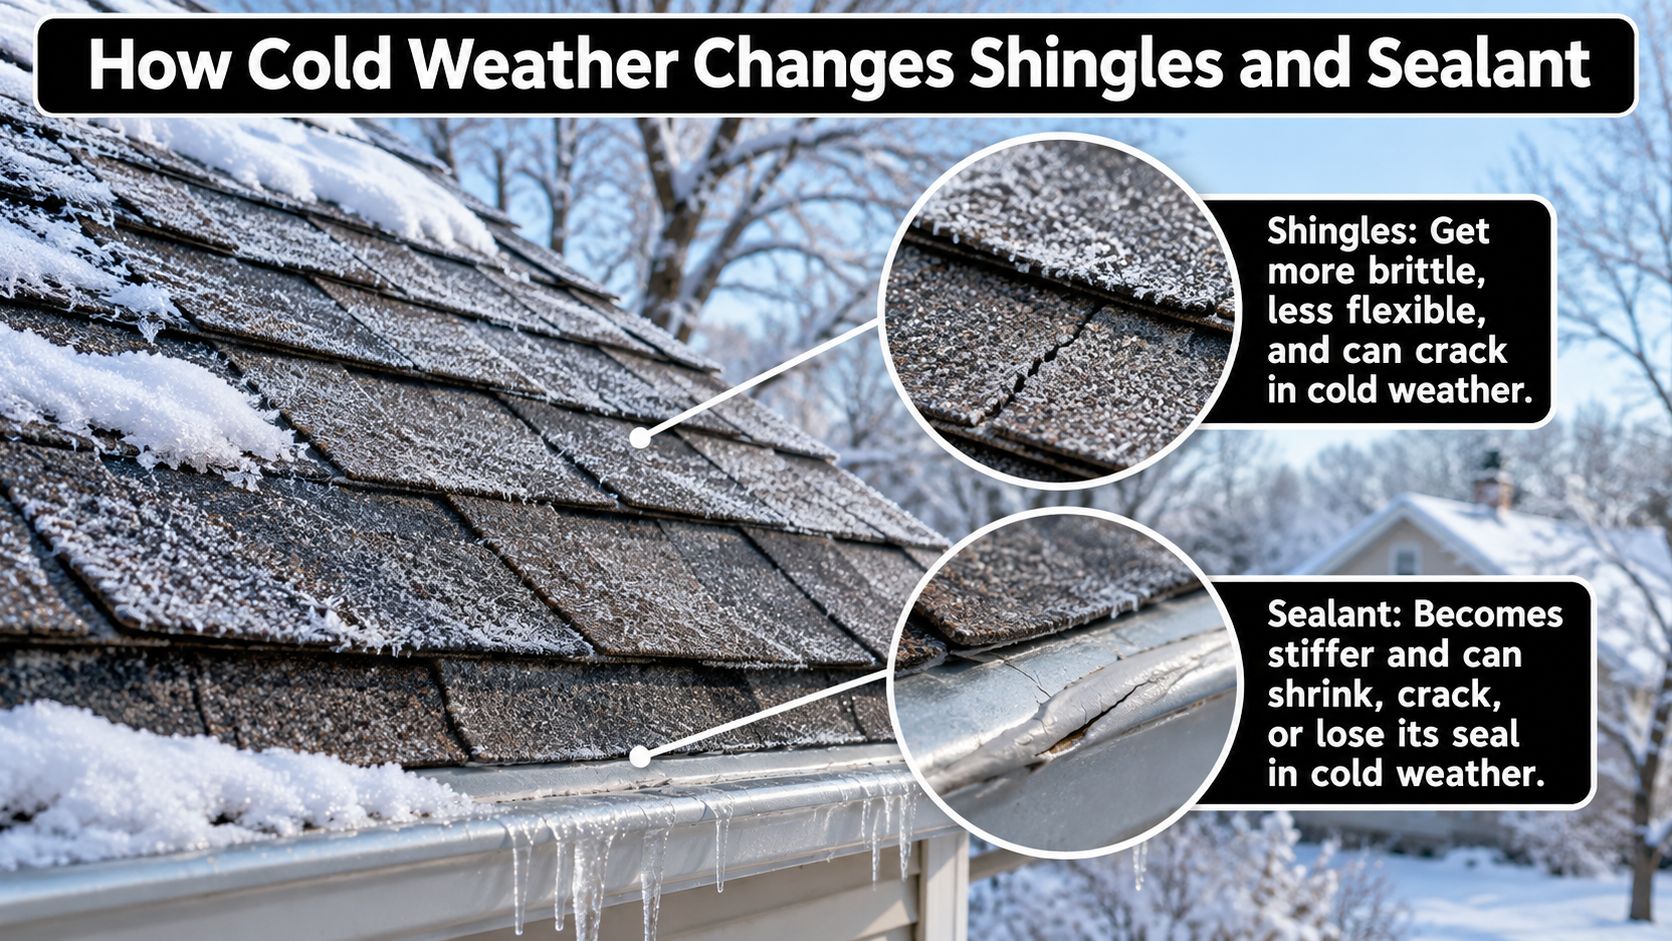
A cold asphalt shingle behaves more like a stiff plastic lid than a flexible sheet. Bend it aggressively and it may crack instead of giving. That matters when an installer lifts an existing tab, carries bundles or fits shingles around a roof penetration.
The Asphalt Roofing Manufacturers Association's cold-weather installation bulletin explains that shingles lose flexibility as temperatures fall, increasing handling difficulty and the risk of damage. It also warns that nearly invisible frost or ice can create a serious fall hazard on a roof that appears dry.
Installed Doesn't Always Mean Sealed
Fasteners and sealant perform different jobs. Nails attach shingles to the roof assembly. Factory-applied sealant strips bond the intended shingle surfaces together, but those strips may not activate immediately during cold conditions.
That creates an important distinction for homeowners: a roof can look finished before the adhesive has developed its intended bond. Don't assume neat rows and flat-looking tabs prove sealant engagement. Ask what the product requires while the roof waits for suitable warmth.
Hand-sealing may be appropriate when the manufacturer specifies it, but the adhesive type, placement and amount aren't matters for improvisation. An arbitrary smear of roofing cement isn't equivalent to following the product bulletin.
What You Can Check Without Climbing
You don't need to walk the roof to ask useful questions or spot a reason for a follow-up:
- Material handling: Ask whether bundles will stay supported and protected from weather rather than being bent over ridges or handled roughly.
- Installation method: Ask whether the exact shingle requires hand-sealing or other approved cold-weather measures.
- Visible movement: From a safe ground-level position, note tabs or corners that remain visibly raised after suitable warm weather.
- Closeout evidence: Request photographs and an explanation of how the contractor confirmed bonding.
A ground-level view can identify a concern, not certify adhesion. Leave lifting tabs and checking the bond to the roofer, since probing a cold shingle can create the damage you're trying to detect.
Cold doesn't forbid the work. It changes the handling, the installation method and the checks required before calling it complete.
How a Winter Shingle Job Is Done Right
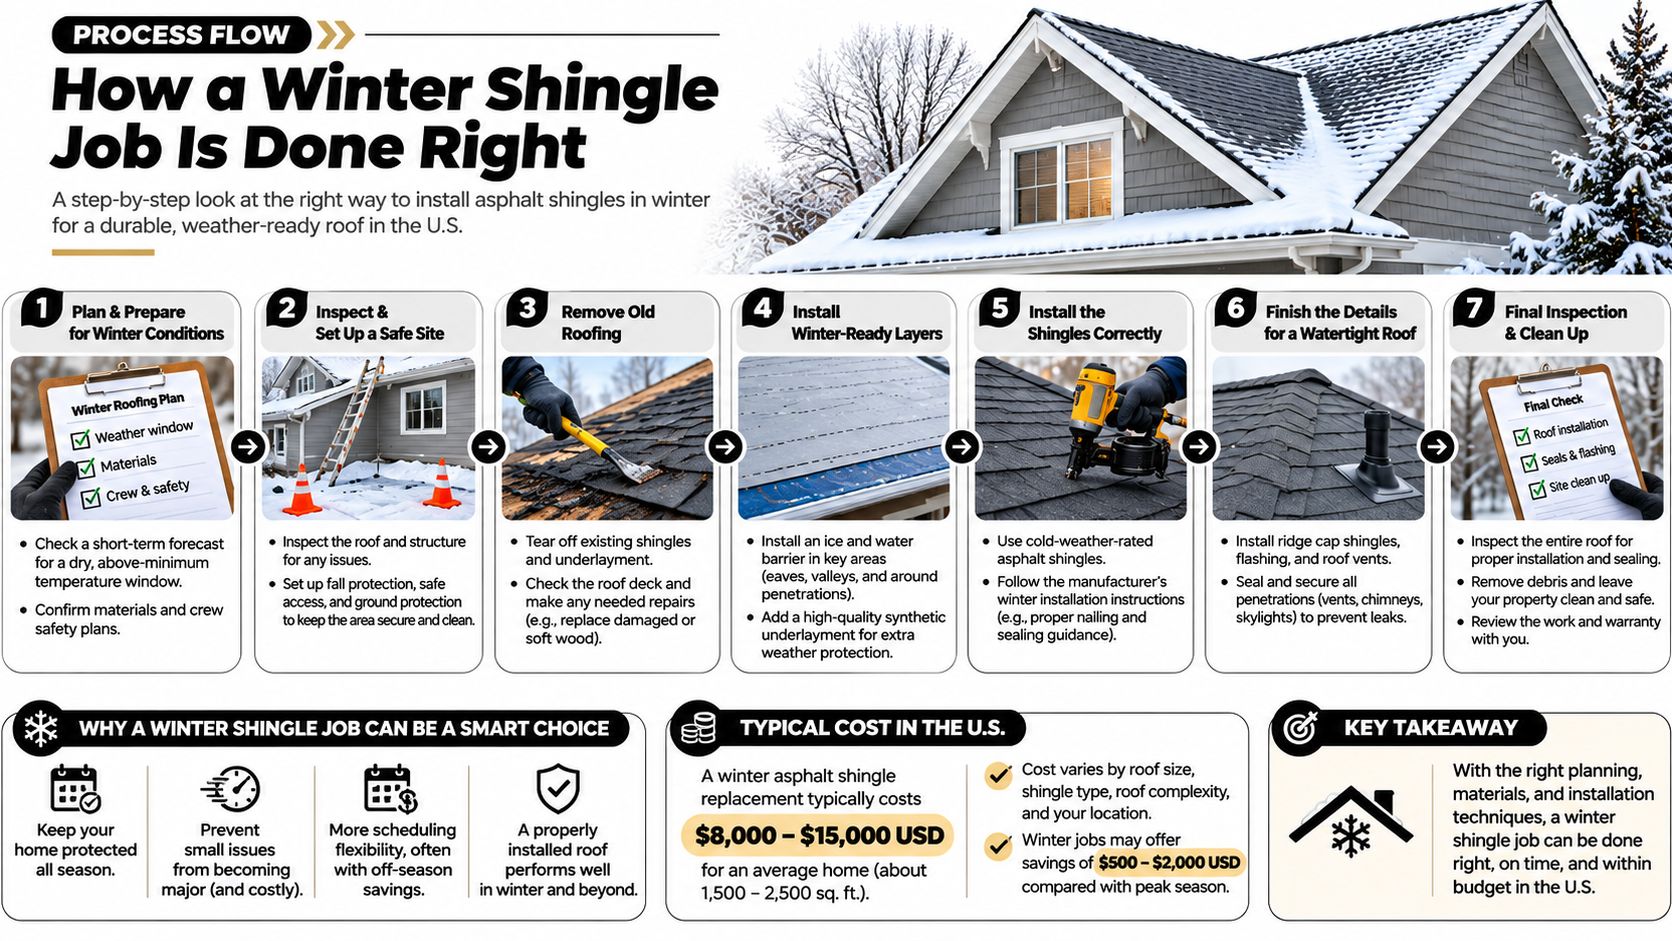
A winter shingle job depends on the roof surface, the forecast and the product instructions. For an architectural shingle installation, the contractor should identify the shingle and explain how its requirements shape the work planned for that day.
The Installation Sequence
Check the roof before access and tear-off. Make sure the working surface is free of ice and frost, and exposed decking is dry before it is covered. Moisture can interfere with adhesive components and flashing details.
Follow the instructions for the exact products. Identify the shingle, underlayment and accessories before opening the roof. An acceptable method for one product may not suit another, so keep the relevant installation instructions available to the crew.
Protect and stage the bundles. Keep materials supported and shielded from precipitation. Move them close to the work without overloading one area, and limit unnecessary bending and repeated handling of cold shingles.
Choose a safe weather window. OSHA's winter-weather guidance advises scheduling exposed work during warmer periods and avoiding high winds, wet weather and icy conditions. Set a stopping point before conditions deteriorate, especially while the roof is open.
Use only approved cold-weather sealing and fastening methods. Hand-seal tabs or add temporary measures only when the manufacturer directs. The attachment method must suit the roofing system. An installer's preferred adhesive is not a substitute for the specified material.
Plan a bonding check for suitable warm conditions. Ask the contractor to inspect sealant engagement and photograph representative areas. Flat tabs alone don't confirm that the sealant has bonded.
Plan for Interruptions Before They Happen
Before tear-off begins, agree on how the exposed area will be protected if work stops. Limit removal to an area the crew can bring to a weather-resistant stopping point, and have a secured water-shedding covering ready. Position it to direct runoff away without trapping moisture beneath it.
Footing matters on permitted access routes. If considering traction equipment, you can shop integrated boot ice cleats. Cleats do not make an icy roof safe to work on or replace fall protection.
A sound closeout covers more than straight shingle courses. Confirm that the roof was protected during construction, then arrange a professional check of sealant engagement after suitable warm weather.
Why Ice Dams Form and How to Stop Them
Ice dams are usually an attic heat problem, not a gutter problem. Warm air escaping from the living space heats portions of the roof deck. Snow melts over those warmer areas, runs toward colder eaves and refreezes into a ridge that obstructs drainage.
Water can then back up beneath shingles rather than flowing off the roof. The resulting damage may extend through underlayment and decking into insulation, ceilings, siding and gutters. Removing visible ice without controlling the escaping heat leaves the main cause unresolved.
Fix Heat Transfer Before Adding Vents
Start with air sealing around attic penetrations, plumbing and wiring openings, attic access points and recessed fixtures. Use assemblies appropriate to the penetration, and preserve required clearances around heat-producing equipment. Then address insulation depth and continuity without blocking ventilation paths.
Balanced ventilation helps keep roof-deck temperatures more uniform. Roofing Contractor's technical discussion of ice dams describes intake equal to or greater than exhaust and another arrangement with approximately 40–50% of total ventilation openings at the ridge, with the remainder at the eaves.
Those proportions aren't a substitute for assessing the actual attic. A ridge vent won't perform as intended when insulation blocks the soffit intake. Adding exhaust openings without correcting air leaks can also leave the heat-transfer problem unresolved.
For Kansas City homes, a practical inspection should cover:
- Insulation coverage: Look for thin spots, gaps and compressed material, not just depth near the hatch.
- Soffit airflow: Check for clear intake paths and correctly positioned ventilation baffles.
- Ridge exhaust: Confirm continuity and compatibility with the intake arrangement.
- Exhaust routing: Verify that bathroom and dryer ducts discharge outdoors through appropriate terminations.
- Deck condition: Note frost, moisture staining or damp sheathing.
A review of roof ventilation requirements should consider the whole airflow path, not just the presence of a ridge vent.
Ice Dam Symptoms, Causes and Fixes
| Symptom | Likely cause | Fix |
|---|---|---|
| Icicles at the eaves with a ridge of ice above them | Attic heat melts snow that refreezes at colder eaves | Air-seal attic penetrations, install code-appropriate insulation and balance soffit and ridge ventilation. |
| Ceiling stains near exterior walls after a thaw | Meltwater backing up beneath shingles | Photograph the stain, check safely for wet insulation and arrange professional assessment. |
| Frost on attic sheathing in winter | Warm, moist air reaching a cold deck | Correct bath and dryer exhaust routing, seal bypasses and assess intake and exhaust balance. |
| Ice in gutters while the attic stays dry | A possible gutter drainage issue rather than confirmed attic leakage | Clear only from secure ground-level access and check downspout drainage. |
A dry attic doesn't prove the gutters are the only problem. Treat these symptoms as diagnostic clues, especially when the same area repeatedly freezes.
Snow Load and Structural Risk on Winter Roofs
Snow and ice add weight that the roof framing, walls and foundation must carry. That makes winter roof maintenance a structural concern as well as a waterproofing concern. A roof doesn't need to leak before its loading deserves attention.
Signs to Note From a Safe Location
Look from the ground or from an interior area you can access safely:
- Changed roof shape: A newly sagging ridge, dipped roof plane or visibly distorted roofline warrants assessment.
- New movement indoors: Doors that suddenly stick or fresh cracks at drywall corners can justify investigation when they appear alongside heavy accumulation.
- Ceiling deformation: Bowing ceilings, pronounced new cracks or movement require immediate caution.
These signs don't establish the cause by themselves. If you suspect structural movement, keep people away from the affected area and seek urgent professional guidance rather than entering the attic to investigate.
Why a Snow-Depth Rule Isn't Enough
The U.S. Forest Service's National Snow Load Information resource directs designers to the International Building Code and ASCE 7, Minimum Design Loads for Buildings and Other Structures. Applicable criteria reflect location and environmental conditions, not a universal assumption about how much snow every roof can carry.
Exposure, elevation, roof geometry and weather history influence the assessment. Drifting, ice buildup, obstructed drainage and repeated freeze-thaw conditions can also create problems that aren't obvious from a uniform-looking blanket of snow.
An older Kansas City home may warrant attention because its framing condition or alteration history is uncertain. On a commercial low-slope roof, a deep drift beside a taller wall may be more concerning than the shallower accumulation elsewhere. Neither situation can be judged reliably by comparing it with last winter.
This video provides an additional visual reference for winter roof concerns.
Book a structural evaluation when accumulation accompanies new deformation, when existing damage is known, or when the building's capacity is uncertain. Local code officials and qualified design professionals, not a generic snow-depth rule, should establish the relevant structural criteria.
What to Do After a Winter Storm and How to Book Inspection
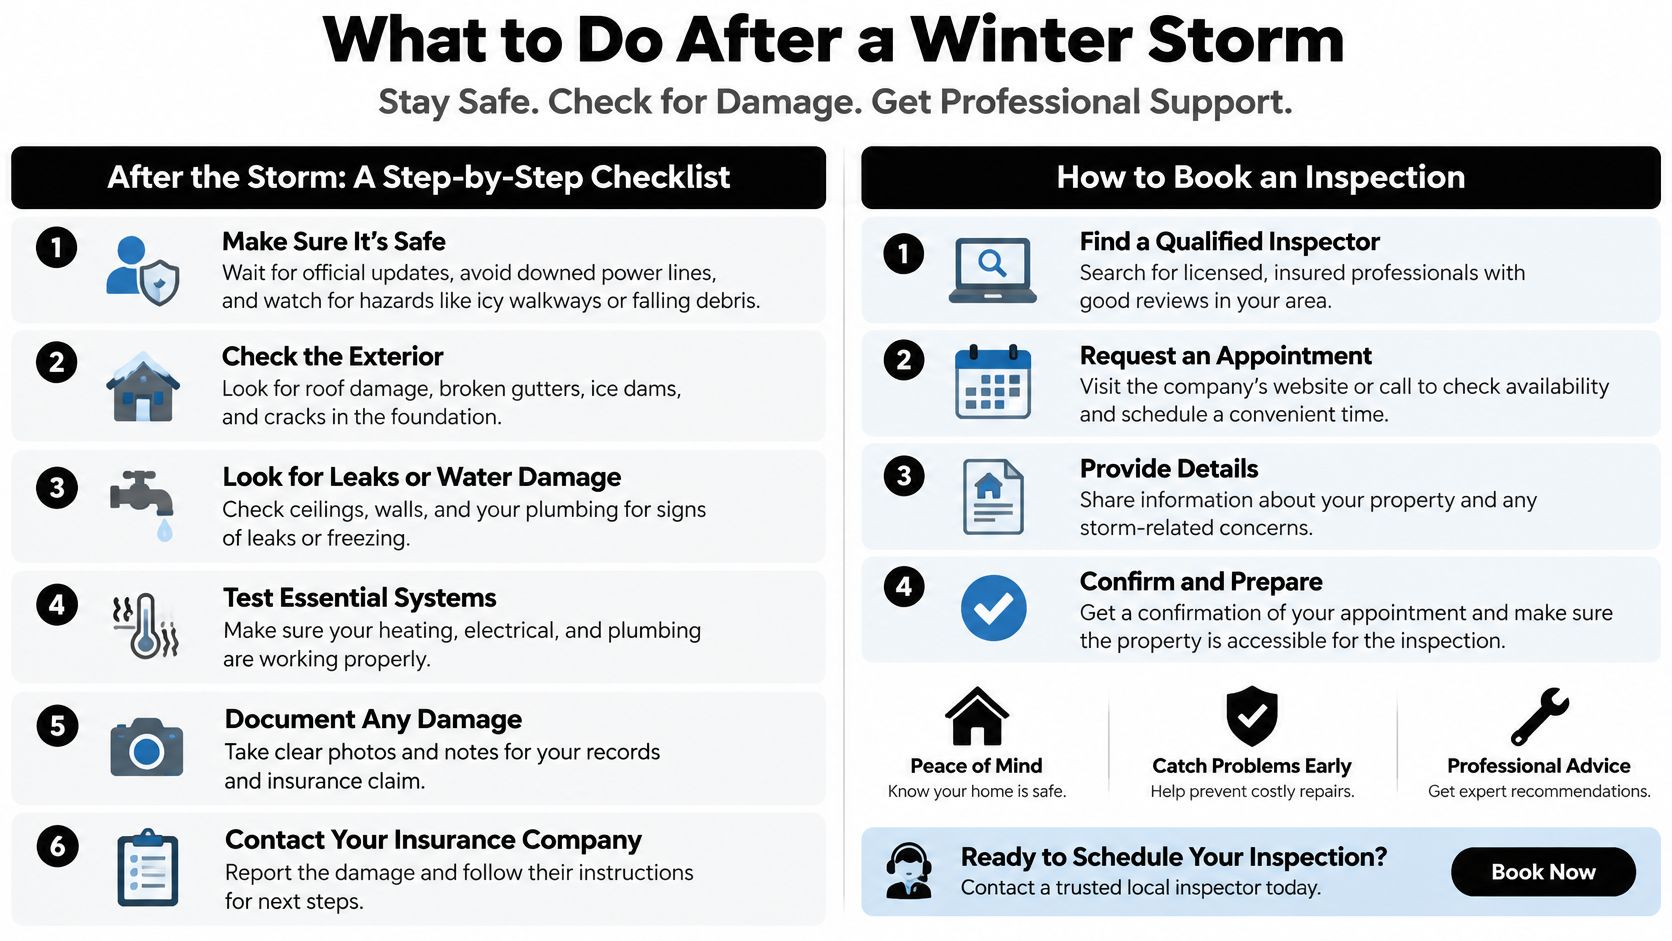
Climbing onto the roof or chipping ice from the eaves can turn a repair problem into an injury. Snow can conceal roof edges and skylights, while ice and wind make access unpredictable. Keep the initial assessment indoors or at a secure ground-level position.
The FEMA winter-weather hazards packet explains the connection between attic heat leakage, ice dams and water intrusion, and warns that heavy snow can increase roof-failure risk. The priority is protecting occupants and diagnosing the cause, not making the roof look clear.
Follow a Safe Triage Order
Photograph interior damage before disturbing it. Capture ceiling stains, drips and wall discoloration with dated images, including a wider view that identifies the room. Don't stand beneath a bulging ceiling or touch wet electrical fixtures.
Look from the attic hatch only if access is safe. Use a flashlight to note wet insulation, frost on sheathing or unexpected daylight. Don't walk across ceiling joists, disturb wiring or enter an area with suspected structural damage.
Address gutters only from secure ground-level access. A long-reach tool may help with accessible loose debris, but don't work beneath hanging ice or use a ladder standing on ice. Leave inaccessible blockages for a professional.
Protect the room without creating another hazard. Move valuables, place containers beneath ordinary drips and keep people away from damaged ceiling areas. Don't pry beneath shingles, chop ice with a shovel or install heat cables as an improvised emergency fix.
Record the storm and the affected areas. Note when the storm occurred, when you first noticed water and which rooms or exterior surfaces appear affected. Keep photographs, repair correspondence and mitigation receipts together for the insurance discussion.
Don't Confuse Clearing Snow With Fixing the Leak
Say a family shovels snow off the roof during a February thaw. The bedroom drip slows, but water later appears inside the exterior wall. That's a hypothetical example of why a changed leak location doesn't prove the original problem was repaired.
Water can travel along roof components before becoming visible indoors. Shoveling may also damage shingles while leaving the attic heat source untouched. The useful diagnostic questions are where water entered, how it moved and what allows the condition to recur.
Stop-work signal: New roof movement, a bowing ceiling or suspected electrical contact changes the priority from cleanup to occupant safety.
Don't ask a roofer to solve an uncertain structural problem by removing snow without an assessment. A safe removal plan must account for access, hidden roof features, the roofing material and the building's condition.
Bring the Right Information to the Inspection
Prepare a small inspection file before the appointment. Include interior photos, safe ground-level exterior photos, the approximate roof age if known, previous repair records and the storm date. If you observed the attic safely, describe what you saw without guessing at the cause.
Ask questions that require a concrete work plan:
- Today's scope: Is the immediate need stabilization, a localized repair or replacement?
- Product requirements: Which cold-weather instructions apply to the proposed shingles and accessories?
- Weather protection: How will exposed decking be protected if work stops overnight?
- Completion check: How will sealant engagement be verified and documented?
- Claim records: What photographs and written findings will distinguish observed damage from proposed repairs?
A residential roof inspection is most useful when it connects exterior findings with the interior symptoms, rather than treating a ceiling stain as proof that the whole roof needs replacement. Ask for the reason behind the recommended scope.
Keep Roof Response Separate From Other Storm Preparation
Power-loss planning belongs in a household storm plan, but it doesn't determine whether the roof is safe to access. For readers also managing a Florida property, ClimateGuard Cooling Services' Sebring hurricane generator prep tips address that separate preparedness topic. Kansas City winter roof decisions still require a site-specific roofing assessment.
We operate 24/7 to handle roofing needs promptly, but availability doesn't remove weather or access limits. Two States Exteriors LLC offers emergency roofing services and annual or semiannual roof inspections, allowing urgent damage and recurring winter concerns to be addressed at the appropriate time.
When you call, describe any active water entry or suspected movement first. Then explain what you can safely see and provide your photographs. You don't need to diagnose the roof before requesting help, and you shouldn't climb it to make the inspection request more complete.
Two States Exteriors LLC offers emergency roof repairs, replacement and inspections for winter storm damage and recurring roof concerns. Visit Two States Exteriors LLC to request an assessment, share your damage photos and discuss whether today calls for temporary protection, a targeted repair or a better weather window.