You're standing in the driveway on a hot Kansas City afternoon, looking at faded siding that was sold as never needing paint, and wondering whether a new color is a smart weekend project or an expensive mistake. You're not really choosing a color first. You're choosing whether your panels are still sound enough to coat, and whether that color will push them hotter than they can handle.
The Short Answer on Exterior Paint for Vinyl Siding
The short answer is this. Use a vinyl-rated 100% acrylic or acrylic-urethane paint in a satin sheen, applied only over sound, thoroughly washed siding, and only in a color that both the siding maker and the paint maker approve for vinyl. That's the whole decision in one sentence, and every part of it matters.
Say your house has straight, solid panels that have faded to a chalky beige you no longer like. That home is a candidate. Vinyl is a thermoplastic cladding, not wood. It grows in heat and shrinks in cold far more than lumber does, it chalks as it weathers, and it sheds any coating that dries stiff or pulls in too much sun.
When homeowners ignore those three facts, they get three predictable failures. You'll see buckled courses from excess heat, peeling film from a rigid or poorly bonded coating, and lap marks from painting hot panels in direct sun. Each failure has a cause you can check before you buy gallons.
Work in this order. First decide whether painting is the right fix at all. Then pick the coating and sheen, understand how heat and color interact, wash and apply carefully, and set a realistic service life. If the job is two stories, heavily chalked, or mixed with damaged panels, a professional assessment comes before any masking tape.
A coating only succeeds when the panels are still sound and the color won't overheat them.
Whether to Paint Repair or Replace the Siding
A homeowner prices out new siding, gets sticker shock, and reaches for paint instead. That instinct is worth slowing down. A fresh color over failing cladding does not save money. It spends your coating budget on a substrate that keeps failing underneath the film, and the repaint arrives years early. Painting is the economical path only when the vinyl is still sound and the new color will not push the panels past their movement limits.
Before you think about products, walk the house slowly and look where water and movement show up first. Check the lower courses near grade, the trim around window and door penetrations, and every panel joint. Look for staining below joints, soft spots you can feel through the panel, and musty odors near penetrations after rain. Those signs point to water behind the wall, which is a repair problem rather than a color problem.
What counts as cosmetic and what does not
Even fading and light chalk are cosmetic. Run a dark cloth across the panel. If it picks up a pale residue but the panel underneath is straight, firm, and well locked to its neighbors, washing can make that surface paintable.
Warped, brittle, cracked, or heavily oxidized panels are a different story. A paint film cannot restore flexibility or impact strength to vinyl that has already given up. Coating over active water entry is worse than doing nothing, because paint can conceal sheathing damage while the leak keeps working. Guidance on whether you can paint vinyl siding makes the same point: substrate condition is the decision that comes before color, and color is only the second half of it.
Kansas City weather adds two complications. Freeze and thaw cycles work water into small cracks and failed joints, then expand it. Hail and storm debris can crack corners and loosen fasteners in ways that are hard to spot from the ground. A panel that looks intact from the sidewalk may be split at the butt edge or come apart along the course above it.
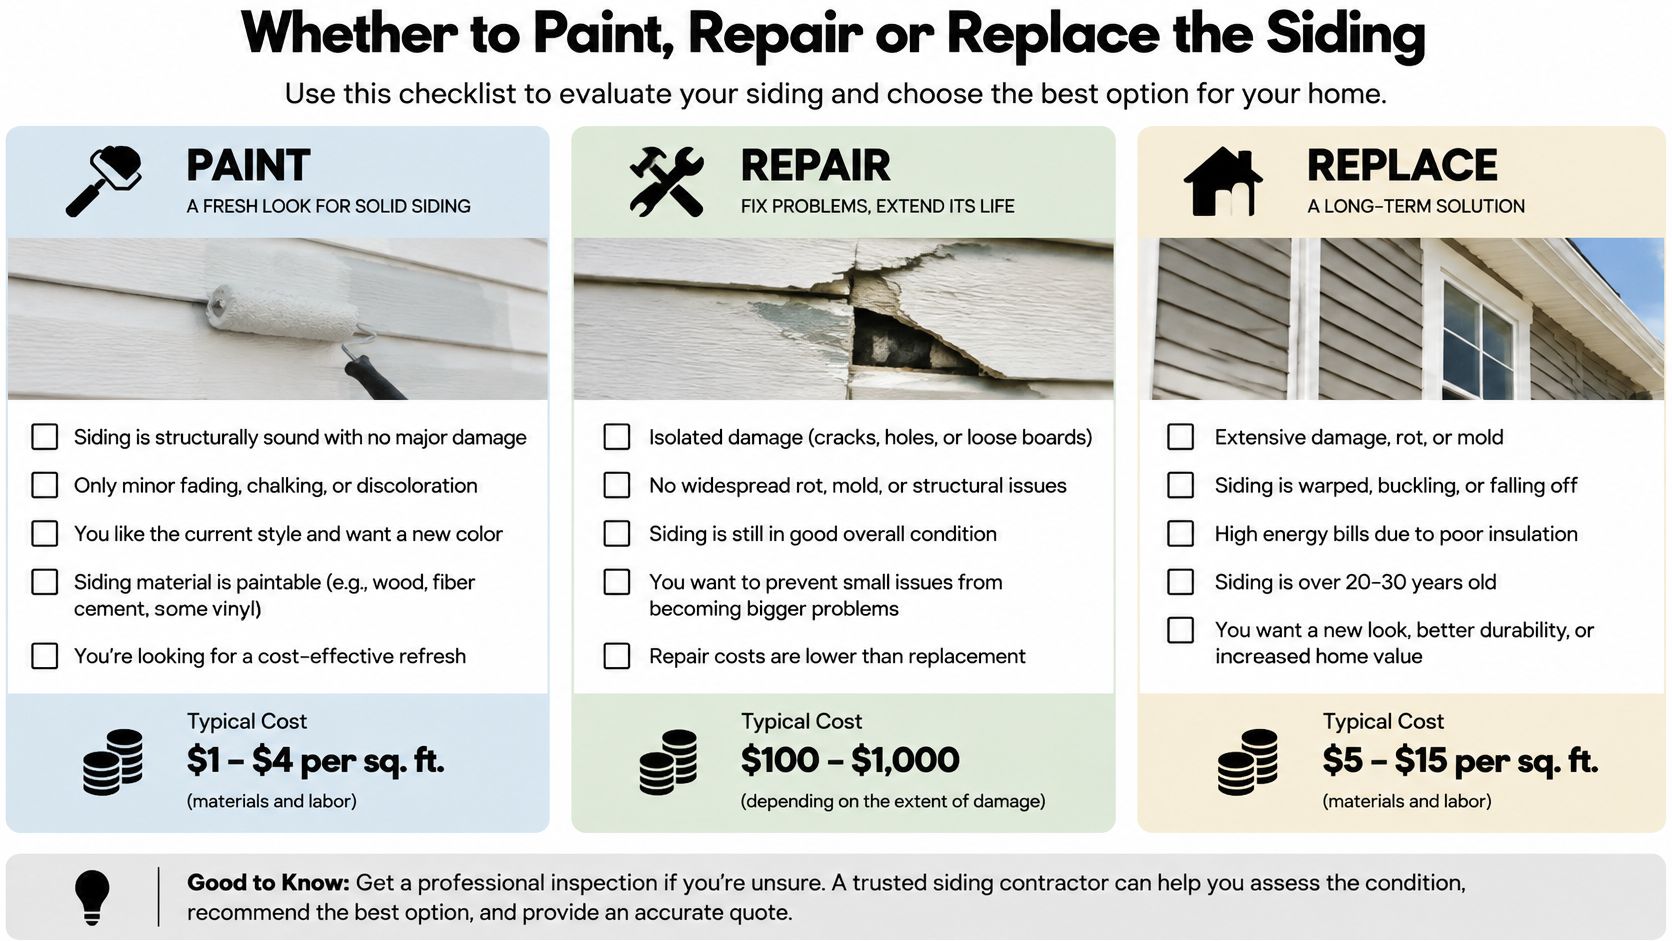
Paint, repair, or replace vinyl siding
| What you see | Verdict | Why |
|---|---|---|
| Even fade or light chalk on straight, solid panels | Paint after washing | Cosmetic only; a vinyl-rated acrylic can refresh it |
| Dirty mildew with sound panels | Wash, dry, then paint if color still needs help | Soil is not damage; coating over mildew fails |
| Failed caulk at windows and doors, panels still straight | Repair the joints, then reassess paint | Seal vertical joints only; leave horizontal laps free |
| A few loose or unlocked courses | Refasten or replace those panels, then reassess | Paint will not hold a panel that can flap |
| Warped, buckled, or heat-distorted courses | Replace those panels; do not coat them | The vinyl has already moved past its clearance |
| Brittle, cracked, or heavily oxidized siding | Replace rather than paint | A film cannot restore impact strength |
| Stains, soft sheathing, or a musty odor at penetrations | Fix the leak and damage first | Paint would hide water entry |
| Hail or storm strikes, especially after a Midwest storm | Inspect before any coating; replace damaged courses | Cracks and loosened locks may be hidden |
Read the table elevation by elevation, not house by house. A shaded north wall can pass easily while a hail-hit west wall needs several courses replaced, and the two calls can coexist on the same house. You can paint one elevation, replace panels on another, and coat everything to match once repairs are done.
Two details trip homeowners up here. First, failed caulk belongs at vertical joints around windows, doors, and corner trim, where you can remove the old bead and reseal. Horizontal laps between courses must stay free to slide, because vinyl has to move with temperature. Sealing them shut traps that movement and invites buckling. Second, a loose course is a fastening problem, not a coating problem. Re-lock it, refasten it within the nailing slots, or replace it. Paint over a flapping panel just gives you a better-looking panel that still flaps.
Here is a practical stop rule. If more than scattered courses on a wall land in the repair or replace rows, stop pricing paint for that wall and put the money into the substrate first. Sound vinyl holds a quality coating for years. Damaged vinyl wastes it in a fraction of that time, and you pay twice: once for the failed coat, and again for the replacement you needed anyway.
Paint Types and Sheens That Belong on Vinyl
Start with the default and work outward. For field siding, choose a 100% acrylic latex or acrylic-urethane system whose label or technical data sheet names vinyl by name, and buy it in satin. If the word vinyl doesn't appear on the can or the data sheet, put the can back. That one habit prevents most product mistakes.
Why satin? It hides the minor waviness and texture that every long vinyl course has, and it washes clean better than flat paint when Kansas City dust and pollen settle on it. Eggshell is a reasonable second choice when the maker rates that sheen for vinyl. Going glossier doesn't make the coating tougher on a broad wall. It mostly makes every wave and nail pattern announce itself in low sunlight.
Exterior coatings and sheens for vinyl siding
| Coating | Use on vinyl siding | Sheen to choose | Heat and movement | Realistic life |
|---|---|---|---|---|
| 100% acrylic latex labeled for vinyl | First choice for field courses | Satin | Stays flexible as panels expand | About 8 to 12 years |
| Acrylic-urethane system approved for vinyl | Premium when the data sheet allows it | Satin or eggshell | Flexible film; honor the recoat window | About 8 to 12 years |
| Heat-reflective vinyl-safe color | Darker looks only inside an approved palette | Satin | Infrared pigments cut solar gain | Similar to a quality acrylic if approved |
| Flat or matte acrylic | Only if the maker rates that sheen for vinyl | Flat | Hides flaws but holds dirt and chalk | Shorter time looking clean |
| Semi-gloss or high gloss | Doors, shutters, and trim, not broad walls | Semi-gloss or gloss | Shows waves; gloss is not a heat fix | Rated for trim use, not field walls |
| Ordinary exterior latex not rated for vinyl | Avoid on siding | Any | May dry stiff and crack at joints | Often 3 to 5 years or less |
| Oil or alkyd enamel | Do not use | Usually gloss | Brittle film peels as vinyl moves | Early failure |
Read the rejection rows as carefully as the approval rows. Ordinary exterior latex that never mentions vinyl may look identical in the can, but it isn't formulated to flex across a moving thermoplastic panel. It can dry comparatively stiff, then crack at joints and peel in sheets as the siding cycles through hot afternoons and cold nights. Oil and alkyd enamels are worse. They cure into a hard, brittle film on a substrate that refuses to sit still, so early failure isn't bad luck, it's the expected outcome.
Flat paint tempts people because it hides flaws. On vinyl it also holds dirt and chalk in its rough surface, so the wall looks tired again long before the film fails. If you want a low-sheen look, use a flat or matte product only when the manufacturer specifically rates that sheen for vinyl siding, and accept more frequent washing as the trade.
Reserve semi-gloss and high gloss for the parts of the house that reward it. Doors, shutters, and trim are small, mostly flat, and easy to recoat. On a twenty-foot siding course, gloss turns normal oil-canning into a fun-house reflection, and it does nothing to reduce heat. Sheen is an appearance choice, not a thermal strategy.
The heat-reflective row is where product selection and color selection meet. If you want a deeper color than what's on the house now, that approved palette is your only safe route, and it belongs to the color checks you'll work through before buying. Homeowners comparing regional advice will find the same vinyl-first logic in siding painting guidance for Columbus homeowners, which is a useful cross-check that this isn't a local quirk. For brand-by-brand comparisons, the roundup of exterior paint brands worth shortlisting for Kansas City homes helps you match a product line to its data sheet before you're standing in a store aisle.
One more buying habit matters. Photograph the can label and download the technical data sheet for the exact product and sheen you're considering. Confirm three things in writing: vinyl is a listed substrate, the sheen you want is covered, and your color sits inside the maker's vinyl-safe palette. If a store employee can't point to those three lines, don't let a verbal yes substitute for them.
The service-life column explains the wide range of estimates you'll hear from neighbors. The split isn't about secret additives. A conventional or poorly prepared system gives up early, while a vinyl-rated acrylic over sound, well-washed siding lasts far longer. You're buying preparation and compatibility as much as you're buying paint.
How Heat Makes Vinyl Move
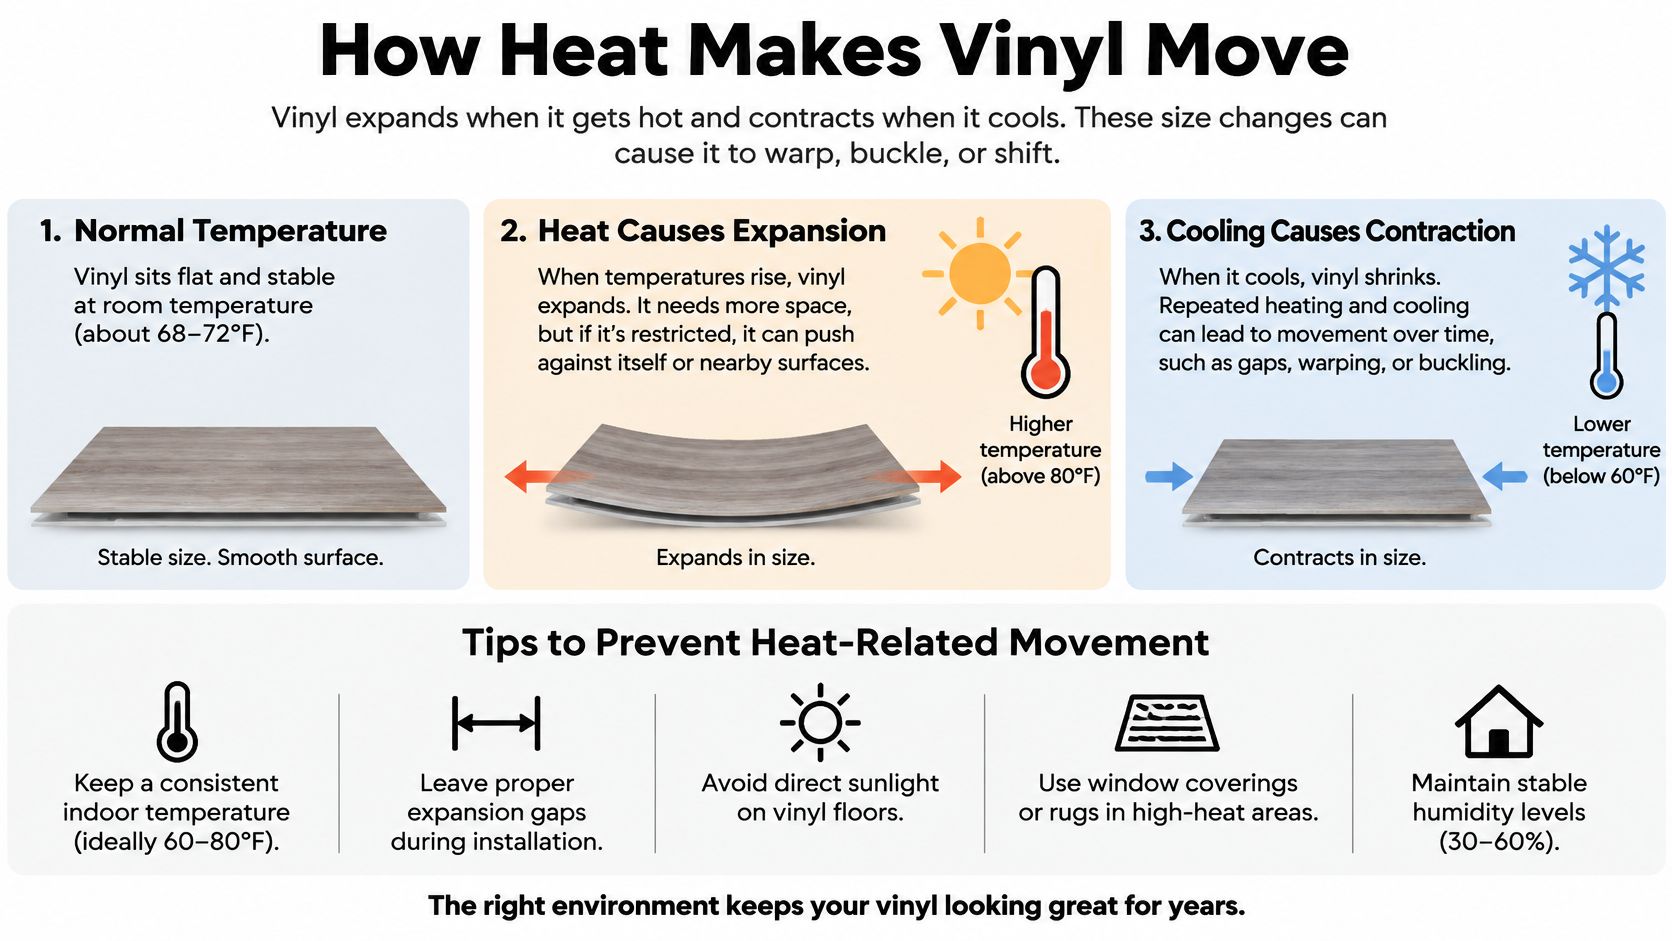
A plastic ruler left on a car dashboard in July comes out noticeably longer and a little wavy. Set it in a cold garage overnight and it pulls back toward its old shape. Vinyl siding does the same thing on a larger scale, every day, in every season. Once you accept that movement as normal, the painting rules stop sounding fussy and start sounding obvious.
The scale of that movement surprises homeowners who have only painted wood. A Lawrence Berkeley National Laboratory report states that vinyl's coefficient of thermal expansion is approximately 10 times higher than that of wood measured parallel to the grain. Wood barely changes length along the grain when temperatures swing. Vinyl changes enough that its entire installation system is built around giving it somewhere to go.
Where the movement goes
Look at how a panel is fastened. Nails sit in long slotted holes along the top edge, and installers are supposed to center each nail in its slot and leave it slightly loose rather than driven tight. Each course locks into the one below and overlaps its neighbor at the ends. Those slots, locks, and overlaps are the panel's travel allowance.
On a hot afternoon the panel grows into that space. On a cold morning it contracts back out of it.
That allowance is generous, but it isn't unlimited. Anything that drives the surface hotter than the color the panel was made in consumes more of it. A coating that increases heat absorption raises the panel's surface temperature and increases thermal stress. When expansion runs past the available clearance, the panel has to go somewhere, and the only direction left is outward.
The temperature ceiling is closer than you think
Vinyl does not need industrial heat to get into trouble. It begins to soften and distort at surface temperatures a sun-struck wall can reach, and a wall surface runs far hotter than the air temperature on your weather app. A dark surface above a light concrete patio, catching direct sun plus reflected radiation off the slab, can push into that distortion territory on a still August afternoon.
The damage has recognizable shapes. Oil-canning is the wavy, quilted look across a course that catches light unevenly. Buckling is a course bowing outward between nails because it grew longer than its fasteners allowed. In winter you will sometimes see the aftermath as gaps opening at corner trim or J-channel, after a panel took a permanent set during summer and then shrank back shorter than it started.
That last detail is why the paint decision starts with the condition of the panels rather than the color fan deck. Vinyl that already shows waviness has spent its travel allowance, and no coating buys it back.
Kansas City makes the swing larger than coastal climates do. Hot, humid summers push panels toward their expansion limit, and hard freezes pull them to the opposite end a few months later. South and west elevations take the worst of it because they collect afternoon sun when the air is already at its hottest. Walls above driveways, patios, and light-colored roofs on lower additions get a second dose of reflected heat from below.
Movement is a property of the material, not a defect. Paint has to leave that movement intact, which means flexible film, free laps, and a color that doesn't spend the panel's travel allowance on extra heat.
Choosing Color Without Overheating the Panels
You've probably heard the rule stated flatly: never paint vinyl darker. Retire the flat version, but keep the caution inside it. The accurate version is narrower and more useful. Darker visible color raises solar absorptance, which raises panel temperature and thermal movement, so the safe default is still a coating no darker than your existing siding unless the paint maker lists your chosen color as approved for vinyl.
The exception is real, and it's chemistry rather than wishful thinking. Infrared-reflective pigments can reflect heat in the near-infrared part of sunlight that your eye can't see, so a deeper visible color can run cooler than a conventional paint in a similar shade. That's how manufacturers build vinyl-safe palettes that include colors darker than the old rule would allow.
Reflectance is the number that matters
The gap between light and dark is wide even among reflective coatings. Research summarized by the U.S. Department of Energy cool-wall literature reports that light-colored cool-wall coatings can reflect roughly 60% to 90% of incident sunlight when new, while darker cool-colored coatings commonly reflect less than 50%. A reflective dark color helps. It doesn't erase the physics that light colors start with a large advantage.
At the paint store, the practical number on a color card is the light-reflectance value, or LRV. One manufacturer's guidance in Sherwin-Williams exterior product selection FAQs identifies an LRV threshold of 55 for many standard vinyl systems, while newer heat-stable siding systems may allow lower values only with compatible products. Treat 55 as a checkpoint tied to specific products, not as a universal law you can apply to any siding and any can.
Two swatches can look identical under store lighting and behave differently on a hot wall. One may use reflective pigments inside an approved vinyl palette. The other may be a conventional tint from a different line with the same visual depth and none of the thermal protection. Never assume a visually similar color has the same performance.
The approval sequence, in order
- Document your siding first: Write down the brand, profile, and original color if you can find them in closing paperwork or on the back of a loose panel.
- Read the warranty and technical sheet: Check whether painting is permitted, whether a reflectance floor is stated, and whether darker colors void coverage.
- Confirm the coating palette: Verify that your exact color appears in the paint maker's vinyl-approved list, and note its LRV or solar-reflectance rating.
- Weight orientation heavily: Keep south and west elevations light, or use only documented reflective colors there, since those walls absorb direct sun during the hottest hours.
- Test on a sun-struck patch: Coat a small area on the most exposed wall and watch it through a hot day for bonding, color, and any sign of distortion.
- Leave horizontal laps free: Never caulk or bridge paint across the laps between courses, so panels keep sliding as temperatures change.
If you're building a whole-house scheme rather than matching a single wall, resources on assembling a cohesive palette for Utah homes show how to balance body, trim, and accent colors, and you can adapt that structure to a vinyl-safe palette. Seeing finished combinations also helps, which is why browsing vinyl siding colors on real houses with pictures beats judging a two-inch chip under fluorescent light. Just remember that a photograph proves a color looks good. Only the manufacturer's approval proves it runs cool enough on your siding.
On Kansas City's sun-exposed elevations, direct solar loading combines with summer ambient heat and reflected radiation from nearby concrete and roofing. That's why the same approved dark color can be a reasonable choice on a shaded north wall and a poor gamble over a west-facing driveway. Judge each elevation on its own exposure rather than approving one color for the whole house at once.
Don't buy a darker color until you hold a documented yes from both sides of the wall, the siding maker's warranty terms and the paint system's vinyl palette. If either document is silent or says no, the answer is no, no matter how good the swatch looks against your brick.
How to Prep and Apply Paint on Vinyl Siding
Vinyl is a low-energy, slightly flexible surface, so dirt, chalk, and a rigid film will defeat a good paint faster than the brand on the can can save it. A Paint and Coatings Industry Magazine overview of energy-saving wall coatings makes the same point plainly. Preparation and coating compatibility drive service life, and reflective coatings can reduce surface temperatures and thermal stress.
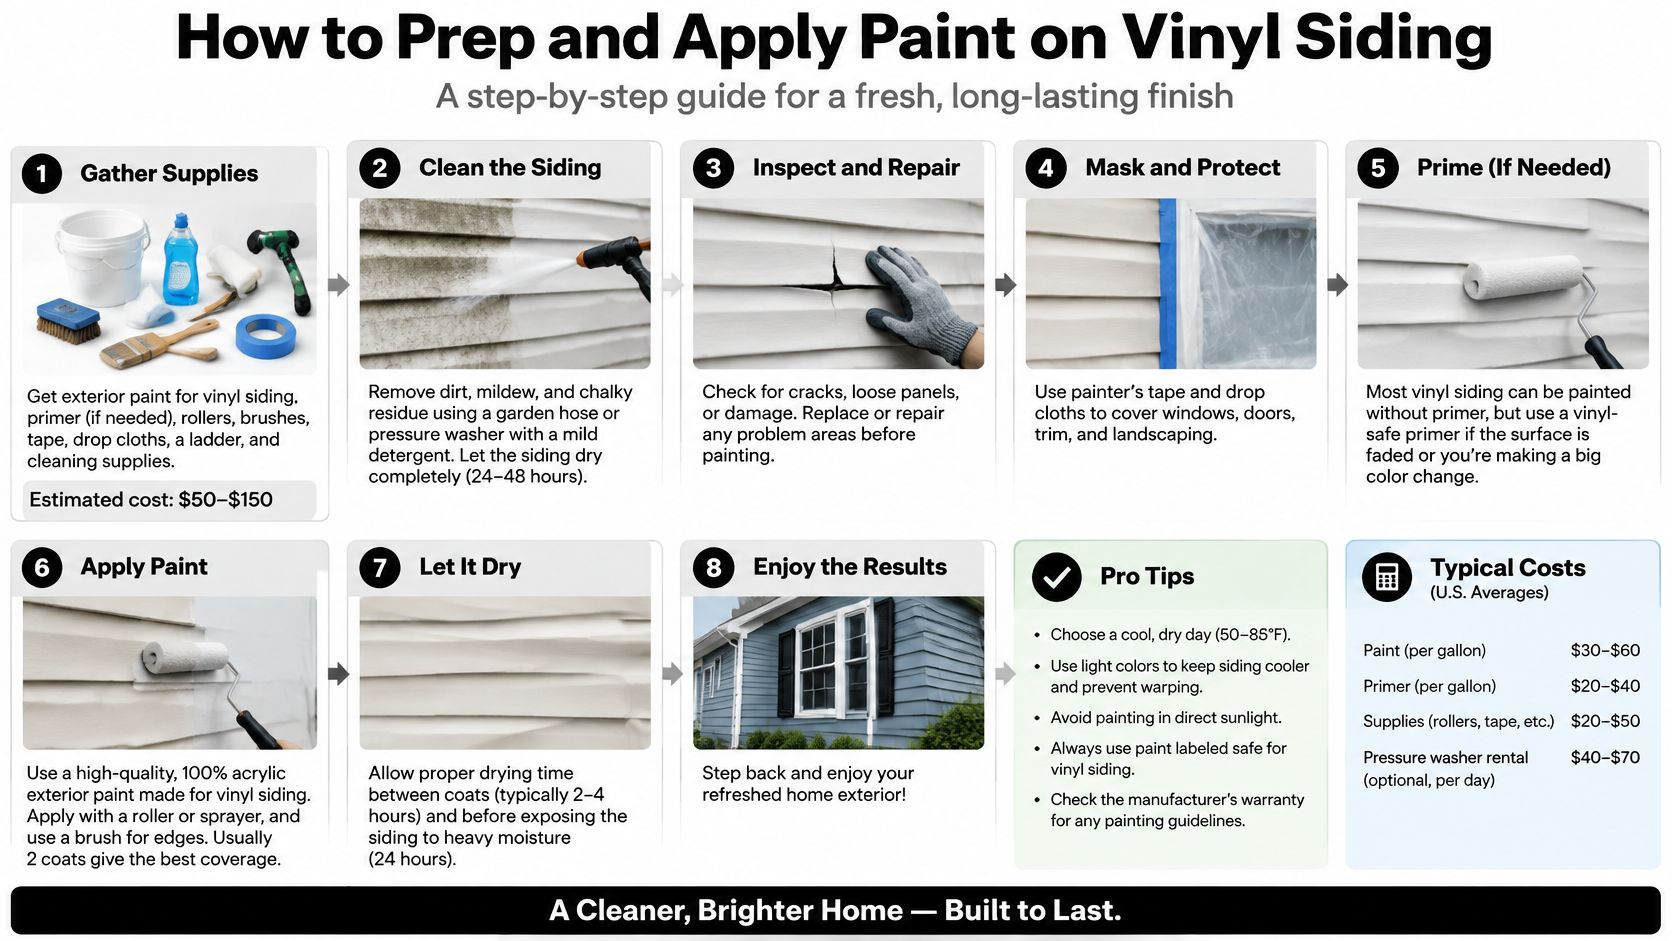
- Wash from the bottom up: Scrub with a vinyl-safe cleaner and a soft brush to remove chalk, oxidation, dirt, mildew, and release residue, keeping pressure modest so you don't drive water behind laps. If you're using a pressure washer, check guidance to choose safe PSI for vinyl siding before you pull the trigger, and review the broader steps for how to prep a house for painting so masking and repairs aren't afterthoughts.
- Rinse from the top down: Flood the wall until rinse water runs clear, then let the siding dry completely. Skipping the rinse leaves cleaner and loosened chalk behind, which is a bond breaker dressed up as a shortcut.
- Handle caulk selectively: Scrape loose caulk at windows, doors, and penetrations and reseal those vertical joints. Leave horizontal panel laps open and free to slide.
- Prime only when directed: Follow the technical data sheet rather than priming automatically. A stiff or incompatible primer can reduce adhesion instead of improving it.
- Coat in mild weather: Check the data sheet for minimum and maximum application temperatures, and never paint panels that are hot to the touch or sitting in direct afternoon sun. Heat flashes the surface dry and leaves lap marks and weak intercoat bonding.
- Run a test patch: Brush or roll a small sun-exposed area, let it cure, then check adhesion, color, and gloss. Chalky vinyl that merely looks pale isn't clean, and the patch will tell you the truth cheaply.
- Work to a wet edge: Coat the field at the stated spread rate and respect the recoat window. A thick film isn't tougher if it can't flex with the panel.
Start full-scale work only after that test patch still looks bonded and unbuckled. By this point your color should already have passed its reflectance and approval checks, so application day is about cleanliness, temperature, and patience, not new decisions.
How Long Painted Vinyl Actually Lasts
Homeowners hear two very different promises and rarely get told why both circulate. A conventional system, or a good product over poor preparation, gives you roughly 3 to 5 years before peeling, cracking, or ugly chalk-through sends you back up the ladder. A vinyl-rated acrylic over sound siding that was washed, tested, and coated in mild weather gives you about 8 to 12 years. The gap comes from prep, exposure, product match, and panel condition. There's no secret additive hiding in the more expensive can.
One piece of history explains why color expectations need managing. An industry account in the Journal of Light Construction vinyl siding update notes that vinyl entered the market in the late 1950s as a no-paint finish with limited colors because fading was a persistent concern, and that the Vinyl Siding Institute certification program expanded to include color retention in 2006, after roughly 350 shades had completed a two-year accelerated outdoor-testing process. Your siding's weatherability was tested and certified as a system. A repaint should complement that tested resistance to sunlight, moisture, and movement rather than cover it with a film that traps heat or cracks.
Light maintenance protects the longer end of that range. Give the walls an annual gentle wash to remove dirt and mildew before they etch into the film. After freeze and thaw seasons, walk the vertical caulk joints at windows and doors and renew any bead that has split. Touch up scuffs only with the same vinyl-rated product in the same sheen, and keep the leftover can labeled with the color formula and date.
Expect uneven aging. South and west walls and unshaded gables collect the most ultraviolet exposure and the most heat cycling, so they fade and chalk first. A shaded north elevation can look freshly painted years after the west wall needs attention, and that's normal wear, not a defective batch.
Two warranty realities deserve a clear head. Painting doesn't restore a manufacturer's fade warranty on the original siding color. Once you've coated the surface, the coating maker's guidance governs the finish you're looking at. Keep both documents, because the siding warranty still matters for the panels underneath while the paint warranty covers the film on top.
When a Kansas City Crew Should Paint It
A handy homeowner can wash a single sound wall, coat a test patch, and judge the result. That's a fair DIY scope, and it teaches you more about your siding than any store display will.
Call a crew when the house is two stories and the work means long ladder reaches over concrete. Call one when south and west walls need a darker approved color, when chalking is heavy enough that your wash water runs milky after two passes, or when your inspection gave different verdicts on different elevations. Storm and hail damage belongs in a documented inspection before anyone masks a window, because coating over cracked courses can complicate both repairs and claims.
Two States Exteriors is a Kansas City metro contractor serving Kansas and Missouri that offers siding installation alongside interior and exterior painting services, so one visit can separate walls that need a coat of vinyl-safe paint from panels that need to come off. Two States Exteriors LLC provides a free estimate, requested by filling out the form on the website or by calling.
Make that visit productive. Bring the siding brand if you know it, clear photos of faded, chalked, or buckled courses, and the LRV or vinyl-approval note for any color you're considering. The useful outcome isn't a gallon count. It's a written scope that says paint, repair, or replace for each elevation, so you're never paying to finish siding that should have been replaced.
If your inspection turned up a mix of sound walls, questionable courses, and a color you're not sure your panels can handle, bring those photos and your color's LRV to us before you buy paint. Two States Exteriors LLC installs siding and provides interior and exterior painting services across the Kansas City metro, and we'll give you a free estimate that separates painting from repair and replacement, elevation by elevation. Start your request at Two States Exteriors LLC by filling out the website form or calling, and get a written scope you can trust before the first coat goes on.