
Siding is the principal outside-wall construction on 48.12% of U.S. homes, according to the U.S. Energy Information Administration's residential housing tables. That makes siding more than a curb-appeal choice. It's a major part of the wall assembly that protects the structure behind it.
A successful home siding installation starts with a question you can't answer from a color sample: Where will water go when it gets behind the panels? For Kansas City homeowners, hail resistance, concealed flashing, drainage space, and a complete installation scope deserve attention before the finish color or lowest bid.
Siding Materials Compared at a Glance
Siding materials differ in how they handle impact, upkeep, and repairs. Vinyl remains a common choice: Pro House Maintenance summarizes Census-based data showing that vinyl accounted for 26% of principal exterior wall materials on new U.S. single-family homes in 2024.
The mix varies by material and year. In NAHB's analysis of new single-family construction, stucco led in 2023 at 26.8%, followed by vinyl at 25.6% and fiber cement at 21.7%. Over the preceding 20 years, fiber cement's share increased 14.2 percentage points, while vinyl's fell 12.8 points. These figures describe material choices in new construction, not how well a particular product will perform on an existing home.
The chart offers a visual starting point. The table adds factors to check before choosing a product.
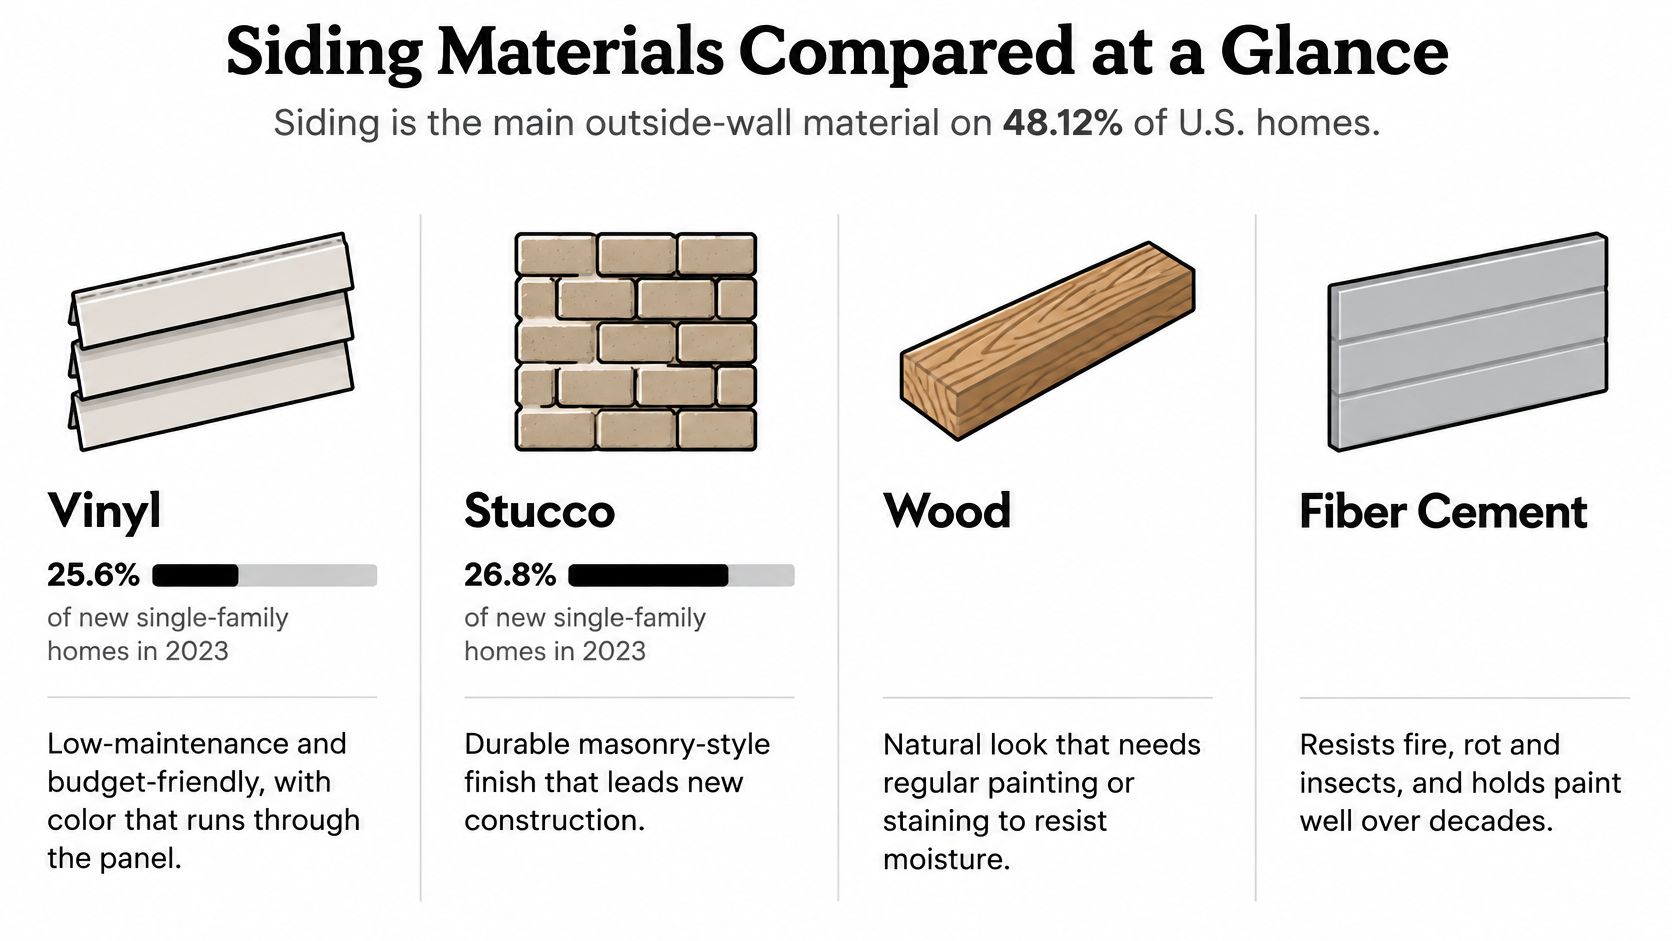
Read the whole material profile
Siding materials by hail resistance, upkeep and lifespan
| Material | Hail resistance | Maintenance | Typical lifespan | Best fit |
|---|---|---|---|---|
| Vinyl | Vulnerable to cracking and impact damage | Wash and check locks and joints | Depends on product, exposure, and upkeep | Budget-conscious replacements with limited hail exposure |
| Fiber cement | Consider it for hail exposure, but verify product testing | Clean, inspect joints, and renew the finish when needed | Depends on product, exposure, and upkeep | Hail-conscious and fire-conscious material shortlists |
| Engineered wood | Look for documented impact performance | Protect cut ends and maintain the finish | Depends on product, exposure, and upkeep | Wood appearance with manufactured-board consistency |
| Solid wood | Species, profile, and product condition matter | Paint or stain, and inspect for decay | Depends on product, exposure, and upkeep | Historic or custom homes with committed upkeep |
| Steel or aluminum | Can dent; the two metals are not equivalent | Wash and inspect damaged coatings | Depends on product, exposure, and upkeep | Metal exteriors with site-appropriate coatings |
| Stucco | Consider impact damage and crack repair | Inspect cracks and drainage details | Depends on product, exposure, and upkeep | Masonry-style homes with a compatible wall assembly |
| Brick veneer | Check both units and mortar after impact | Inspect mortar, flashing outlets, and movement joints | Depends on product, exposure, and upkeep | Long-term ownership with suitable structural support |
A material name alone cannot give a dependable lifespan. The product, exposure, installation, and maintenance all affect how long the siding performs. Ask for the exact product's warranty, maintenance instructions, and exclusions, and treat any broad service-life promise as an estimate, not a guarantee.
The outer material is only one part of the wall. Water can get behind siding, so the barrier, flashing, and clearances underneath help determine whether moisture drains away or reaches the structure. A durable-looking surface cannot make up for a poorly managed water path.
Compare each material's upkeep with the attention you can give it. Wood siding may suit a homeowner prepared to maintain the finish; without that care, the match is weaker even if the installation looks good. For fiber cement, consider its handling, fastening, and coating requirements alongside the fiber cement siding pros and cons guide.
Use these questions to narrow your shortlist:
- Weather exposure: Does the property regularly experience hail, strong winds, or concentrated roof runoff?
- Actual upkeep: Will you inspect coatings and joints, or would a less demanding finish suit you better?
- Ownership plans: Are you choosing with a sale in mind, or planning to maintain the wall yourself?
Do not assume a dense board is hail-proof or a masonry appearance makes the whole assembly fire-safe. Check the specific product and the wall layers behind it.
What Siding Installation Costs
The replacement benchmark is broad for a reason. In 2024, the average U.S. homeowner paid $11,679 to $21,250 to replace home siding, according to Fixr's siding statistics.
The Journal of Light Construction's 2024 Cost vs. Value Report reported an average vinyl replacement cost of $17,410, with $13,957 in resale value added, equivalent to 80% cost recovery. Separately, the NAHB Construction Cost Survey, summarized by SimplyWise, put exterior wall finishes on surveyed new homes at $24,450, or 5.7% of total construction costs, in 2024.
Siding replacement cost benchmarks, 2024
| Figure | Value | What it measures | Source |
|---|---|---|---|
| Average U.S. siding replacement | $11,679–$21,250 | Typical homeowner replacement project | Fixr |
| Average vinyl siding replacement | $17,410 | Full vinyl project cost | Journal of Light Construction, Cost vs. Value |
| Resale value added by vinyl replacement | $13,957, 80% recovery | Estimated resale value contribution | Journal of Light Construction, Cost vs. Value |
| Exterior wall finishes on new homes | $24,450, 5.7% of construction cost | Siding, brick, stucco, and stone in surveyed new construction | NAHB Construction Cost Survey |
These are national benchmarks from different project categories, not interchangeable quotes. New construction doesn't require removing an old exterior, and estimated resale value isn't money returned automatically when the work finishes.
What changes your written quote
Wall area matters more than interior floor area. A tall, narrow house with dormers, gables, and many corners can require more access equipment and cutting than a simpler house with similar living space.
- Demolition and disposal: Ask whether removal, hauling, and disposal are included.
- Hidden repairs: Require a written method for pricing damaged sheathing or framing after exposure.
- Access: Steep ground, nearby structures, and upper walls can change staging needs.
- Scope boundaries: Identify whether soffit, fascia, window trim, exterior insulation, and gutters are included.
- Wall preparation: Compare barrier replacement, flashing reconstruction, and drainage provisions separately from the visible siding.
Budget rule: A low price isn't a saving if the contractor reaches it by omitting work the wall needs.
Material changes labor as well as purchase cost. Cutting and handling fiber cement differ from hanging vinyl; brick veneer can introduce support and masonry requirements. Use an exterior siding replacement cost breakdown to prepare questions, then ask bidders to price the same product and written scope.
Don't subtract anticipated resale value from the amount you need to fund. Your local, site-specific contract is the number that governs the project.
How to Install Siding Step by Step
Siding is the outer layer of a wall, not the whole water-management system. A sound installation starts with solid backing and works outward, leaving the barrier, flashing, and drainage paths arranged to shed water. The exact sequence varies across vinyl, wood, fiber cement, stucco, and masonry. For panel or lap siding, follow the selected product's installation manual for fastening, joints, accessories, and drainage details.
Use this illustrated sequence to understand the order of work, then follow the product-specific instructions for each layer.
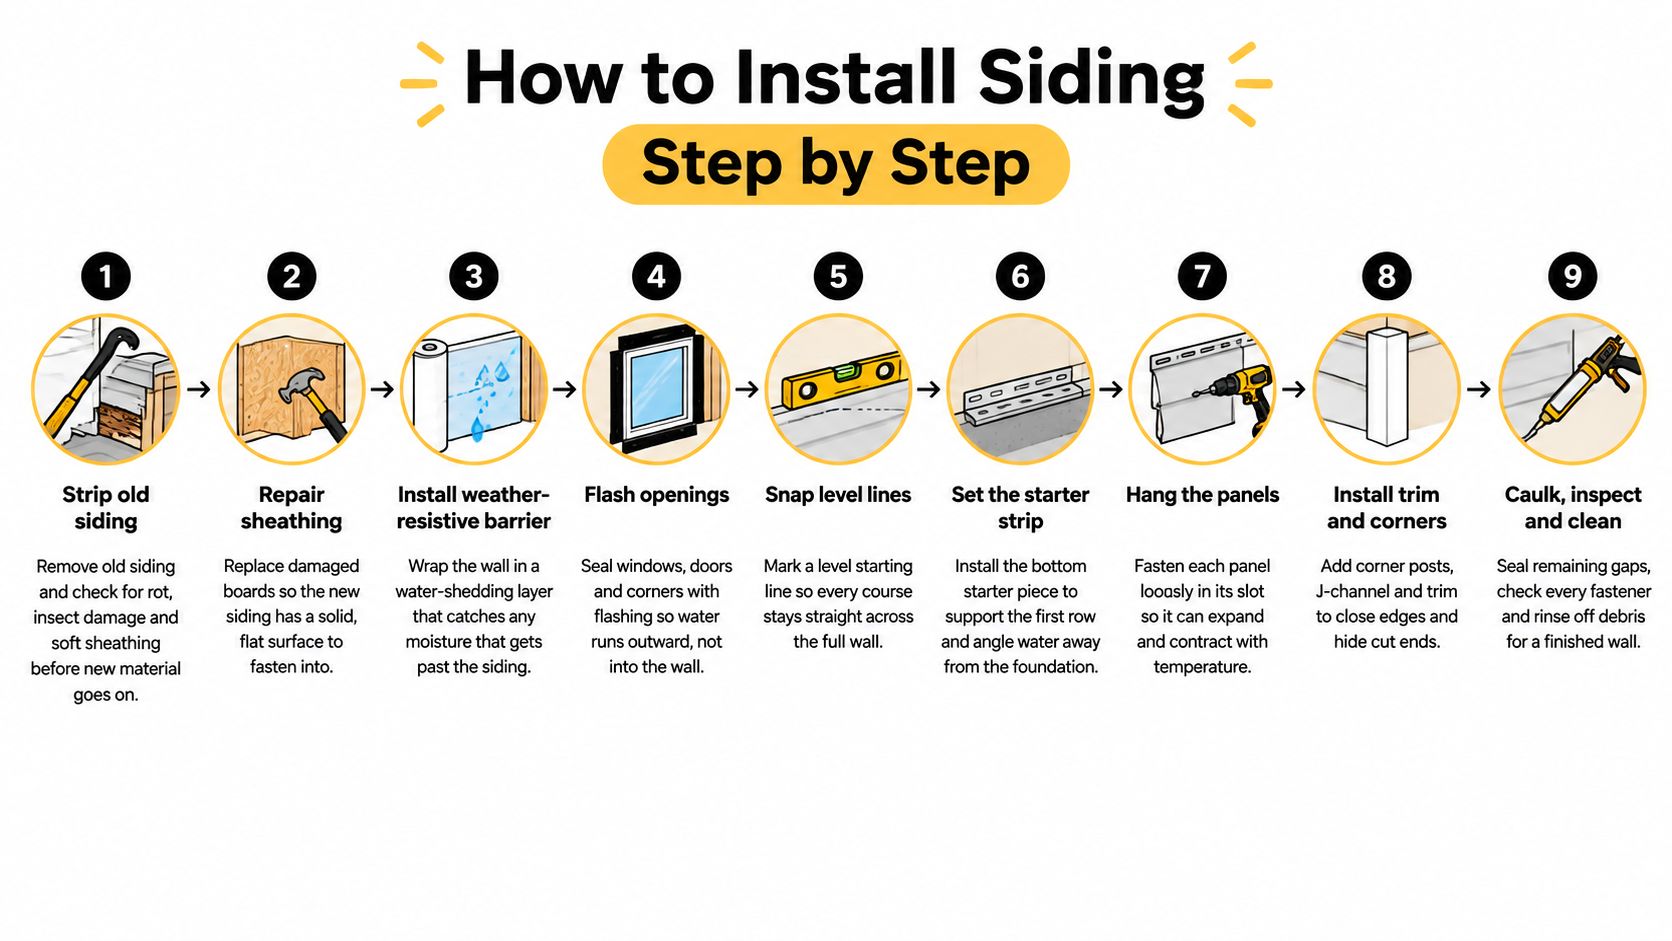
Build from sound backing outward
Expose and inspect the existing wall. Remove old cladding where replacement or inspection requires access. Probe suspect sheathing with an awl, especially below windows, beside decks, and near roof intersections. A clean-looking surface doesn't prove the backing is sound.
Repair the substrate. Replace deteriorated sheathing and address damaged framing before covering the wall. Check with a straightedge and level; otherwise, new siding can follow a bowed or uneven surface.
Establish the weather-resistive barrier. Work from the lower wall upward, overlapping each layer so water remains on the exterior face. Use compatible seam tape and patches rather than tape chosen only because it sticks at first.
Provide the specified drainage space. Install a drainage mat or furring system when the wall design calls for one. Plan fasteners to pass through the assembly into the required backing, and keep drainage openings clear.
Coordinate openings and the starting course. Fit window, door, and penetration flashing before siding blocks access. Snap reference lines and install the product's starter system; the foundation edge may not be level.
Mark clearances before cutting boards. Set out the bottom course in relation to soil, paving, decks, and roof surfaces. For wood and hardboard siding, residential-code guidance specifies at least 6 inches above finished grade, 2 inches above adjacent horizontal surfaces, and at least a 1-inch overlap for horizontal lap siding.
Fasten for the selected material. Use the specified fastener material, length, placement, and penetration into framing or approved backing. Slotted vinyl needs room to move. That does not mean fasteners for fiber cement or wood should be left loose.
Complete transitions and trim. Fit corners, compatible channels, roof intersections, and accessory blocks without closing drainage paths. Install kickout flashing as part of the roof-to-wall system before finishes make the detail inaccessible.
Inspect before concealment and at completion. Photograph fastening, opening details, and drainage exits while they remain visible. Then check alignment, remove debris, and walk through any remaining punch-list work.
A pneumatic tool can help keep fastening consistent, provided it matches the product's fastener schedule. The Value Tools Co siding nailer is one reference for checking nail compatibility, operating requirements, and depth control. Test the setup on scrap before fastening the wall.
The video provides another view of the sequence and how materials are handled.
Schedule by release conditions
Typical duration by installation phase
| Phase | Typical duration | What decides it |
|---|---|---|
| Permit review | 1 to 4 weeks | Local workload and submission completeness |
| Material ordering | 1 to 4 weeks | Product stock and color availability |
| Tear-off and substrate repair | 1 to 3 days | Concealed deterioration |
| Weather barrier and flashing | 1 to 3 days | Opening count and transition complexity |
| Siding installation | 2 to 5 days | Wall area, access, corners, and product |
| Trim, caulk, and cleanup | 1 to 2 days | Detail work and suitable weather |
These are typical planning ranges, not fixed promises. Material delivery, concealed repairs, inspections, and weather can interrupt the sequence. Ask what a contractor's completion date assumes, and whether work can proceed if opening the wall reveals damage that needs repair.
Flashing and Weatherproofing That Stops Leaks
Siding sheds rain, but it isn't the wall's last line of defense. Think of roof shingles over underlayment: the visible covering handles most exposure, while the layer beneath manages water that passes the outer surface. A wall needs that same deliberate route outward.
The Pacific Northwest National Laboratory's moisture-control guidance identifies improper siding installation, defective flashing, and poorly sealed joints as causes of rain leakage. It also recommends drainage mats or furring cavities behind absorbent claddings to interrupt capillary movement and support drainage and drying.
This window detail illustrates where separate materials must work together.

What the finished wall must prove
At a window head, the critical question isn't whether tape looks neat. It's whether water descending the wall reaches flashing that directs it outward. A reverse lap can direct water behind the protective layer even when every seam appears firmly taped.
At the sill, incidental water needs a collection and exit path. Without a properly integrated sill detail, water can remain against vulnerable wood instead of leaving the assembly. Sealing the exterior perimeter indiscriminately can make matters worse if it blocks a designed outlet.
Roof-to-wall intersections receive concentrated runoff rather than rain alone. Step flashing and a kickout must move that flow away from the wall corner. If staining starts at that junction, the HomeProBadge guide on how to repair leaking roof flashing provides useful context for discussing the roof-side defect instead of treating the siding stain as the whole problem.
A bead of caulk can close a specified joint. It can't replace an incorrectly arranged flashing assembly.
Trapped moisture can deteriorate sheathing, support mold, corrode metal, and impair insulation. In a freeze-thaw climate such as Kansas City's, repeatedly wet details also face changing temperatures, so drying capacity matters alongside rain shedding.
Request evidence while access is available
- Barrier photographs: Ask for wide views and close-ups showing continuity, patches, and connections at penetrations.
- Opening details: Request records of head flashing, jamb integration, and sill drainage before trim conceals them.
- Roof-junction discharge: Have the installer show where runoff leaves the flashing and confirm that trim doesn't obstruct it.
A photograph isn't a substitute for inspection, but it gives you a useful record. Ask the contractor to explain the water's route in plain language while the layers remain visible.
Hail, Fire and Code Rules That Change Your Choice
The cheapest installed siding may cost more over time on a hail-exposed home. Repeated impacts can mean replacement labor, mismatched finishes, and another round of disruption, even if the original panels were inexpensive. Siding is the outer layer of a wall, so consider how it performs after impact as well as how it looks.
The Institute for Catastrophic Loss Reduction's siding guidance identifies vinyl as particularly vulnerable to hail and recommends avoiding it unless it demonstrates UL 2218/FM 4473 Class 4 performance or equivalent missile-impact testing. The document also identifies wood, engineered wood, fiber cement, stucco, masonry, steel, and products with a hail-impact warranty as alternatives.
Ask for product evidence, not a broad promise
An impact-rated roof does not certify the siding. Ask for documents that identify the exact wall product, the test method, and any installation conditions that apply. The rating is useful only if it covers the product being installed.
Separate impact performance from warranty coverage. Check whether the warranty covers cracking, dents, finish damage, replacement material, or labor. A product may remain weather-resistant after an impact and still show damage you find unacceptable.
Fire behavior calls for a different check. A Fire Safety Research Institute review found that some foam-insulated stucco assemblies can support fire spread if foam separates or melts and burning material pools near the wall. The finding concerns how an assembly behaves, not all stucco walls.
Requirements and checks by situation
| Situation | Rule or check | Why it matters |
|---|---|---|
| Vinyl in a hail-prone area | Obtain documented impact-test performance for the exact product | Ordinary vinyl can suffer impact damage |
| Wood or hardboard lap siding | Verify applicable grade, deck, overlap, and fastening requirements | Vulnerable edges need separation from wet surfaces |
| Wildfire-prone property | Evaluate noncombustible cladding and keep the area beside walls free of combustible accumulations | Cladding and nearby fuels interact during exposure |
| Foam-insulated stucco wall | Request assembly-specific fire-performance information | Foam behavior can change exterior fire spread |
| Storm damage with an insurance claim | Photograph before removal and preserve labels and invoices | Replacement can destroy useful evidence |
| Any project | Confirm local permits and HOA restrictions before demolition | Approval and inspection requirements are location-specific |
Noncombustible siding does not make a home fireproof. Vents, eaves, insulation, wall penetrations, and combustible materials beside the house also affect how fire may reach or spread along a wall.
Before choosing a product, ask the building department which adopted requirements apply to your address. HOA appearance approval and a building permit serve different purposes. Check both, and do not treat one as a substitute for the other.
Keeping Siding Sound for Decades
Say a Kansas City homeowner notices a cracked vinyl panel after a spring hailstorm but postpones having it checked. Later rain enters through the damage, and an already defective drainage detail allows moisture to reach the sheathing. When the wall is finally opened, the repair involves more than replacing the visible panel.
That's an illustrative scenario, not an inevitable outcome. A functioning drainage plane can manage incidental water, but damaged cladding still deserves prompt attention because you can't judge concealed conditions from the sidewalk.
Build a practical inspection routine
- Wash gently: Start with a garden hose, soft brush, and cleaner approved for the finish. Don't aim water upward into laps or force it around window joints; use a pressure washer only where the product instructions permit it.
- Walk the exterior after storms: Look for cracked panels, displaced courses, bent trim, loose accessories, and new gaps at corners. Use binoculars for high areas rather than climbing an unsecured ladder.
- Inspect specified sealant joints: Check for separation, cracking, and failed adhesion around trim and penetrations. Replace failed sealant with a compatible product, but leave weep openings and drainage gaps unobstructed.
- Control roof runoff: Clear gutters and check downspout discharge. Overflow concentrated against the wall needs correction at its source, not another coating over the stain.
- Keep vegetation back: Trim branches, shrubs, and vines that rub the finish or prevent the wall from drying.
- Maintain coatings: Check wood and engineered wood for exposed edges, peeling, and swelling. Use the manufacturer's preparation and recoating instructions rather than painting over damp or deteriorated material.
- Keep a maintenance file: Save dated photographs, product information, repair invoices, and warranty documents so you can identify what was installed and what work was performed.
Distinguish appearance from a warning
A faded finish isn't the same problem as a soft board or recurring interior stain. Surface dirt may need cleaning; swelling, movement, or moisture marks call for investigation.
Inspection habit: Photograph the same wall areas during routine checks so you can compare changes rather than relying on memory.
Don't automatically replace an entire exterior because a localized section is damaged. First establish whether the damage is isolated, whether compatible replacement material is available, and whether the backing remains sound.
Choose a Contractor and Sign Only a Full Scope
A contractor's proposal should describe how the wall will be rebuilt, not merely name a siding brand and color. You need enough detail to compare the work, identify exclusions, and resolve changes before the crew reaches them.
Use this checklist as a starting point, then verify which licensing and insurance requirements apply locally.
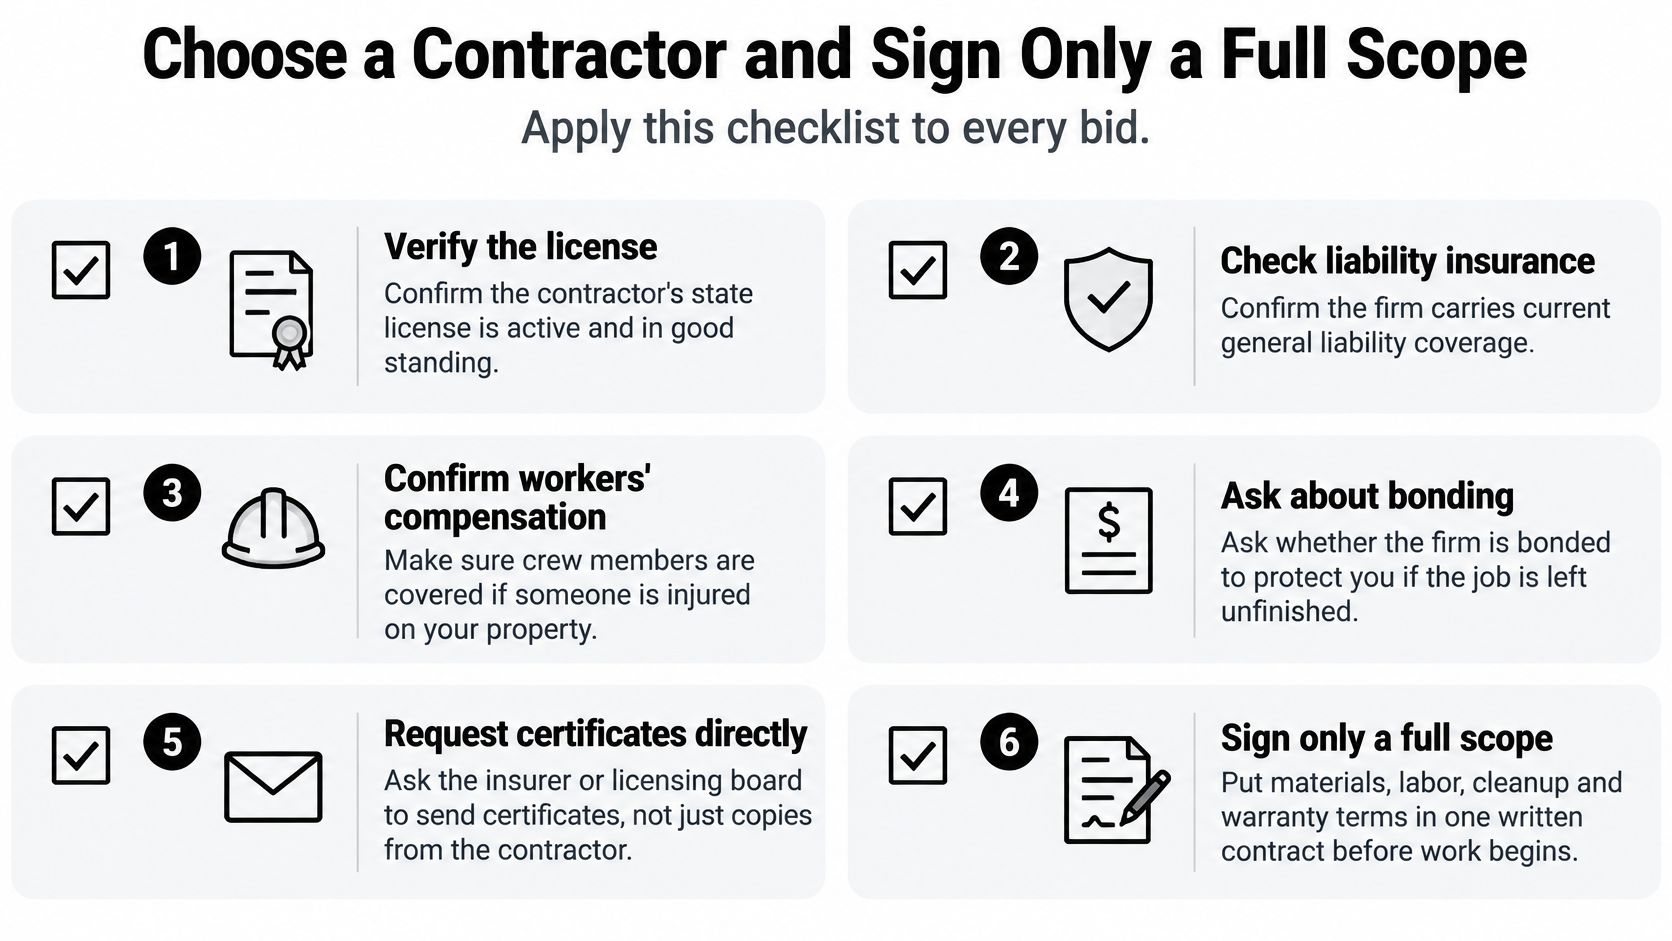
Verify who will perform and supervise the work
Ask for the contractor's legal business name and any required license information. Confirm liability coverage and workers' compensation documentation with the issuing parties rather than relying on a verbal assurance or an undated image.
Ask whether the firm is bonded and what that bond covers. Bonding, liability insurance, and a workmanship warranty are different protections; none guarantees that every dispute or unfinished task will be covered.
- Permit responsibility: Identify who applies, pays fees, schedules inspections, and closes the permit.
- Crew responsibility: Ask whether employees or subcontractors perform the work and who supervises product-specific details.
- Manufacturer training: Request the exact credential and verify its relevance to your chosen siding.
- Comparable references: Speak with recent local customers whose houses involved similar materials, access, or storm repairs.
- Claim assistance: If insurance is involved, clarify what documentation the contractor supplies and which decisions remain with you and the insurer.
A local siding replacement contractor search can help you build a shortlist, but an in-person assessment and written proposal should determine who stays on it.
Require a scope you can inspect
The contract should identify the product line, profile, finish, accessories, and approved fasteners. It should also describe demolition, disposal, wall preparation, weather-resistive barrier, flashing, drainage provisions, trim, and required clearances.
Require a process for concealed damage. The contractor should document the condition, explain the repair, and obtain authorization under the contract's change-order terms before additional work proceeds.
| Contract item | What you should be able to identify |
|---|---|
| Materials | Exact product, finish, accessories, and substitutions policy |
| Concealed work | Barrier, opening flashing, drainage design, and fastening |
| Repairs | Pricing method and authorization for hidden damage |
| Site protection | Landscaping, access, debris handling, and cleanup |
| Payment | Milestones tied to defined work or delivery |
| Warranties | Separate product and labor terms, exclusions, and claim contacts |
Treat same-day signing pressure, vague allowances, substantial unexplained cash demands, and refusal to provide a written scope as reasons to pause. A noticeably lower bid deserves a line-by-line comparison, not an automatic rejection or acceptance.
Choose in the right order: first the material suited to the exposure, then the complete installation scope, then the price. For storm work, preserve photographs and product records before demolition removes the evidence.
Confirm permit and HOA requirements, prepare your material shortlist, and request comparable written quotes from contractors who inspect the house. Sign only when the contract makes the concealed work as clear as the visible finish. The paperwork is part of the installation.
Two States Exteriors LLC offers siding installation, storm-damage assistance, and free on-site inspections in the Kansas City metro area. Visit Two States Exteriors LLC to request an assessment and discuss a written plan covering the siding, underlying wall condition, flashing, and drainage details.