
The storm has passed, the parking lot is clear, and from the ground your commercial roof looks fine. No loose metal, no obvious hole, no leak inside, so it's tempting to file the event away and move on. With a white single-ply membrane, that first impression can mislead you. Some marks are only cosmetic, while others point to fractured reinforcement, crushed support, or a seam that needs closer checks before the next rain tests it.
What Hail Does to a TPO Roof
A Kansas City property manager climbs the roof hatch the morning after hail, expecting missing sections or standing debris. Instead, she sees a broad white field with scattered scuffs, a few dimples near a curb, and no active leak below. That scene is common with hail damage on a TPO roof, and it's exactly where confusion starts. An intact appearance doesn't prove the assembly is undamaged, but a scuff doesn't prove failure either.
TPO matters here because it's everywhere on low-slope commercial buildings. A review published by the International Institute of Building Enclosure Consultants on hail resistance reports that single-ply systems account for more than 80% of low-slope roofing, with TPO identified as the most common membrane type. When hail crosses a metro area, many warehouses, offices, and retail buildings share the same basic question at once. What did that impact energy do below the bright surface you can see?
The factors that shape that answer extend well past the membrane itself.
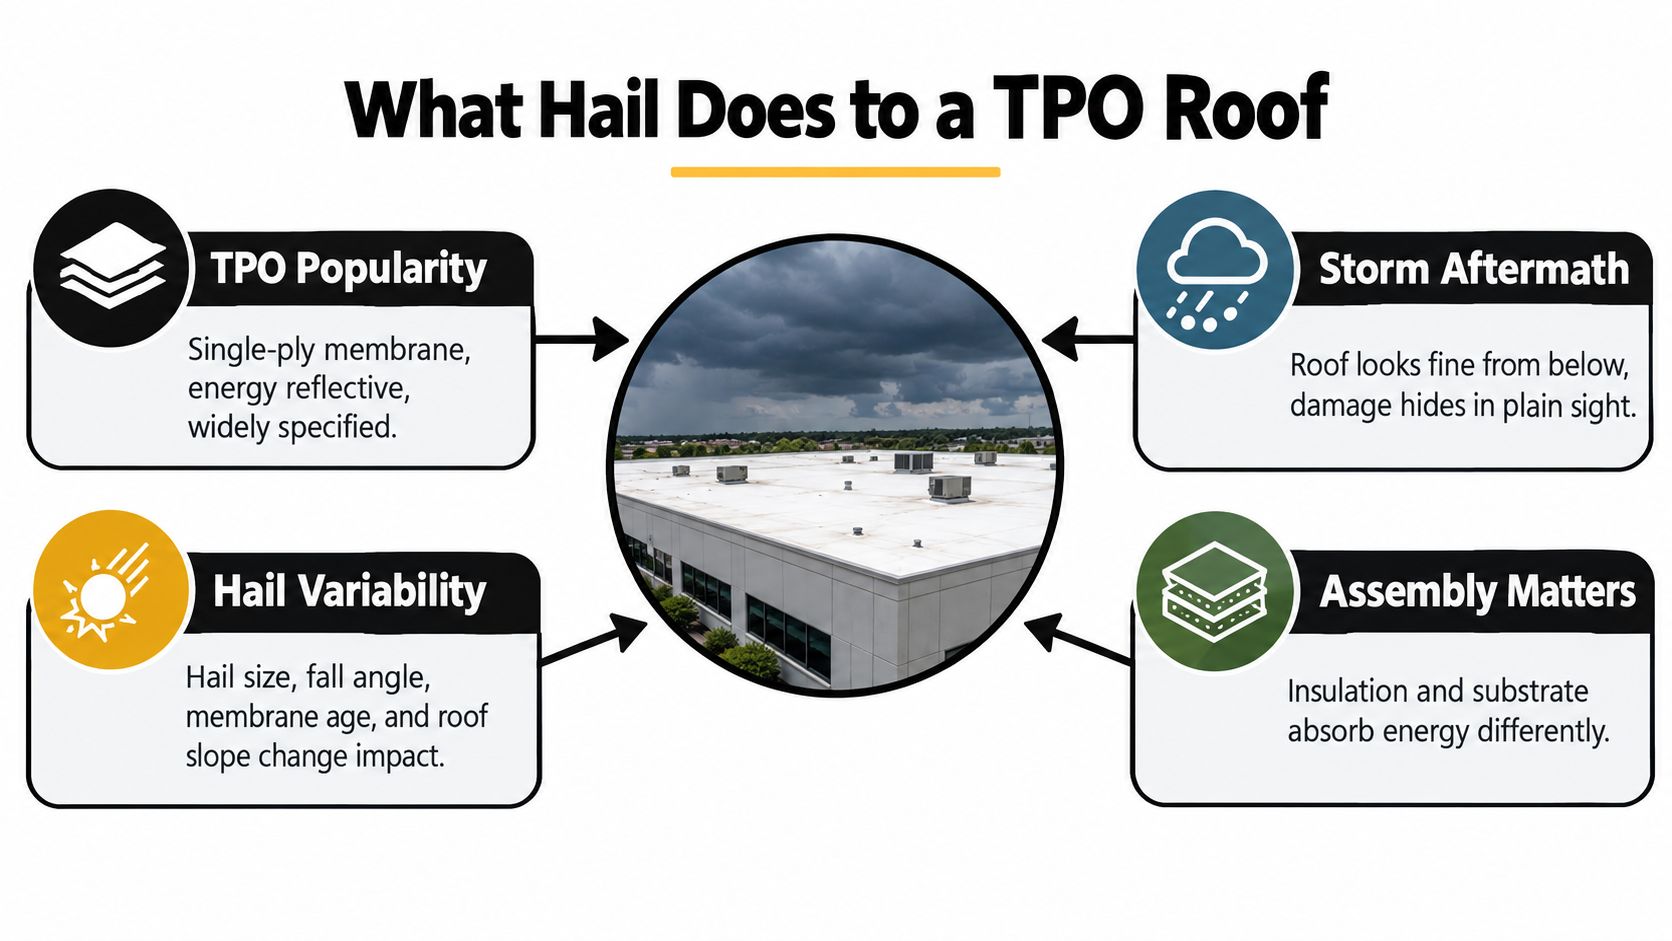
A Layered System Takes the Hit
Think of the roof like a mattress stack rather than a single sheet. The TPO membrane is the fitted sheet on top, but the cover board, insulation, fasteners, adhesive, and deck underneath decide how much give exists when something strikes. A firm layer spreads force and supports the membrane, much like a hard table under paper. A soft layer lets the sheet deflect into a dent, which can stress reinforcement inside the membrane even if no hole opens.
| Component | Role in the Assembly | Why It Matters After Hail |
|---|---|---|
| TPO membrane | Weatherproof top surface with internal reinforcement | May show scuffs, bruises, fractures, or punctures |
| Seams and flashings | Join sheets and seal edges, curbs, and pipes | Welded areas can hide separation or localized stress |
| Cover board | Firm support layer over insulation | Density changes how impact energy spreads |
| Insulation | Thermal layer under the membrane or board | Crushed areas can leave unsupported, soft spots |
| Attachment and deck | Hold the system to the building | Impacts over fasteners or plate edges concentrate force |
Age complicates the picture too. An older membrane and its seams may respond differently from new material exposed to the same storm, so you can't judge two neighboring buildings by hail size alone. Dents, abrasions, punctures, and hidden substrate damage sit at different levels of concern. Your first job is to separate what's visible from what's verified, not to guess from the sidewalk.
Why Hail Performance Depends on the Whole Assembly
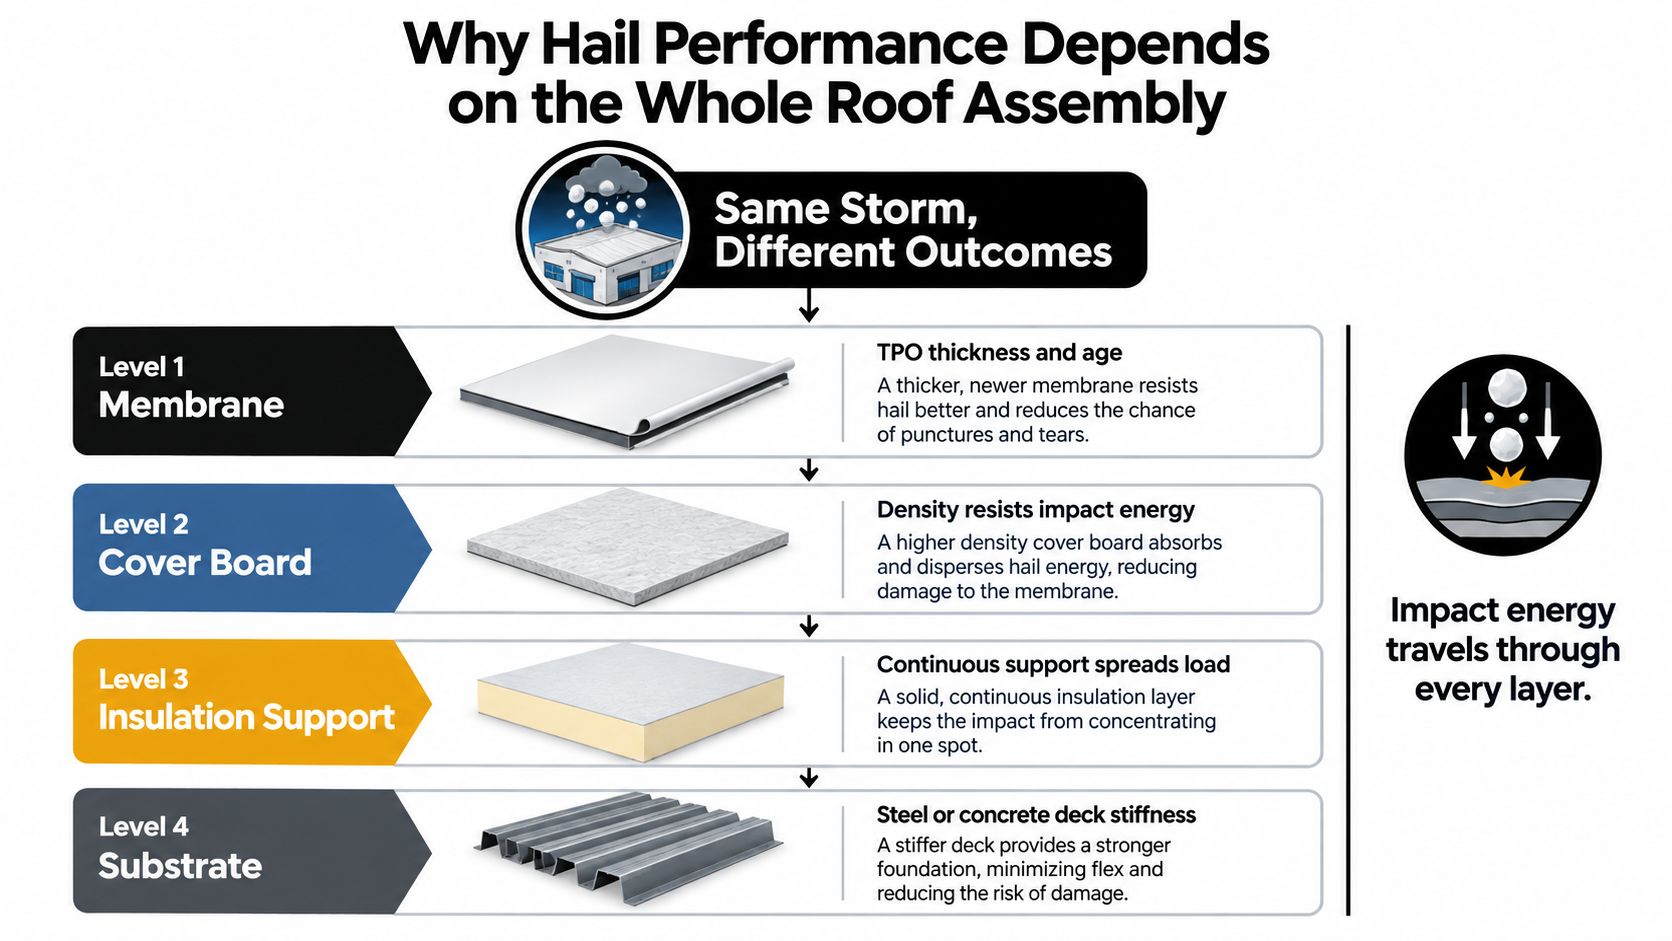
Two buildings on the same street can get the same hail and leave with different reports. One manager finds light marks and no follow-up concerns, while another learns that several impacts fractured the surface over soft insulation. That gap isn't mysterious once you follow the energy through the layers. Hail strikes the membrane, but the assembly absorbs, spreads, or concentrates the blow.
Substrate strength is the clearest evidence for that point. A technical review of hail investigations and severe-hail design found that more than 43% of membranes over low-compressive-strength substrates had significant damage, compared with 25% over high-compressive-strength substrates. That's an 18-percentage-point difference in observed damage. Stronger support improves resilience, but it doesn't make any roof hail-proof.
This layered view shows where each part changes the outcome.
Thickness Is Only One Variable
Property owners often ask which membrane thickness would've prevented the damage. Thickness and formulation matter, and fleece-backed TPO systems have generally delivered better impact performance in the research summarized earlier, particularly after simulated long-term aging. Still, a thicker sheet over weak support can flex and stress at the impact point. If you're still building basic fluency in the material itself, a plain-language primer on what TPO roofing is and how it is assembled helps before you compare products. Material choice matters, but it sits inside a larger system decision.
Impact location adds another twist. A strike in open field meets a broad supported surface, while a strike over a fastener plate, seam edge, or board joint concentrates force on a smaller, harder or less uniform point. Roof age, attachment method, and membrane formulation then change how much stress that point can tolerate.
The short video below gives a visual sense of how impact effects differ across a roof surface.
| Assembly Factor | Inspection Relevance | Potential Damage Signal |
|---|---|---|
| Cover-board strength | Confirms support under impact marks | Repeated bruising over softer areas |
| Membrane age and type | Sets expectations for flexibility and seam condition | Cracking or stress patterns near impacts |
| Attachment method | Locates fasteners, plates, and bonded zones | Concentrated damage at fastener locations |
| Impact position | Separates field hits from seam or detail hits | Splits, deformation, or weld concerns |
Practical rule: Ask what is under each serious mark, not only how large the mark looks.
That question separates cosmetic damage, which affects appearance without opening a water path, from functional damage, which can fracture reinforcement, weaken a seam, crush support, or create an entry point. It also tells you what belongs in your records. Note the membrane type, cover board, insulation, attachment, installation date if available, and where each observation sits on the roof plan.
Common Hail Damage Patterns
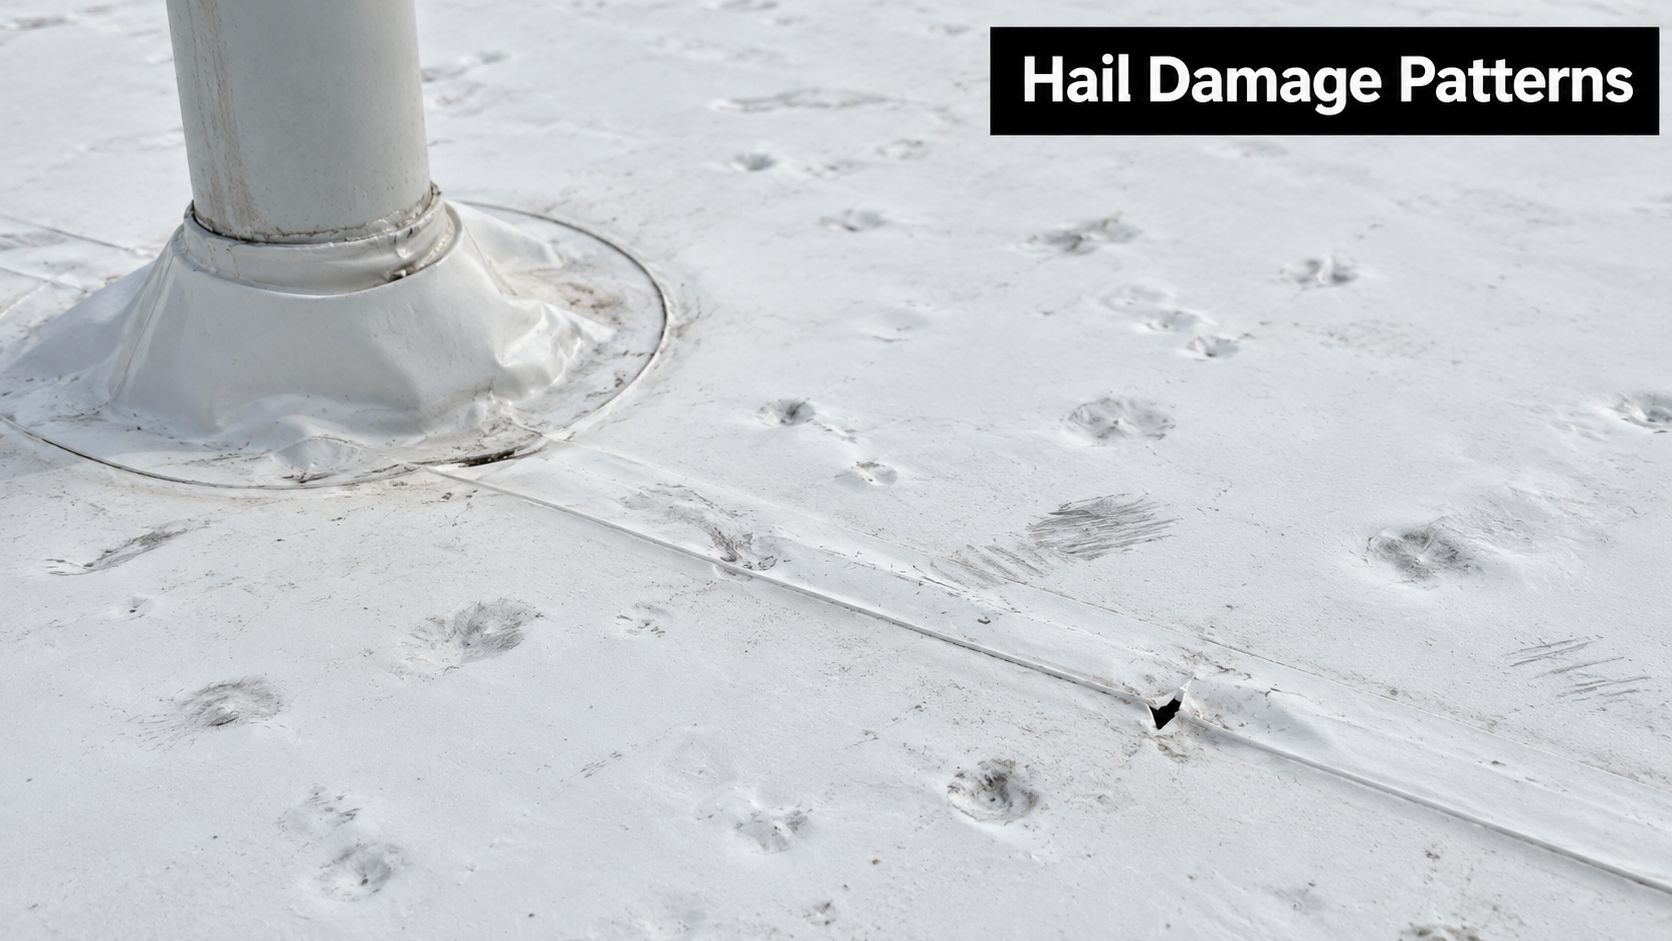
Start by naming what you see in plain terms, then stop before assigning a verdict. A field impression may look like a shallow dimple or a matte circular area where hail compressed the surface. A bruise can feel softer than the surrounding field because the material below yielded, even when the top ply hasn't split. Abrasions and scuffs are shallower marks from glancing contact, and they shouldn't automatically be grouped with fractures.
A puncture is more direct. The membrane has an opening, cut, or split that can admit water, sometimes at a fastener or sharp support point rather than in the center of a sheet. Concentric or star-shaped cracking in the top weathering ply deserves prompt professional assessment because that pattern suggests the impact stressed the membrane beyond a simple surface rub. Cleaning a small test area can make fine fractures easier to see in photographs, but don't scrub, cut, or peel material yourself to prove a point.
These close surface marks illustrate why scale and location belong in every photo.
Patterns Around Details Deserve Extra Care
Seams, penetrations, and curbs interrupt the smooth field, so impacts there behave differently. Look for deformation at pipe boots, displaced flashing edges, cuts near curb corners, dents in metal coping, and stress lines where sheets are welded. A seam can look closed from standing height yet need probing by a qualified roofer using a seam tester. Don't tug welds open yourself, since careless testing can create the very opening you're worried about.
Below-surface clues are equally important:
- Soft or spongy spots: Note areas that depress under careful foot pressure and mark them for follow-up.
- Repeated dimples in a zone: A cluster may reveal weaker support below rather than random cosmetic marks.
- Interior stains or drips: Record the room below, but don't assume water entered directly above the stain.
- Drainage changes: Granular debris, displaced strainers, or new ponding can complicate later water entry.
Context keeps you honest. Wind can drive hail at an angle, nearby parapets can shelter one zone and expose another, and an aged section may mark more readily than a newer section beside it. Dents on rooftop metal, vents, or coping help confirm strike direction and intensity, but metal dents alone don't prove membrane failure.
Document what is visible, describe what is suspected, and let qualified testing decide what is functional.
That escalation rule protects you from two costly errors. Calling every scuff a failure inflates the scope, while calling a smooth-looking roof sound can miss crushed insulation or fractured reinforcement. When marks cluster at seams or fasteners, when soft spots repeat, or when any puncture is present, move from screening to a professional roof evaluation.
Inspecting Hail Damage on a TPO Roof
Inspect in an order you can repeat after the next storm. Begin before anyone steps onto the roof by confirming safe access, dry-enough footing, fall-protection needs, and a weather window that won't rush the work. If access is unsafe, if the membrane is slick, or if electrical equipment and roof edges create hazards, your inspection starts with a contractor visit rather than a manager walk.
Bring a roof plan or simple sketch, phone or camera, tape measure, chalk or removable markers approved for the membrane, notebook, and a flashlight for interior checks. Photograph the whole roof first, then move closer in a grid so each close image can be tied to a location. Put a coin or tape beside selected marks for scale, and record whether each one sits in the field, on a seam, at a penetration, or near drainage.
This checklist keeps the walk in a consistent order.
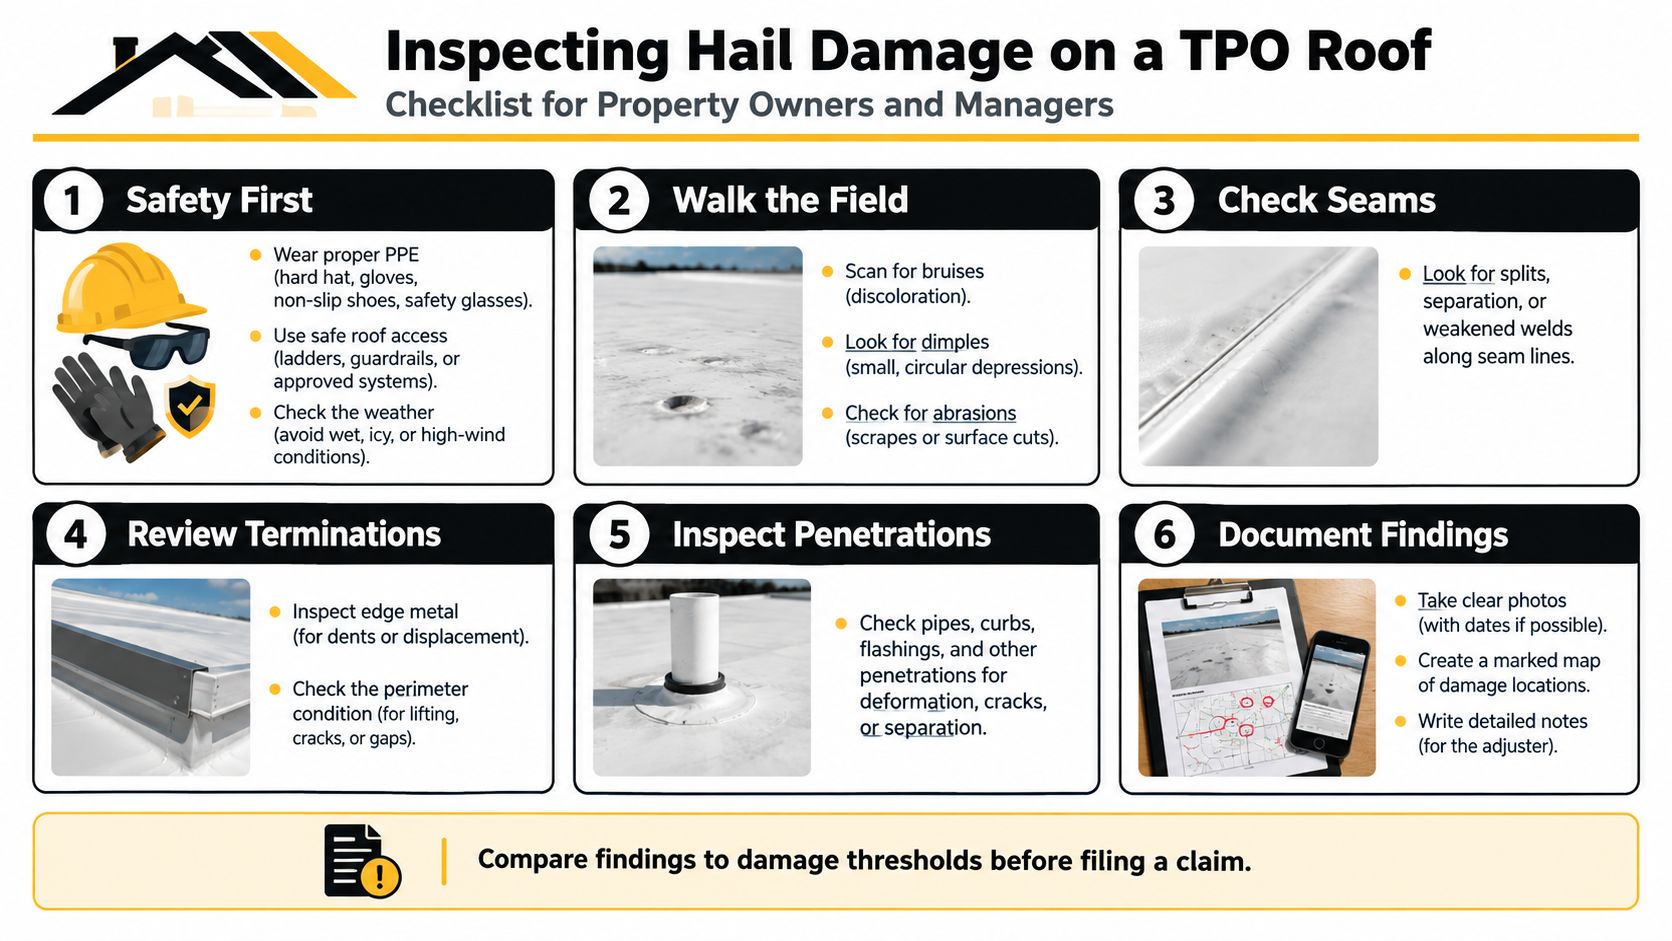
A Repeatable Field Sequence
- Confirm storm details: Write the date, approximate hail duration, wind direction if known, and when anyone first noticed interior symptoms.
- Walk the field slowly: Scan for dimples, abrasions, fractures, cuts, and areas that feel noticeably softer, without bouncing or digging at marks.
- Check seams and terminations: Look for splits, lifted edges, fishmouths, cracked detail work, and damage to edge metal or parapet caps.
- Inspect penetrations and curbs: Circle rooftop units, vents, pipes, drains, and skylights, then photograph deformation from more than one side.
- Follow drainage paths: Clear views of drains and scuppers help show debris or ponding, but don't disassemble drain components during screening.
- Check inside below: Note ceiling stains, damp insulation where safely visible, odors, and affected rooms, then align those notes with the roof sketch.
A structured commercial roof inspection checklist for documenting roof conditions can keep those observations consistent across buildings and storms.
Visual screening has limits, and that's not a weakness in your process. Qualified evaluators may clean selected spots, use magnification, probe seams, take core samples where justified, or use moisture-detection methods to check insulation and cover board. Those steps can disturb the system if done casually, so the person doing them should also know how to restore test locations properly.
For a benchmark, the FM 4470 approval standard for roof assemblies treats cracking or splitting under magnification and seam separation or rupture as failure conditions, and it includes specimens weathered with ultraviolet exposure as well as unconditioned specimens. That supports a practical priority list after hail. Focus first on punctures, reinforcement fractures, seam defects, and strikes over fasteners, then decide whether suspected concealed damage justifies invasive checks.
Finish with a packet another professional can use without calling you for missing basics. Include the marked roof plan, dated photos, roof age and assembly details if known, maintenance notes, interior observations, and clear labels separating confirmed openings from suspected soft areas. That record doesn't guarantee a condition or a claim result, but it gives a roofer, engineer, or insurer a clean starting point.
Repair or Replace the Damaged TPO Membrane
The repair question isn't, can a patch cover this mark. It's, can a localized repair restore a sound area without hiding weak support or leaving a new weak zone beside it. A qualified roofer may clean, prepare, and weld a compatible TPO patch over limited damage when surrounding membrane is healthy and test results support that scope. The edges, surface preparation, and weld quality matter because a shiny patch with a poor bond is only decoration.
Limited repair fits best when damage is isolated, seams nearby test sound, the substrate below hasn't crushed, and the roof otherwise has useful service life. One puncture from a clear impact point, with firm support and no related defects around it, is very different from repeated bruising across multiple roof zones. Age matters here too, because welding new material to weathered TPO requires proper preparation and compatibility checks rather than assumptions.
When the Scope Grows Beyond Patching
Broader replacement deserves serious discussion when damage is widespread, multiple seams or details are compromised, insulation or cover board has been affected, moisture is already present, or the membrane is near the end of serviceable condition. Replacement may mean a defined roof section rather than the entire building, especially where roof areas differ in age or construction. Avoid any universal dent-count rule offered without assembly information, since the same number of marks can mean different things over different support.
| Consideration | Localized Repair May Fit | Broader Replacement May Need Consideration |
|---|---|---|
| Extent | Few verified defects in limited zones | Defects repeat across several zones |
| Membrane condition | Surrounding sheet remains sound and weldable | Aged membrane shows related cracking or seam issues |
| Support below | Cover board and insulation remain firm | Crushed or moisture-affected layers are found |
| Details | Flashings and terminations stay intact | Curbs, seams, and edges show related defects |
| Documentation | Test locations support a narrow scope | Findings show a connected system problem |
Ask for the reasoning in writing. A useful proposal identifies each repair location, explains what testing supports it, states whether underlying layers will be opened or replaced, and separates confirmed work from contingency work. If a contractor recommends replacement, ask which findings make patching unreliable and whether a section boundary follows an expansion joint, drainage area, or different roof vintage.
Don't let the first leak make the whole decision. Water entry is urgent and may need temporary protection, but one leak can come from a single detail failure while the wider field stays serviceable. Conversely, a dry interior today doesn't settle widespread reinforcement or substrate concerns. Compare condition, extent, age, moisture evidence, and assembly design together before authorizing either a small welded repair or a capital replacement.
Preparing an Insurance Claim After Hail Damage
Build the claim file as a factual record, not a sales argument. Notify your insurer promptly according to your policy, then give a short storm narrative with the date, property address, roof type, and when the damage was first observed. Keep your language precise. Saying three punctures were documented near a curb and several soft areas require further evaluation is stronger than saying the whole roof was destroyed.
Your packet should let an adjuster reconstruct the roof without guessing:
- Dated photographs: Include wide roof views, marked locations, close images with scale, and interior symptoms if present.
- Roof system details: List membrane, cover board, insulation, attachment method, age, warranty papers, and prior repair records if available.
- Inspection observations: Separate visible scuffs and confirmed openings from suspected concealed damage that still needs testing.
- Professional documentation: Add a contractor or engineer report when findings go beyond simple visual screening.
- Maintenance history: Prior inspections and completed repairs help distinguish storm effects from older wear.
A step-by-step guide to the roof hail damage insurance claim process can help you organize notification, documentation, and follow-up without treating coverage as guaranteed.
Keep Visible and Suspected Conditions Separate
That separation matters because cosmetic marks and functional failure can be treated differently, and policy language controls what applies to your building. Don't inflate shallow abrasions, and don't bury a suspected fractured area under generic wording either. Mark it as suspected, pending evaluation, with the reason it's suspected, such as a fracture pattern, soft substrate, seam location, or impact over a fastener.
Protect the building while the file moves. If there's an active opening, ask your roofer about temporary watertight measures that won't interfere with inspection, and keep invoices and photos from before and after that work. Don't authorize permanent replacement before you understand the insurer's process and your policy duties, unless emergency action is needed for safety or to prevent further loss. This approach prepares an organized claim packet, but it isn't policy or coverage advice and it can't promise approval.
Midwest Advice for Commercial Property Owners
Kansas and Missouri property teams don't need a new process for every spring storm. They need records that are ready before hail arrives and a calm sequence they can run under pressure. Start by keeping one roof file per building with the roof plan, assembly details, installation and repair history, warranty contacts, access notes, and dated baseline photos. Baseline photos are powerful because they make new marks easier to discuss without arguments over what the field, seams, and coping looked like last season.
Coordinate the exterior and interior from the start. Facilities staff can log tenant leak reports by room and time, protect inventory or equipment below suspect areas, and note whether stains are new, unchanged, or growing. On the roof, work only within safe access limits and document before anyone begins sweeping debris into drains or applying temporary materials. That teamwork prevents a familiar gap where the roof report says one thing and the tenant log tells a different story.
A Disciplined Midwest Response Path
- Inspect safely: Screen the roof, seams, details, drainage, and interior in a consistent order.
- Document thoroughly: Tie every close photo to a roof-plan location and separate confirmed from suspected damage.
- Evaluate the assembly: Ask what lies under serious marks and whether testing is justified.
- Compare scopes: Weigh localized welding against sectional or full replacement using condition and extent.
- Use qualified reviewers: Bring in a contractor, and an engineer or consultant when concealed damage or a disputed scope needs technical review.
Don't choose help based only on who knocks first after a storm. Ask how the inspector will test seams, how test cuts would be restored, what photos and marked plans you'll receive, and how temporary protection will avoid obscuring evidence. A clear proposal should name materials and repair methods, identify whether damaged cover board or insulation is included, and explain exclusions in plain language. If two scopes differ sharply, compare their evidence location by location rather than comparing only totals.
Local storm exposure rewards preparation, because the best post-hail decision usually starts with records created before the hail.
Use quieter months to strengthen the file and the roof. Schedule routine professional inspections, keep drainage paths checked, record seam and flashing repairs, and update assembly notes whenever a section is replaced. If a future re-roof is planned, discuss cover-board strength, membrane selection, and attachment design as one hail-resilience package rather than shopping by sheet thickness alone. Those choices can't remove Midwest storm risk, but they can improve how the system absorbs impact and how clearly you can prove its condition afterward.
The central lesson is reassuringly simple. A hail damage TPO roof assessment isn't a hunt for the ugliest dent, and it isn't settled by the absence of a leak on day one. Inspect safely, document thoroughly, evaluate the complete assembly, compare repair with replacement on evidence, and proceed through qualified help. That sequence protects occupants and assets while giving you a defensible record for maintenance planning, capital decisions, and any insurance conversation that follows.
If hail has left you unsure whether a mark is cosmetic or functional, Two States Exteriors LLC can inspect your commercial TPO roof, document the assembly and damage locations, and explain repair or replacement options before work begins. Their Kansas City metro team handles storm and hail roofing work across Kansas and Missouri, including support for organizing insurance claim documentation. Visit Two States Exteriors LLC to schedule an inspection and get a clear next step for your building.